The Inspired Home


Activities for Kids, DIY Crafts for Kids, Simple Meal Ideas, Home Organization Ideas, Parenting

  • Activities
  • Holidays
  • Crafts
  • Gifts
  • Meal Ideas
  • About
    • Work With Us
    • Disclosure

How to Sew Bean Bags for Kids

By Andrea 17 Comments

Share Button

TheInspiredHome.org // How to Sew Your Own Bean Bags {Tutorial}. A great project for beginners, making bean bags is quite simple and kids of all ages will love them!

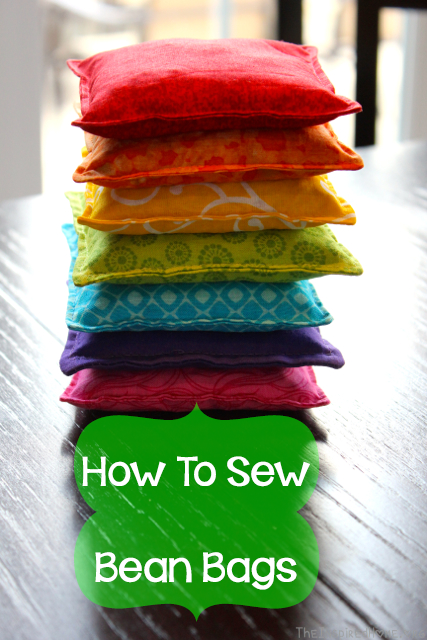
How To Sew Bean Bags for Kids

Bean bags are an excellent toy for babies, toddlers and big kids alike. They can be used in a variety of ways to learn a variety of skills. Plus they’re just plain fun! Anyone can sew bean bags – they are the perfect project for beginners. Your kids will never notice if you can’t sew in a straight line. It might seem like it would be very simple to sew bean bags. It most definitely is, but in this tutorial you will see a few little tips and tricks that I employed to make it easier. I learned the hard way when making my I-Spy Bags so I made a few changes for my bean bags!


Items Required

  • Fabric: Two 4.5″ x 4.5″ squares for each bean bag or one piece of fabric cut 4.5″ x 9″ (this is how I did it)
  • Thread
  • Glass-head pins
  • Iron
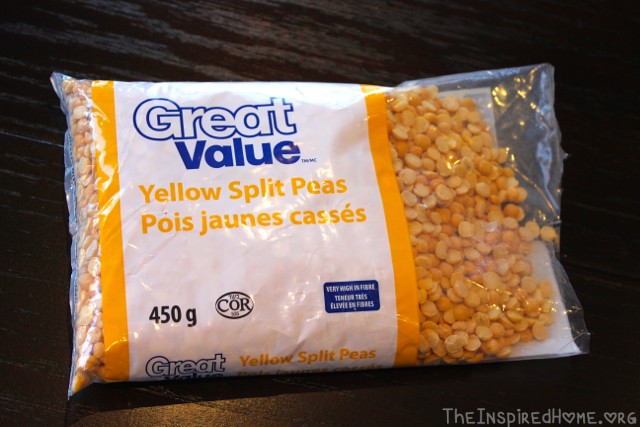
  • Stuffing: I used yellow split peas but you can use any sort of dried pea/bean, rice, or plastic pellets (these will allow you to wash the bean bags)
  • Funnel

How To Sew Bean Bags

Cut your fabric into 4.5″ x 4.5″ squares or a rectangle of 4.5″ x 9″. I made a rainbow of bags so I cut out 7 rectangles in total.

Take the time to iron your fabric – it will make things so much easier plus you barely need any pins. If you cut out rectangles, fold your fabric in half, wrong side out and iron a nice crease in the centre. If you have squares, line them up and pin together right sides together.

Sew all the way around your square leaving a 1-2″ opening where you will eventually flip the fabric right side out. Before flipping, be sure to cut the corners off to ensure a sharper corner once flipped. Make your cut as close to the stitches as possible.

bean bags 4


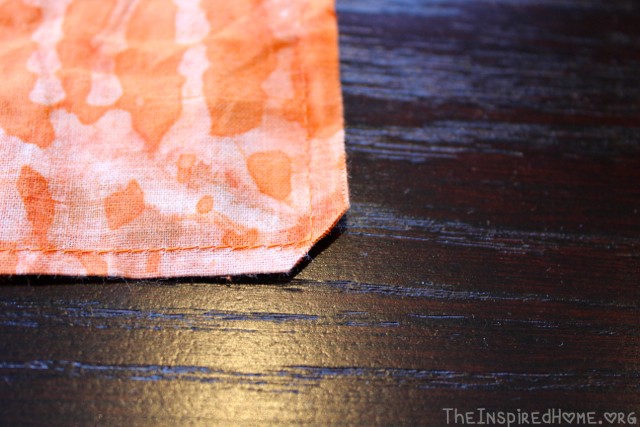
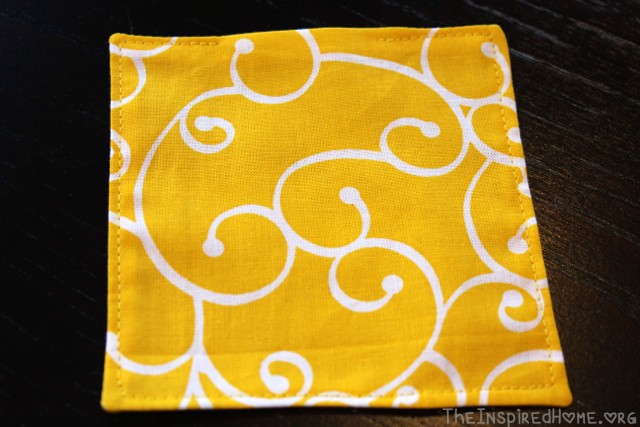
Flip your bags right side out. I like to use a chopstick to poke the corners out. Iron your fabric again ensuring you tuck in and line up the edge of the opening. Stitch around the outside of the bag with as small of a seam allowance as you can manage. Mine ended up being about 1/8″. Start at the edge of your opening and stop at the opposite edge. You want to leave the opening to fill the bag. The photo below shows how it should look at this point; the opening is at the top.

bean bags 1


Fill your bag with 1/2 cup of your stuffing of choice. I highly recommend using a funnel to make your life easier. I used yellow split peas, mostly because Miss O was with me at the grocery store and she demanded the yellow ones on the shelf of dried beans. You can use beans, peas, lentils, rice or poly pellets. If you plan on making bean bags for a lot of kids to use such as in a classroom, I suggest the poly pellets as you will be able to wash the bags then. *Note: You will not be able to put them in the dryer! They will survive the washing machine but then let them air dry. If you wash ones with dried food in them, they will grow mould inside.

bean bags 2


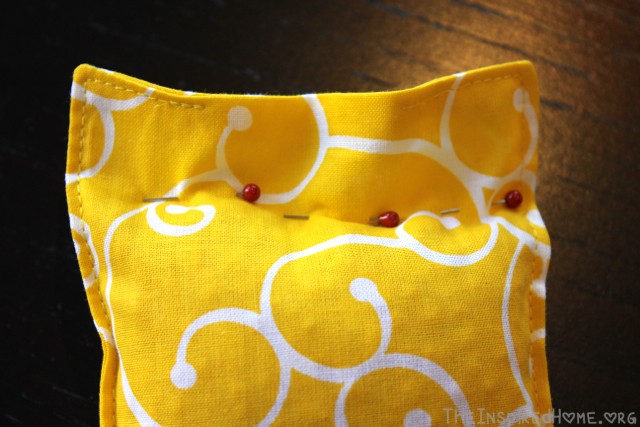
You will need to sew your opening closed which can be difficult with a bag full of beans. I pushed all of the beans to the bottom and placed a row of pins to hold them down while I stitched. You will need to really push them down as far as they will go and place the pins very close to them in order for your presser foot to clear the pins as you stitch the opening shut. I suggest going over your opening two or three times for extra security. 

bean bags 3


Voila! Your bean bags are complete. Miss O was very excited to play with them and even carts one or two of them around with her when we go out. Sometimes the homemade toy really is the one they love the best! Stay tuned for an upcoming post listing a variety of activities you can do with your fancy new bean bags.

TheInspiredHome.org // How to Sew Your Own Bean Bags {Tutorial}. A great project for beginners, making bean bags is quite simple and kids of all ages will love them!

Share Button
Andrea
Andrea

Andrea can always be found with a new craft in front of her, a form of technology on her right and a coffee on her left. This is how she survives suburbia with her two crazy toddlers in tow.

www.theinspiredhome.org

Filed Under: Kids Activities

« Avocado Quesadilla
DIY Non-Scary Halloween Decorations »

Comments

  1. Sharne says

    April 29, 2015 at 10:32 am

    Thank you so much, this was so helpful, i made 4 and they took me much longer than they should have, i kept jamming my machine, i think it was because i was trying to get the seam so small that the feeder bit underneath didnt have any fabric to pull on to guide it though. Got there in the end and love them so much, i used some old fabric samples 🙂

    Reply
    • Andrea says

      April 30, 2015 at 1:00 pm

      I had the same problem 🙂 Glad they turned out for you in the end!

      Reply
  2. Jackie Boeheim says

    May 6, 2015 at 12:40 pm

    This will be my first ever sewing project, I’ve never even used a sewing machine before! Do you have any easy tips for the ultimate beginner?

    Reply
    • Candace N says

      May 10, 2015 at 4:45 pm

      This will be my first sewing project as well. I just took a class yesterday to familiarize myself with my machine. I hope you have fun making your bean bags. 🙂

      Reply
  3. Andrea says

    May 20, 2015 at 3:48 pm

    The best advice I can give is to take a class. I bought my machine from a local store and with it came 3 free classes. I learned SO much in those classes. Even watching tutorial videos online can be very helpful but I loved having someone there to answer my questions. Good luck ladies!

    Reply
  4. Carrie says

    May 20, 2015 at 8:29 pm

    Thank you so much for the great instructions! I just bought my first sewing machine last weekend and this was my 2nd project. Took me longer than it should have, too, but it was so much fun and I think they turned out great (even if I do say so myself!).

    Reply
    • Andrea says

      June 5, 2015 at 10:51 pm

      When you’re first starting, even the simplest of projects can seem like they take forever. This was also one of my first projects! You will only get better with time 🙂

      Reply
  5. Shannon says

    January 24, 2016 at 4:36 pm

    Fab, absolutely love these, may I ask where did you get the fabrics from? Love the colours

    Reply
    • Andrea says

      February 14, 2016 at 11:42 am

      These are all from my fabric stash but you can buy cute fat quarters of fabric from Walmart 🙂

      Reply
  6. Pat says

    April 18, 2016 at 10:28 pm

    How about using a zipper foot for the last bit of sewing to close the bag? Moving your needle to the left and using this foot shouldn’t interfere with the pins.

    Reply
    • Kerry says

      July 3, 2017 at 12:56 pm

      I like that idea! I’m going to make these……… now!

      Reply
  7. Caterina says

    July 4, 2018 at 12:09 am

    Hi, what about to put the beans or whatever in a second transparent bag, prepare the second final cute bag with a zipper and insert the beans already in their own bag? You can wash separately the cute bag/pillow without any damage to yours beans ( or lentils, peas, …etc).

    Reply
  8. Anna says

    June 28, 2019 at 8:29 am

    I love this idea. I am making these for a camp project and the kids are going to sew them closed by hand stitching. Then they will have their own bean bags to play corn hole.

    Reply
  9. Charlene says

    July 11, 2019 at 2:14 pm

    I’ve made these once before using dried beans but they got rained on and then sprouted!!! Does anyone know if baking the dry beans ahead of time will keep them from sprouting or moulding?

    Reply
  10. Ann says

    September 8, 2019 at 9:02 pm

    Are the poly beads heavy enough to play tic tac toe toss for students?

    Reply
  11. Terri says

    March 13, 2021 at 2:55 pm

    I’ve used the little rocks you put into a fish aquarium to fill the been bags. That way you can wash them.

    Reply

Leave a Reply Cancel reply

Your email address will not be published. Required fields are marked *

Recipe Rating


  • Facebook
  • Instagram
  • Pinterest
  • Twitter
  • YouTube

Holidays Coming!

DIY Custom Craft Beer Mugs for Dad

TheInspiredHome.org // Cheers to You Dad!

Personalized Beer Mug for a Handy Dad

DIY Custom Pint Glasses: Binary Dad

TheInspiredHome.org // Make some custom pint glasses for the geeky dad on your list this Father's Day. This binary dad beer glass made with Cricut vinyl is sure to be a hit.

Father’s Day Gift Guide for Geek Dads

TheInspiredHome.org //Father's Day Gift Guide for Geek Dads

Father’s Day Recipes

Categories

Search for Question

If you like our answers, please share a link to our website! If your version of the game (iOS or Android mobile app, Facebook App, Video game, etc) has a different answers or scoring, please do let us know!  Thanks!

The Inspired Home

Join Our Monthly Newsletter!

We guarantee 100% privacy.  Your information will not be shared.

Pages

  • About
    • Disclosure
    • Work With Us
  • Contact
  • Contributors
  • Fortune Cookie Generator
  • How old am i
  • Privacy Policy
  • Recipes
  • Wedding Hashtag Generator

All original content, copyright 2013-2022 · The Inspired Home. · WordPress · Log in