We’d love to hear how your experience went if you tried something of ours! You can always comment with your questions or how it went on a post or connect with us on social media: Facebook, Twitter, Instagram, or Pinterest.


Fresh & Fast Family Fun Starts Here!
With six kids between ages 2-7, it’s gotta be fast and easy. We understand that you’re flying by the seat of your pants, and balancing priorities. We aim to inspire you to do-it-yourself, get outdoors and add simple homemade recipes that make family life fun and fresh. We’ve tried it – and it works.
Our blog is written by Andrea, a suburban stay-at-home mom who enjoys all crafty mediums from felt to peeler beads; Holly, a rural farm mom who loves being outdoors, gardening and healthy food and Melanie, a busy working urban mom who loves whipping up new recipes and playing with the latest techy gadgets.
About Us:

Smashing a computer long ago in grade nine yielded a beautiful friendship. It’s been one of those friendships that has lasted more than a decade. We’ve lasted from ICQ to FaceTime, from not-speaking-to-you-ever-again to hey-there, and from letter writing to blogs. The old adage about friends becoming your family certain rings true.

We’ve always had plenty to share. As teenagers, we got grounded from the phone abundantly, so we creatively purchased ourselves walkie-talkies with the right distance range and would gab on to each other on them every night. (At the time, that was cutting edge electronics).
We founded our first blog in the 90s via HTML, and blogged through teenage angst, flinging pudding (don’t ask), and poetry. It was the days of Tripod, Geocities and Pegasus mail. We have these brilliant phone calls each week where we talk about parenting, crafts, and life in general. Think about our posts as conversations come to life. If we survive these little kid years, we might even do a podcast someday.
Melanie has recently joined our team of awesomeness. She is the missing piece of the trifecta. She is a busy working mom who lives in the heart of Toronto. She’s mom to Mr. S, the 7-year old with a heart as geeky as his mom’s and Miss A, the sweet little girl who has William’s Syndrome, a genetic condition. You can learn more about Melanie’s trials, tribulations and advocacy as the mom of a special little girl at www.mommydo.ca.

Andrea
Hi! I’m Andrea, momma to Miss O (2012) and and Little J (2014). We live in suburbia just outside of Toronto (Burlington, Ontario) where I was born and raised along with the hubby. I’m a thrifty, crafty geek who enjoys all mediums from felt to sewing to perler beads. In the past I’ve dabbled in scrapbooking, jewelry-making, hand-sewing felt projects and more. You name it, I bet I’ve tried it! My latest venture is into the Cricut world. In my free time (when I’m not crafting or working on websites), you will find me at the local mall scouring for deals with Tim Hortons in hand or redecorating my house….again.
I have the attention span equal to that of my children. All things DIY have to be simple and able to be completed in a day. I just don’t have the patience nor the desire to spend months working on a quilt or a weekend refinishing my hardwood floors. My kids keep me on my toes and as such, don’t allow me the freedom to spend an entire day sewing something fancy so it needs to be completed between their bedtime and mine. I change my mind as often as I do my hair so my crafty medium of choice tends to change month to month.
I’m currently learning how to sew, creating more quick recipes, thinking up new and fun ways to entertain my kids and drooling over the newest Cricut.

Holly
In 2009, my husband and I got married, then two weeks later shucked off our Ontarian urban life and made a run for the mountains. We’ve been here in the foothills of the Canadian Rockies ever since. We renovated a 1950’s mill home in our spare time from top to bottom (a little project we like to call HoboChic) over 6 years, and soaked up mountain life.
More recently, we took an even bigger leap of faith and changed jobs & locations again. We have moved on to our biggest project to date – a 1950s farmhouse and 12 acres of land that need a lot of love (and elbow grease) just out of Mayerthorpe, Alberta. This is an incredible change for two suburban Ontario kids, as we discover how to produce food for our family and adjust to rural, country life.
I have been blessed with two beautiful children – Mr J (2011) and Miss P (2013) and one active border collie, Milton. I work full-time at the local Recreation department. In my free moments, I am exploring, geocaching, canning, and gardening (when there’s no snow!). I’m a passionate advocate for growing your own food, and getting children outdoors in nature. We’re an active family who loves swimming, skating, skiing, hockey and camping (just to name a few).
Melanie
Hi, I am Melanie, a busy working mom revelling in the perfect imperfection of the modern world. Born in Northern Ontario, I now live in Toronto with my husband, 2 children Mr S (2009) and Miss A (2012), and Sir Squeaks-A-Lot, the guinea pig. I love hot tea, the latest gadgets, craft beer, sweater-weather and the unexpected beauty in life. At night, I dream about an organized home and self-ironing shirts. My favourite topics to write about are: food from scratch, tech for grownups and kids, special needs parenting, holiday traditions and trying new things.

Sarah
I am a busy mom to 3 kids, so my days are typically filled with tea parties & story books, singing & dancing, crafts (for as long as a 3yo’s attention span will allow) & cuddles. All the while trying to keep up with laundry & cleaning & meals (we have PB&J sandwiches for dinner more often than I’ll ever admit). The days (& weeks & months) seem to speed past so I try to soak up as much as I can each day.
Born and raised in Ontario, my whole life changed in 2011 when I moved to Nova Scotia. Just over a year later I started dating my partner, and soon after we started our family. We have Allie (2013), Emily (2015), and Lindsay (2017) – and I certainly cannot forget our 16 year old black lab, Rocky, who is our biggest baby.
In my spare time I absolutely love baking, enjoy sewing (my machine may be collecting dust at the moment), and write to several pen-pals around the world. I love all sorts of crafts, especially papercrafts – from scrapbooking to cardmaking to paper loop wreaths. I also have a long lost love of photography which quickly fell by the wayside when I started having children, and I am working on making that a priority again.
]]>My regular gig is as the publisher and creative director at Hello Creative Family. At Hello Creative Family we believe that creative parents raise creative kids, but often grownups lose their creative selves when they get married and have babies. We want to reignite that creativity so that our readers can raise their kids in a handmade, homemade, heart-made home.

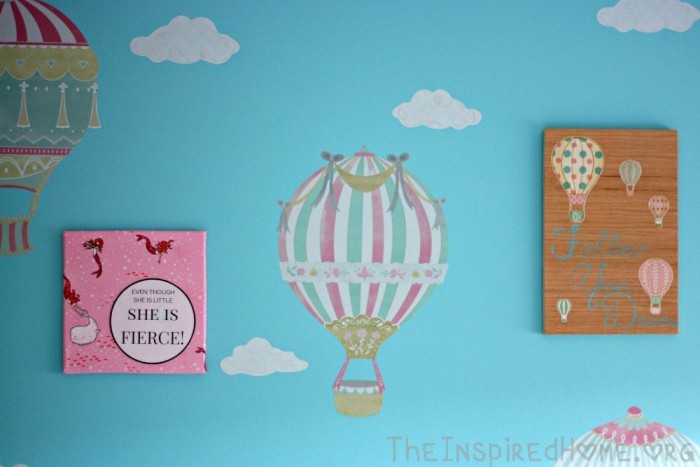
One of the things that I love about handmade is how everything you produce can be 100% customized and personalized. I have a 7 year old daughter named Bean who I absolutely adore. I wish that I was more like her. Bean knows what she likes, is her own person and isn’t afraid to stand out from the crowd. You’ll often find her with colorful knee high socks pulled up over her jeggings, a tulle skirt over her pants and her pink and purple highlighted hair pulled into Punky Brewster style pig tails. I do everything I can to support her creative spirit and encourage her to express herself.
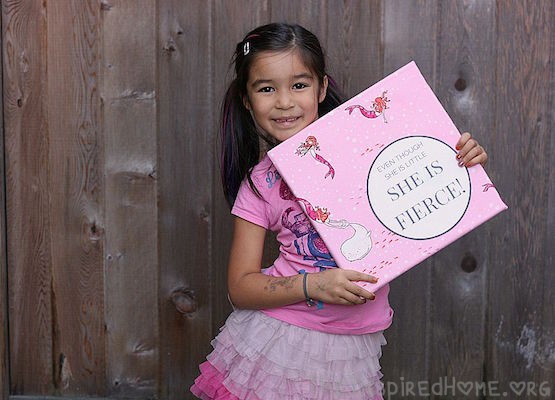
I recently brought home a card for Bean created by Hello Tosha that features the famous William Shakespeare quote “Though she be but little, she is fierce”. Bean loved the sentiment behind the quote– she’s an itty bitty kiddo, but boy, she is one tough cookie! She hung the card above her bed and read the quote aloud every single night. After a few weeks she started to question the Shakespearian language. “I wish it said ‘Even though she is little, she is fierce’, Mommy. I don’t really understand the ‘but’ in there.”
I explained to my kiddo all about Shakespearean language, and then decided to surprise her with a piece of wall art in her bedroom with a revised “Bean-ean” version of the quote. I hope that you like this project! I created downloadable versions of the quote with both the Shakespeare version and the Bean version.
DIY Customized Wall Art – Though She Be But Little, She Is Fierce
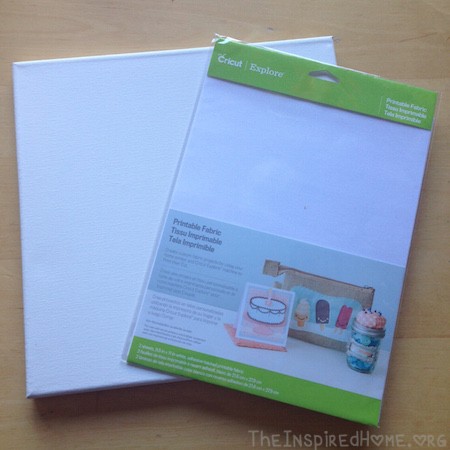
Materials
- 12 inch by 12 inch square framed canvas (I bought mine at Michael’s. I also sometimes buy canvases at my local dollar store)
- 15 inch by 15 inch piece of your favorite fabric (The fabric I used in this project was Out To Sea Mermaid Play, designed by Sarah Jane for Michael Miller Fabrics)
- Download of the Shakespeare version of the quote or the Bean version of the quote
- Printable fabric (I love the printable fabric from Cricut)
- Spray adhesive and/or staple gun
Directions
Print your quote on the printable fabric and cut to size.
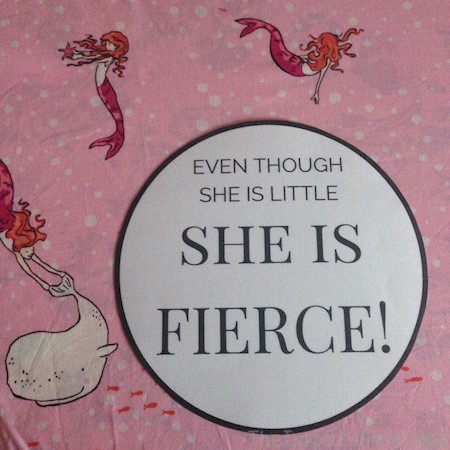
Lay your fabric over the canvas to determine positioning. Affix the quote to the fabric. (With the Cricut printable fabric you peel of the backing and stick it to the fabric.)
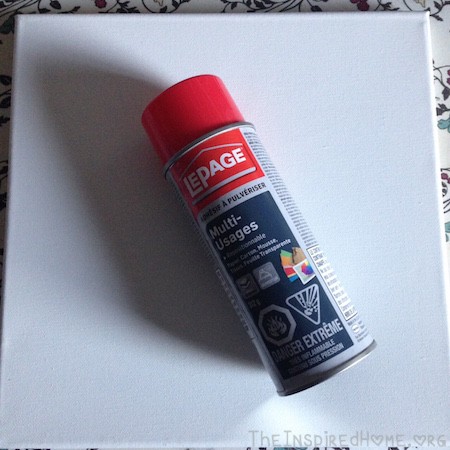
Following the directions on the bottle, spray the spray adhesive on the canvas. Lay fabric over the canvas and smooth away any wrinkles. (Alternatively if you don’t have spray adhesive, stretch fabric over canvas, smooth away wrinkles and proceed to next step.)
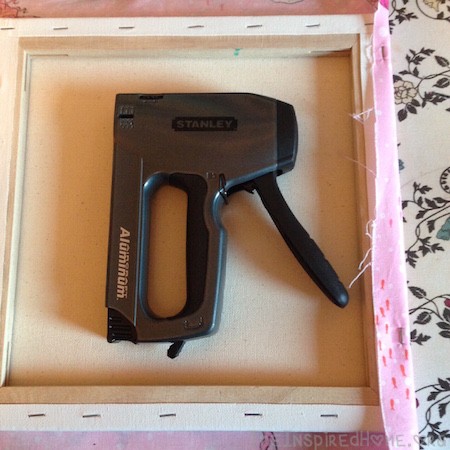
Fold over edges and staple or glue to the back of the frame of the canvas.
Hang your new customized art on the wall and enjoy!
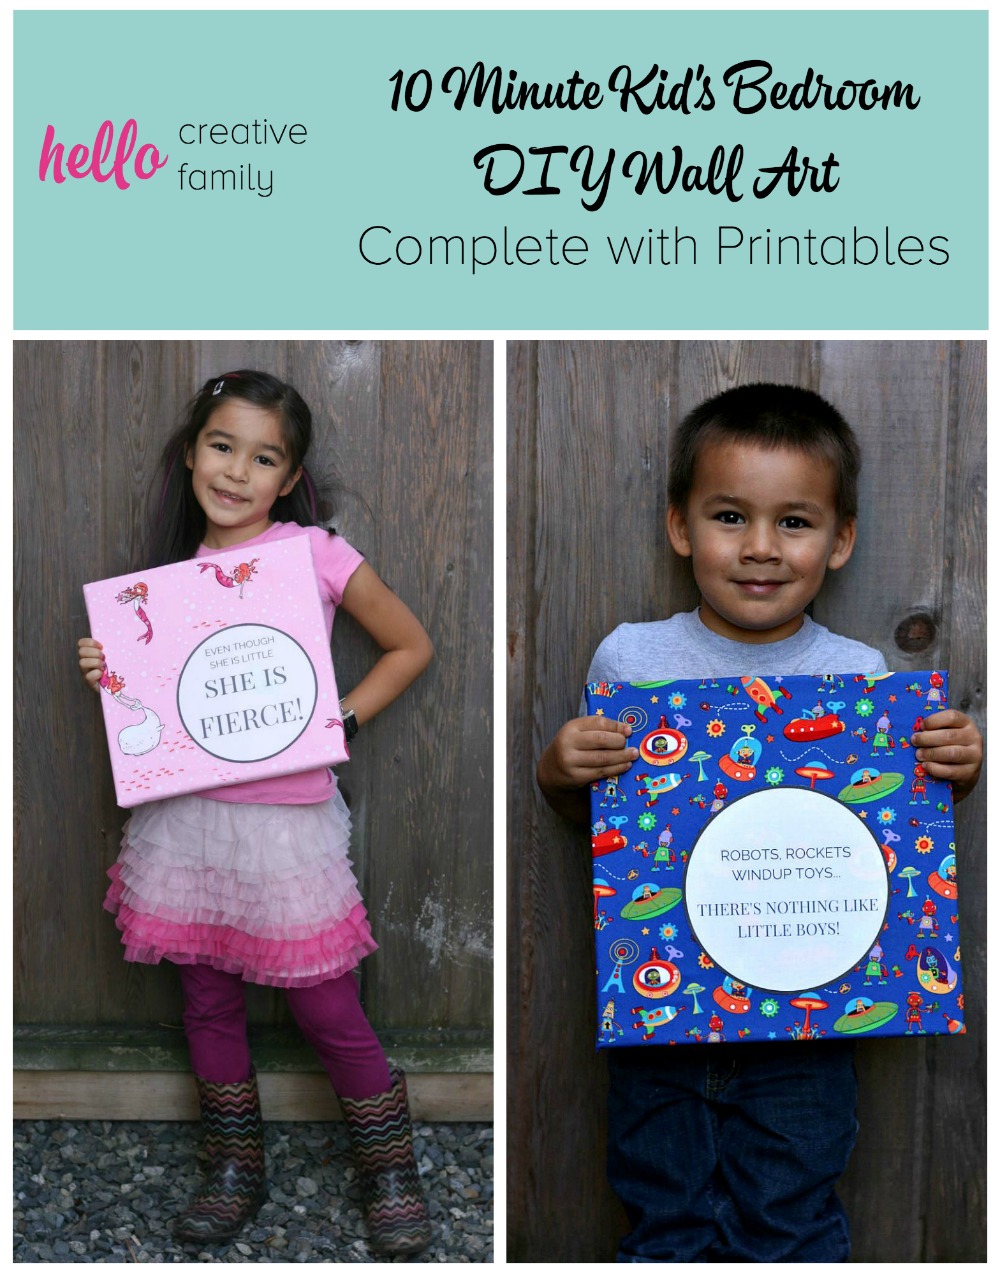
Crystal has also created a 10 Minute DIY Wall Art For a Boy! Head over to Hello Creative Family to get the full tutorial.
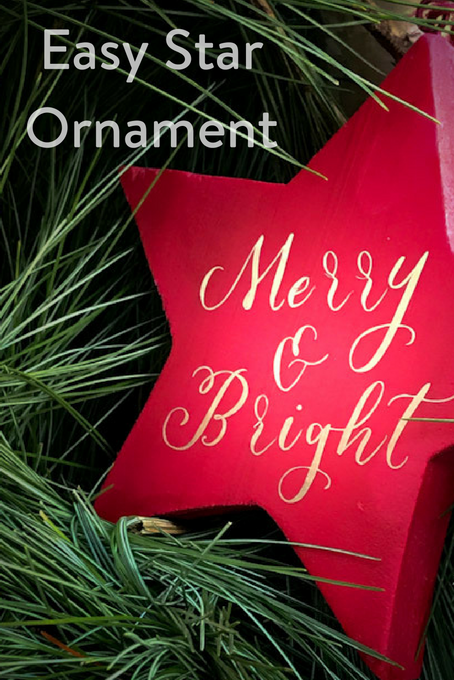
Easy Star Ornament
I chose to make an easy star ornament because I love the holidays. I’ve recently dubbed my decorating style for the season “Fam Glam”. I definitely love to have a little sparkle and modern touches too – Christmas is for big kids too. I just want everyone to feel welcome and warm and happy.
Merry And Bright
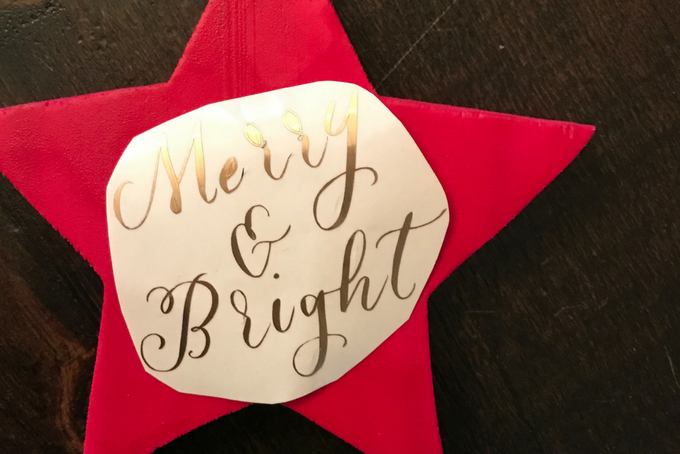
I think that’s why this carol line stands out for me. I want my home to feel merry and bright; and really, shiny red and gold foil are just about as bright and merry as you can get. I’ve searched high and low for an ornament with this quote with no luck, so now that I have a Cricut Explorer Air, I decided to make one myself.
Getting Started
This is only my second finished Cricut project, so I think it’s important to note ANYONE can make beautiful things with a Cricut machine. Seriously, this ornament is a snap. If you’re a more advanced Cricut creator you can probably skim this steps; they are really for newbies and nearly newbies like me.
Supplies:
- Cricut Explorer Air 1 or 2
- Cricut adhesive gold foil
- Cricut weeder tools
- Transfer paper
- Wooden ornament
- Spray paint
Instructions
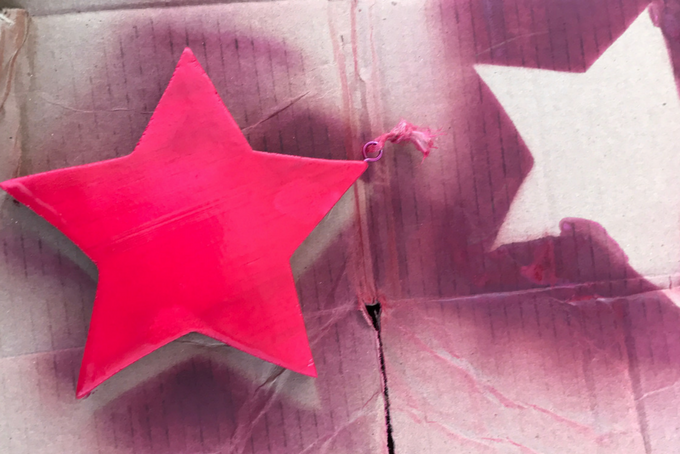
Step 1: Get a star. I found this one at Michaels here in Toronto. Make sure the centre area between the points is large enough for your message.
Step 2: Grab some spray paint. I had some leftover from a previous project and used that. You could also keep the natural wood colour if that’s your style.
Step 3: Create your design. The design studio for the Cricut explorer is very user friendly and easy to navigate. I created this simple text using the app on my iPad.
Step 4: Prepare to cut. The star I made features Cricut Adhesive Gold Foil. There are lots of mediums to choose from but I love the glitzy look of the shiny foil. Because the foil isn’t something you use everyday, you need to set your machine to “Custom” and select “Foil, Adhesive Backed – 0.25mm.
Step 5: Double check that your design size will fit in the inner part of your star. (You can probably guess why I’m stressing this).
Step 6: Send your design to print. Yay! This is my favourite part.
Step 7: Use the Cricut tools weeder to remove excess foil from around your words.
Step 8: With transfer paper, apply your message to your star.
Step 9: Hang your ornament on the tree and let it shine!
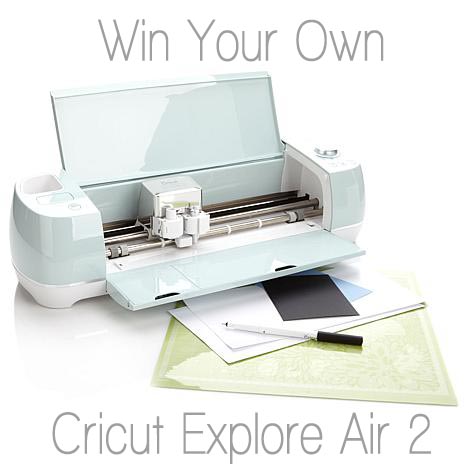
Giveaway: Cricut Explore Air 2
Now that you’ve seen what the Cricut can do, it’s time to enter to win your own Cricut Explore Air 2!
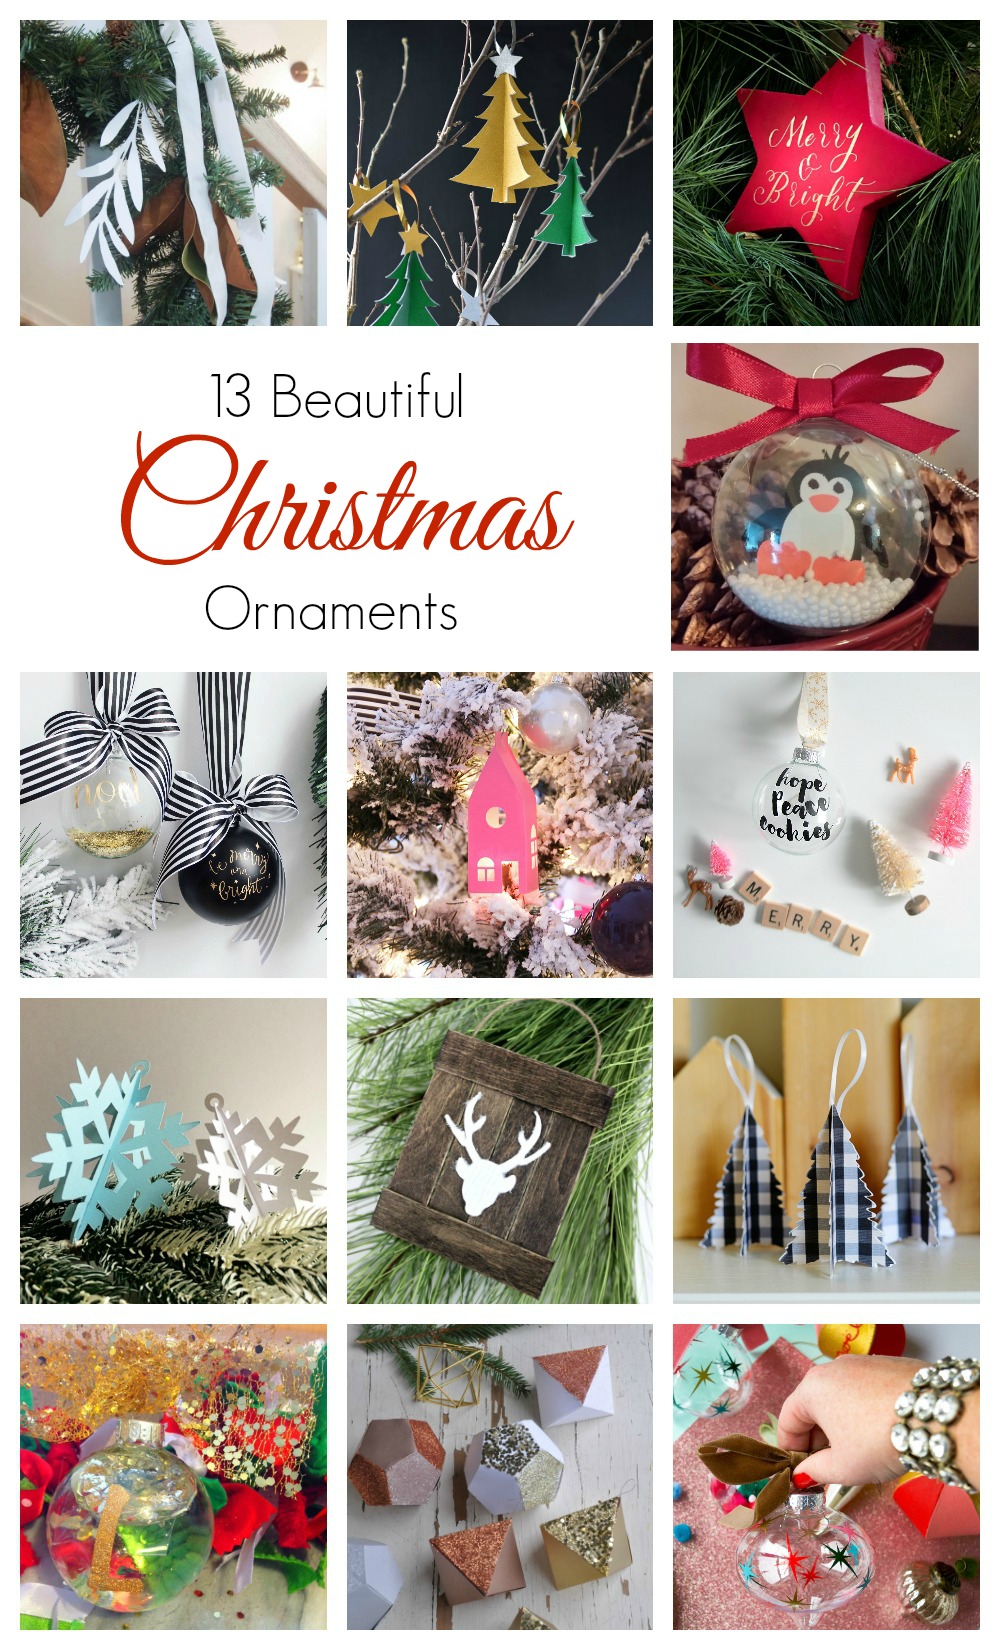
More Great Ornaments
From top left, they are:
Christmas Garland from The Learner Observer
3D Christmas Tree from Woman in Real Life
Penguin Ornament from A Boy and His Mom
Handlettered Ornaments from Teacups and Things
Paper House Christmas Ornament from Fresh Crush
Easy Christmas Ornaments from Sparkle Shiny Love
3D Snowflake Ornament from Brooklyn Berry Designs
Mini Deer Pallet Ornament from Love Create Celebrate
3D Gingham Trees from Rambling Renovators
Glitter Monogram Snow Globe Ornaments from Bawlers and Crawlers
]]>
In Flanders fields the poppies blow
Between the crosses, row on row,
That mark our place; and in the sky
The larks, still bravely singing, fly
Scarce heard amid the guns below.
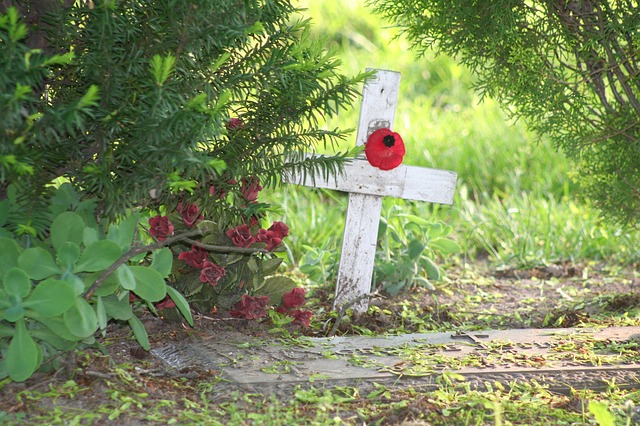
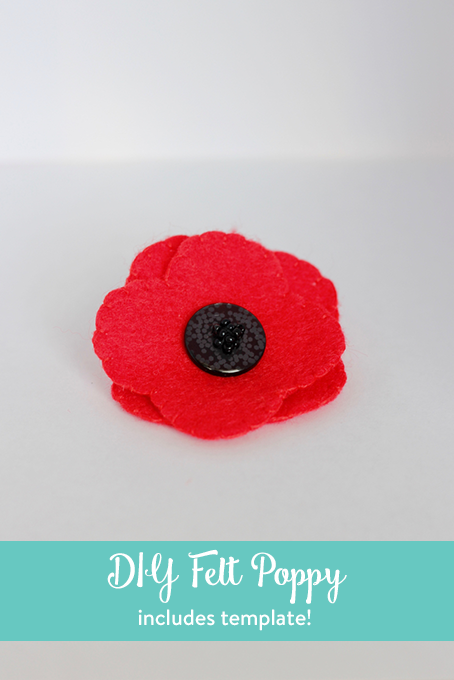
On Friday November 11th, 2016, we will commemorate Remembrance Day here in Canada (Veterans Day in the USA). People everywhere will be sporting a bright red poppy to remember those who have fallen. While most people will purchase a poppy from a young cadet outside a grocery store, I am not a fan of the sharp pins on them. I perpetually lose them and it is important to me to wear one on this day.
DIY Felt Poppy
To solve my little dilemma, I decided to craft my own felt poppy. I pulled out my trusty Cricut Explore Air and a piece of red felt from my epic stash. I also found a black button, some black seed beads and a pin to attach. While you can buy pinbacks in any craft store, I dismantled an old button that doesn’t get any use and used the pin inside. It has a little hinge to ensure it will stay affixed to my jacket. You definitely don’t need a Cricut to make this poppy, it just speeds up the process.
What You’ll Need
- Red felt
- Black button with 4 holes
- Black seed beads (optional)
- Pinback
- Red thread
- Black thread
- If not using Cricut, download free template
- If using Cricut, you will also need:
- iron-on, tear away stabilizer of your choice
- Deep Cut Blade with Housing
- StrongGrip Mat
- Flower template (free in Cricut Design Space – #M35A3D – turn off the red inner flower)

Cricut Instructions
(Non-Cricut instructions are further down the page)
You will first need to set up your canvas in Cricut Design Space. Simply search the images for #M35A3D and insert 2 of them. Adjust their sizing so one is 2.2″ and the other is 1.9″ – the larger is the bottom, the smaller is the top. You will also need a circle shape that is 0.85″. These will all be cut from red felt.
Iron your tearaway stabilizer onto your felt and place the stabilizer side down onto your StrongGrip Mat. Insert the Deep Cut Blade and Housing into the machine.
Set the dial to Custom and select Felt, With Backing from the list. You will need select Edit Custom Materials at the bottom. Find Felt, with Backing and change it to Deep Cut Blade and ensure it is set to cut 2x. Once this is set up, load up the mat and let it go! Once complete, tear away your stabilizer and it’s time to get sewing. See the steps below in the basic instructions.
Basic Instructions
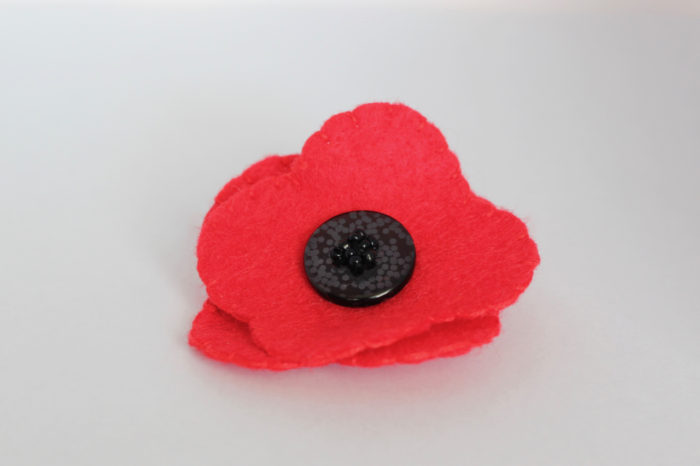
First up, you’ll need to print out the free template. Cut out the three shapes on the page. Staple each to your red felt and cut out the shapes. Gently remove the staples and paper templates and discard.
Now that you have your two layers, you will need to do a blanket stitch around the edges of each of the flowers (leave the circle for now).
Once your petals all have a beautiful edge, it’s time to assemble your felt poppy. Place a black button in the centre of the smaller layer then add your larger layer followed by the pin back. Using your black thread, attach all of these layers together with about 2 runs through each hole of the button, ensuring you are stitching in an X.
Before you tie everything off, this is when you add the seed beads if you choose. Simply come up through the first hole of your button and add about 3-4 seed beads then go down the opposite corner. Do this again for the other part of your X. Now you’ll want to run from side to side instead of in an X, doing 2 more rows of seed beads. If you want more or less, feel free to do this step to your liking. Once you’re happy with how it looks (you’ll have to fiddle with the beads a little bit so they sit just right), tie off your thread at the back near the pin.
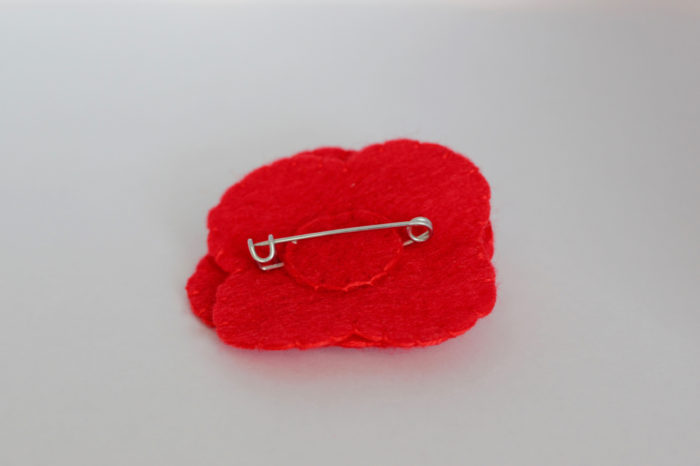
Cover the base of the pinback with your circle of red felt. Carefully blanket stitch around the edge of the circle, attaching it to the bottom layer of the flower.
You have just assembled yourself a beautiful felt poppy to wear year after year!
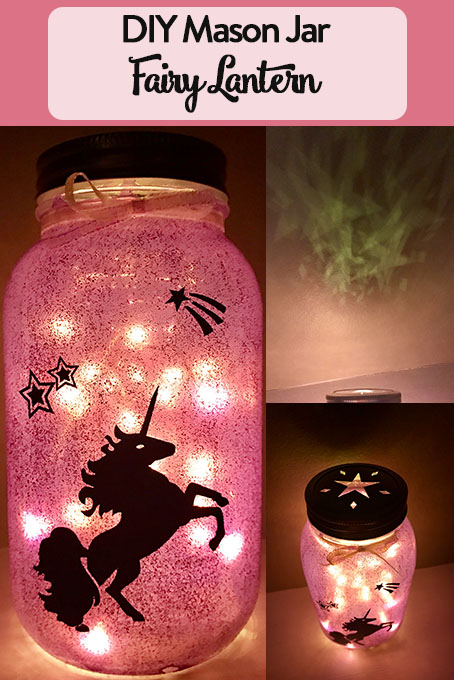
Mason Jar Fairy Lantern
Bring a little bit of magic and whimsy into your home with a beautiful lantern. My daughter is definitely a girly girl. She loves unicorns and rainbows and glitter and the colour pink. Fairy jars are typically just that: a jar featuring a fairy. For my five year old daughter, I decided to alter it exactly to her liking. So technically, this is a unicorn lantern but I think it still contains the same magic as a mason jar fairy lantern.
What You’ll Need
- Bernardin 1L Mason Jar
- Transform Mason™ Metal Star Lid
- White glue
- Extra fine glitter (either silver or a matching colour)
- Food colouring
- Foam paintbrush
- Permanent adhesive vinyl in black (aka Oracal 651 or similar)
- Transfer tape
- Cricut or similar device
- If you do not have a Cricut, arm yourself with a template, small scissors and some patience!
- Twine or ribbon
- Battery-powered light strand
Invite Magic In
This isn’t a project you can complete in one sitting as it requires several layers of “paint” in the form of white glue. Get a small bowl and pour in some glue. Add a few drops of food colouring (I used about 6 drops of the purple colour from the neon pack). Blend it all together and paint a thin layer onto your jar with the foam brush. Allow it to dry at least 1 hour. Apply a second coat and allow to dry. For the third coat, stir in a healthy dose of your glitter and add another layer to the jar. After letting dry once again, apply your fourth coat of the glue, colouring and glitter mixture. Let dry overnight.
Customization

While you’re waiting for those many layers of glue to dry, start preparing your design. I simply used files available to me in the Cricut Access software: the unicorn and a variety of stars. This is where you can have some fun. You may want a fairy and some flower shapes. Maybe your little one prefers rainbows. Let your imagination run wild. Your focal point (in my case, the unicorn) is about half the height of the jar. I used black permanent adhesive vinyl (aka Oracal 651). The designs were cut and weeded, ready to be applied to the outside of the mason jar once dried.
Be sure to press your decals down very well. I used my scraper to burnish them on. Once I removed the transfer tape, I used my thumb to really press the vinyl onto the surface. Due to the glitter, you will have many lumps & bumps but these will not be seen once the jar is light.
Starlight, Star Bright
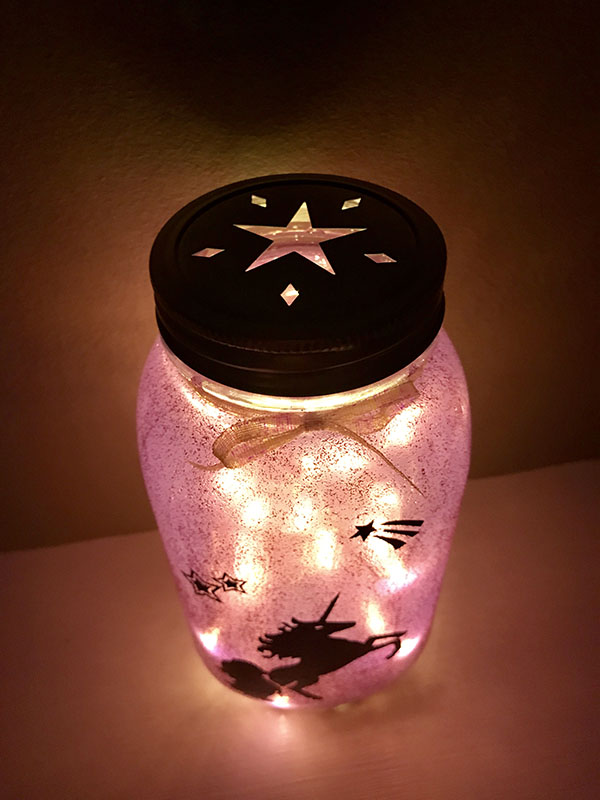
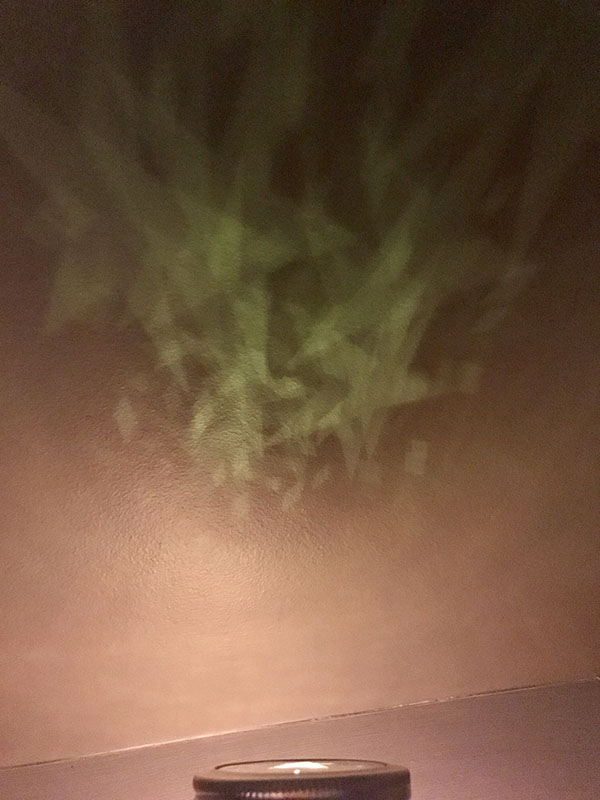
Remove the lid of the jar, discard the snap lid and place your metal star lid inside the ring. Drop your battery-powered light strand into the jar and place the lid on. Tie some pretty ribbon or twine around the next of the jar. Another nice touch would be to add a Metal Wire Handle to hang it. The star lid will shine a smattering of stars all along the ceiling which your little one is sure to love.
Check out more of our DIY Crafts for Kids.
Looking for more Bernardin Mason Jar crafts? We’ve got you covered.
]]>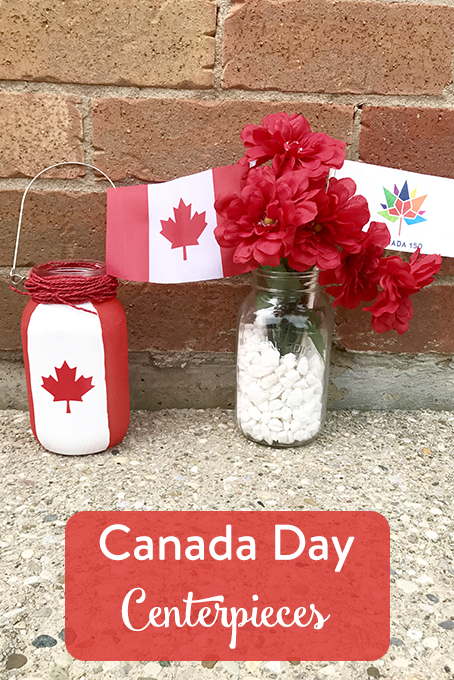
Happy Canada Day!
It’s time to celebrate Canada’s 150th Birthday and I thought I’d spruce up our tables with two different styles of a Canada Day centerpiece. Both of these were fun and simple to make using some Bernardin mason jars and a variety of dollar store items on all payday loans direct lenders.
What You’ll Need
- Bernardin 1L mason jars (1 for every centerpiece)
- Transform Mason Metal Wire Handle
- Acrylic paint in red & white
- Sponge brushes
- Red twine
- Maple leaf stickers (or cut out two from vinyl with your Cricut)
- LED tea lights
- White rocks
- Red fake flowers
- Mini Canada flag
Canada Day Lantern
![]()
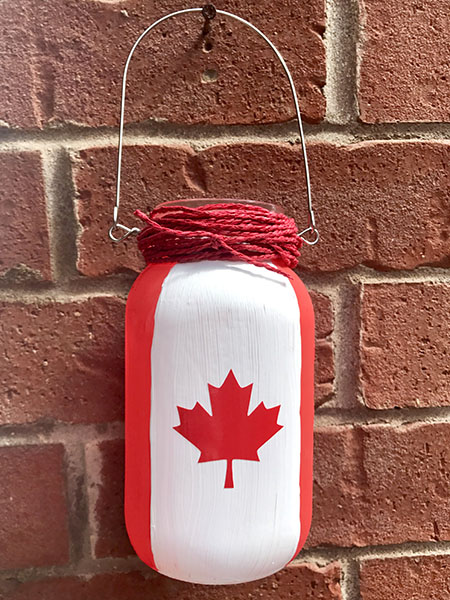 The most time-consuming part of these Canada Day lanterns is waiting for the paint to dry. Aside from that, they’re quick and simple to complete. I suggest putting your wire handle onto the jar before painting. I didn’t and it scratched up my paint. Since you will be covering the wire with twine or ribbon, it won’t matter if you get paint on it! Using a Bernardin 1L mason jar, I took my sponge brush and painted red down two of the sides. If your jar only has one decorative side as these do, make sure you paint the sides with the decoration in red. I didn’t use any tape to ensure straight edges as I have a pretty stead hand. Once your red paint dries, do a second coat. It will take a little while for it to dry – I left mine for about an hour. Once your second coat of red paint has dried, use your white paint to cover the other two sides, leaving time in between coats. Once the paint is dry, add your maple leaf stickers or vinyl decals to the middle of the white sides. Wrap the top of the jar with red twine. Drop an LED tea light or two inside and you have a lovely festive lantern.
Canada Day Centerpiece
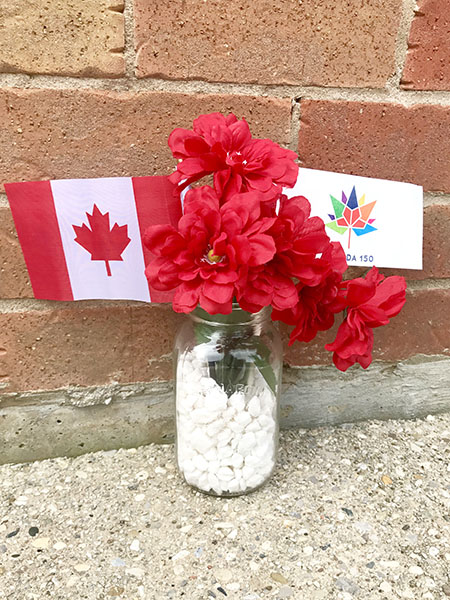 This centrepiece couldn’t have been any easier to make. Grab your 1L mason jar and dump in some decorative white rocks. Next, insert your red flowers and your Canada Flags. Voila! A gorgeous centerpiece that took mere minutes to assemble. Everything in this jar is from the dollar store. The mason jar itself is courtesy of Bernardin. You could also add some decorative ribbon around the neck of the jar for even more punch.
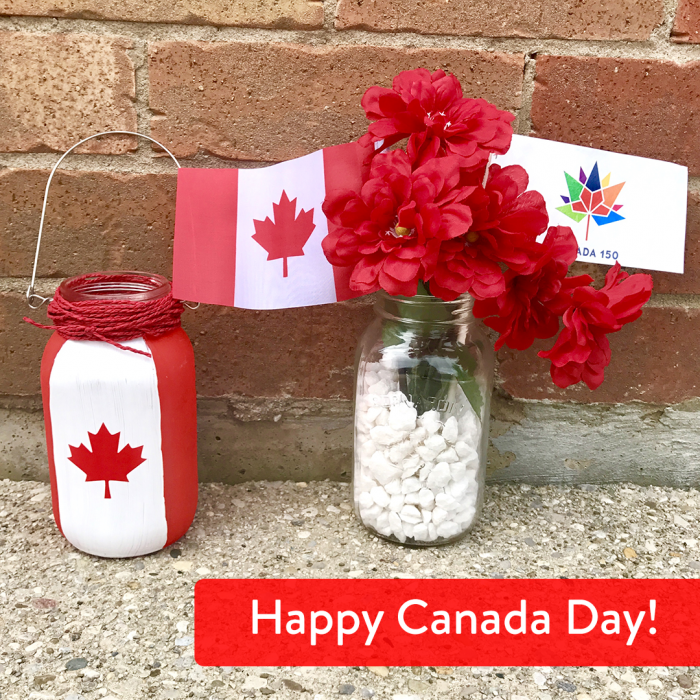
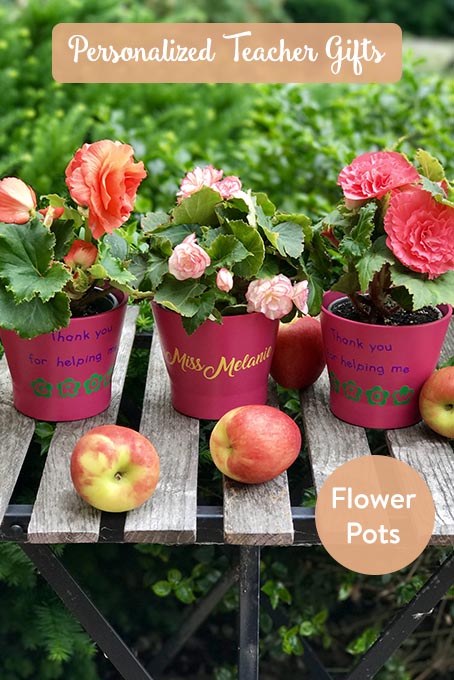
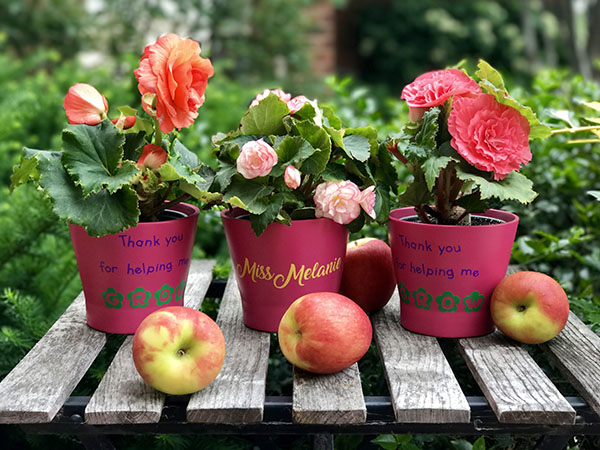
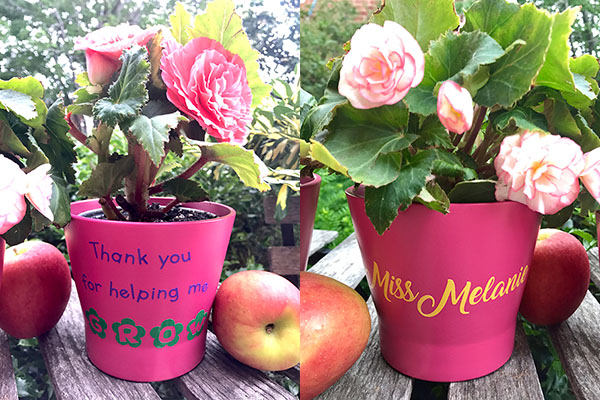
Personalized Teacher Gifts – Flower Pots
It’s that time of year again: The kids are excited to be finished school and you’re freaking out about what to get their teachers for the dreaded year-end teacher gift. No one needs another mug to add to the collection but a bright, colourful flower is always welcome in a home. Spruce up your personalized teacher gifts this year with these adorable flower pots.
What You’ll Need
- Flower pots – I picked up IKEA Papaja pots (they come in more colours)
- Cricut Explore Air™ 2 machine
- Vinyl in your choice of colours – I opted for Lime, Sunshine and Grape
- Transfer Tape
- Tools-Basic Set
- Standard-Grip Cutting Mat
- Flowers – I chose begonias
Get Crafty
Boot up Cricut Design Space. Add 3 different text boxes with the following information:
- Teacher’s Name in Amarillo font (download & install free from dafont.com)
- “Thank you for helping me” in KG Primary Whimsy font (download & install free from dafont.com)
- GROW in Flower font (download & install free from dafont.com)
Adjust all of your sizing and spacing to fit nicely on your flower pots. You will be placing their name on one side and “Thanks for helping me grow” on the other. When using the Amarillo font, you will need to ungroup the letters and move them together to form an attached script. Once they are perfectly in place, Weld them together. Now you can adjust the sizing as a whole.
Feed your vinyl through the Cricut to cut out your designs. Trim around the design once complete to save the remainder of the sheet of vinyl. Cut a piece of transfer tape for each design.
Patience is a Virtue
If your flower pots are angled as mine are, you will need to have some patience. I suggest cutting out each of the words and placing them individually. If you attempt to place them all at once, they will bow as you may have noticed with my teacher names. My advice is to start with the word GROW, placing each letter individually. My pots had a nice line close to the bottom to help me lay each letter perfectly straight.
Next, place the word ‘helping’ centred above GROW, about 2/3 of the way down from the top of the pot to the top of GROW. The picture above will give you a good idea for placement. Once the front is adhered, you can place the teacher’s name on the opposite site. I found this easiest to do by placing the pot in my lap, ensuring the opposite side was centred in my lap.
Once your pots are complete, drop in your flowers! And there you have bright, beautiful personalized teacher gifts. They will appreciate that you didn’t buy them yet another coffee mug.

We love homemade gifts made easy!
Try something different for the teachers with this craft supply kit.
]]>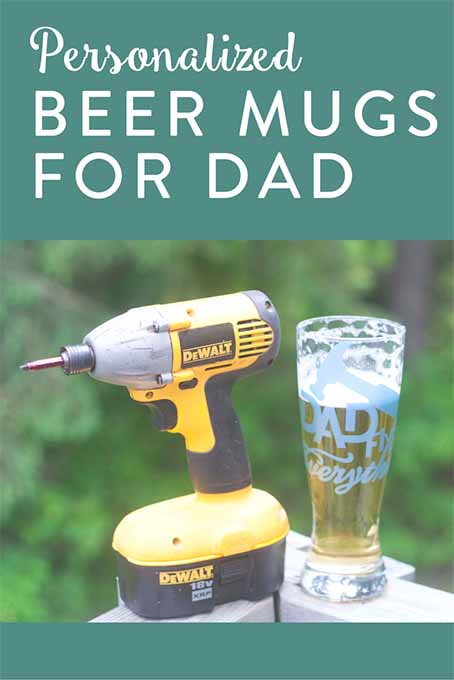
Personalized Beer Mugs For Dad
It’s been a week where (almost) everything broke. Enter Dad – king of the Fix It. Together we were able to get the parts to fix the truck, fix the plumbing when it exploded, and various other little pieces around the farm. With our aging house, tons of infrastructure to maintain, it can seem like a thankless job at times. But Dad hasn’t met a challenge he hasn’t been able to solve.
In honour of Father’s Day, I created the perfect personalized beer mug for the Mr. Fix It in your life. Although if you know my husband, you know the likelihood is high that this personalized beer mug might have Coca-Cola in it rather than beer. I tested that out too – and two cans (or the fuel needed to kick this handy guy into action) fits perfectly.
What you’ll need:
Cricut Explore Air™ machine
Blue Vinyl
Standard-Grip Cutting Mat
Transfer Tape
Cricut® Tools Basic Set
Beer Mug of Your Choice

How To Make a Personalized Beer Mug
Add graphic from the Cricut Design Studio to a new Canvas. Our size was 4″ x 2″ but you can change it to suit your mug. You only need the one layer to be set to cut, and turn the second layer of the graphic off unless you intend to use two colours. Let the Cricut Explore work its magic and cut you a lovely graphic.
Use the weeding tool and pull off the excessive vinyl. Remove all the little bits of vinyl that aren’t part of your art – like the little circles inside the letters, or parts that should be cut out.
Press the transfer paper gently on to your art. Peel the backing off the vinyl. If it doesn’t get everything, stick it back down and try again gently. Place the design on your mug and smooth it out from the center to the sides with the scraper tool. Once it’s adhered to the personalized beer mug, peel away the transfer paper at a 45 degree angle.
Let the vinyl set up for 48 hours and enjoy!

Check out more awesome ideas for Father’s Day!
Don’t have a handy dad? Try our Binary Geek Dad or Craft Beer Mugs instead.
]]>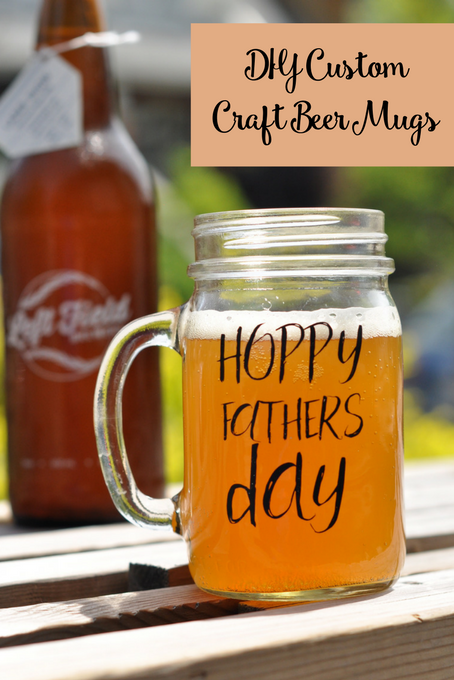
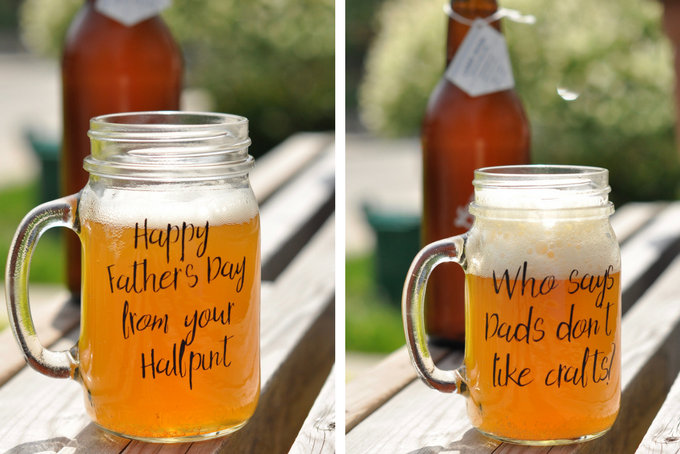
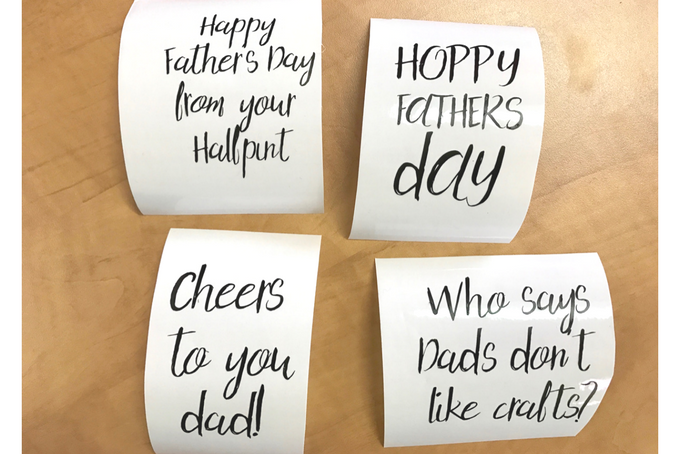
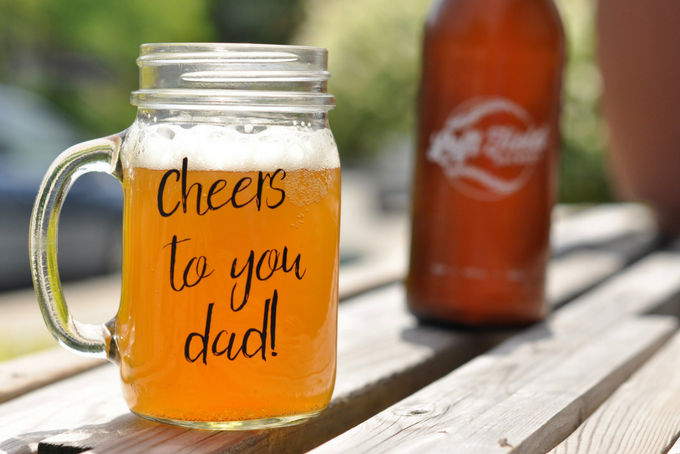
DIY Custom Craft Beer Mugs
I created these DIY custom craft beer mugs for Father’s Day for my craft beer loving husband.
With the weather getting nicer, it’s almost time to sit out on our back deck. We have a host of family friendly breweries popping up in our neighbourhood so there is always something new to taste.
I wanted to make some mugs that would give him a giggle and make the kids feel like they were from all of us. Bernardin Beer Mugs come in a 4 pack, and I love the idea of each one saying something different. My Cricut Explore Air made it easy to design them using a font I had on my computer, then save the type as an image, and import into Cricut Design Space.
What you’ll need:
- Cricut Explore Air™ machine
- Black Vinyl
- Standard-Grip Cutting Mat
- Transfer Tape
- Cricut® Tools Basic Set
- Bernardin Mason Jar Mugs/ handle
I used a font called Holy Mountain Style. I love how they turned out, but I would probably choose a font with more substantial letters next time. The type was a bit finicky for a beginner like me.
To create the art, I used Adobe Illustrator. I’m trying to learn the software and thought I’d give it a try. I was able to turn the type into an image and save it as an .SVG. You could easily create these in Cricut Design Space as well.
Once your .svg is in Cricut Design Space (or you’ve finished setting your type there), adjust the text to the right size for your mug.
Once you are content with your design, set the Cricut to the vinyl setting, place your sheet of black vinyl onto the mat and start cutting. After it’s cut, trim the vinyl around your art and save the rest for another day. Then, weed the vinyl. During this process, you remove all the little bits of vinyl that aren’t part of your art – like the little circles inside the letters.
At this point, I suggest you wipe down the part of the mug you’re going to use with alcohol or sanitizer for a better stick.
Now gently press your transfer paper over your art. Using your scraper tool, rub your transfer paper onto your vinyl.
Next, peel up your transfer paper at a 45 degree angle. The vinyl should now be on the transfer paper.
You might want to cut your design so you can apply the words line by line, but I really wanted to maintain the spacing that I set and, let’s face it, I’m terrible at eyeballing.
Ok, final step. Place your design on the right spot on your mug. Then use the scraper tool to rub over the transfer paper and adhere the vinyl to the mug. Go over every aspect of the design very carefully. Once the vinyl is attached, slowly remove the transfer paper at a 45 degree angle.
One last tip: theseDIY custom craft beer mugs will be hand wash only – and let them sit for 48 hours before you get them wet the first time.
That’s it! Cheers to Father’s Day everyone.
]]>
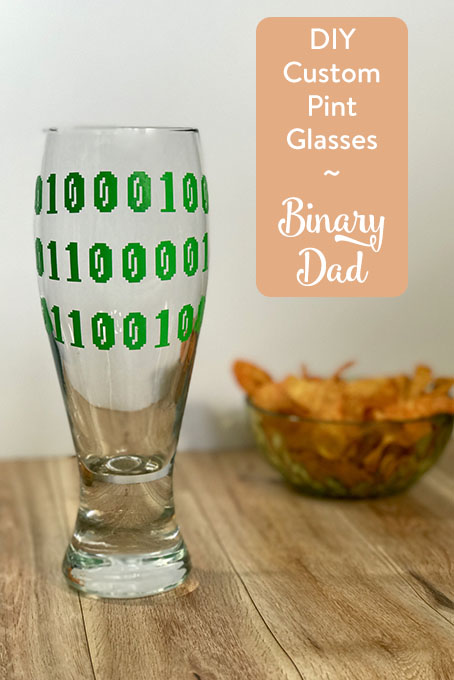
Custom Pint Glasses
My husband is a geek and loves craft beer. So it really only made sense to combine these two things into a gift for him for Father’s Day. While he loves many geeky things, computers are his one true love (after me, of course). He is constantly making binary jokes. I decided to put some binary onto some personalized glassware just for him. Let’s see if he realizes that it’s not just binary but that it spells something! Each line of text represents a letter in binary. It spells out D-a-d. To make this customized beer stein, I pulled out my trusty Cricut Explore and some vinyl and got crafting.
What You’ll Need
- Cricut Explore Air™ 2 machine
- Lime Vinyl
- Standard-Grip Cutting Mat
- Transfer Tape
- Cricut® Tools Basic Set
- Beer glass of your choice – I used a Pilsner Glass
Get Crafty
Load up Cricut Design Space™ and create a text box. Type in the following 3 lines of text to spell Dad in binary:
01000100
01100001
01100100
Set your font type to Sweater Weather which is included with your Cricut Access Membership. Adjust the three lines of text to a size that will fit correctly on your beer glass. You want the image to start about 1″ down from the rim and end about 2/3 of the way down the glass. Once you are content with your design, set the Cricut to the vinyl setting, place your sheet of green vinyl onto the mat and cut away! When it has finished cutting, trim around the lines of text to save the rest of your vinyl for another project. Weed the vinyl – this means to remove all pieces of excess vinyl. The little pieces in the 0’s were tricky but with patience, you will persevere!

Don’t Always Do As I Do!
And now it’s time to learn from my mistakes: Do not use one piece of transfer tape and attempt to lay the whole design down onto a curved glass in one shot. You can see the top and bottom rows of text are curved on my glass. Cut out each row separately and use one piece of transfer tape per strip – the tape should be trimmed to be just slightly larger than your design.
A trick for perfectly straight placement on a glass is to pour water into it. Ensure the glass is on a level surface and add enough water to give you a straight line to line up your design with. I did not do this for my glass as I just worked with the natural curves of the glass. I also have an eye for keeping my vinyl straight (hey – the middle row is straight!). If you are using a pilsner glass, I suggest placing your middle row of text first on the widest area of the glass.
The vinyl is a bit forgiving in that you can lightly place it onto the surface and quickly lift it again to readjust. This is handy when trying to line up 3 rows of text. Thankfully, the middle number of each row is a 0 which will ensure you have them centred nicely over each other.
Use your scraper to secure the vinyl to the glass and peel back the transfer tape. And there you have it: customized beer glasses fit for a geeky king.
Check out more awesome ideas for Father’s Day!
We rounded up some great gift ideas for geek dads.
]]>
DIY Time Out Chair
Do you have a little troublemaker on your hands? If so, you might be considering using timeouts. This is relatively new territory for me as I think I had to give Miss O a grand total of 3 timeouts when she was little. But now Little J is testing his limits and has far surpassed his big sister at the ripe old age of 2.5. Drastic times call for drastic measures so out came the timeout chair. And clearly I have a need to craft everything and this was no excuse!
I decided to pull out my Cricut Explore Air™ 2 machine and spruce up an old IKEA chair with some vinyl. Designing it took me about 10 minutes and assembling it all took about 15. All-in-all, a quick & easy craft.
What You’ll Need
- Cricut Explore Air™ 2 machine
- Midnight Vinyl
- Sky Vinyl (or any other colour of your choice)
- Sunshine Vinyl
- Transfer Tape
- Standard-Grip Cutting Mat
- Tools Basic Set
- Timer
- Small Command Hook
Make a Timeout Chair
In Cricut Design Space™, add two text boxes with the following:
- When I’m good, I’m really good. But when I’m not…
- I sit here.
Set the font to Don Juan. If you are using a chair similar to mine, adjust the sizes as follows:
- Width of 9.5″, font = Black
- Width of 8″, font = Blueberry
Next, add a shape and put in a star. If you prefer a star with a bit of a different shape, you can also insert an image from the library. I used image #M3AA08. I sized it to 4″ wide. Set the colour to Candycorn.
Now it’s time to cut. Put your machine to the vinyl setting, press Go and get cutting!
Once you have each colour cut, trim around each piece to preserve the rest of your sheet of vinyl. Use the Weeder tool to remove the excess vinyl from each piece – don’t forget the middle of the letters. Cut a piece of transfer tape just larger than the bigger text piece so you can reuse it for all 3 transfers. Peel away the backing from the transfer tape and use your Scraper tool to adhere the transfer tape to the vinyl. Slowly lift it, ensuring you take all the pieces of vinyl with you. Lay it centred on the top piece of your chair and use the scraper to adhere it to the surface. Slowly remove the transfer tape. Use the same process for the phrase & star for the seat of the chair.
Attach a small Command Hook to the back of your timer and press onto the chair in the upper left corner. We use the rule of thumb: 1 minute for each year of the child. Little J is 2.5 so he gets 2 minutes!
I wish you much success with your fancy new timeout chair!
Be sure to check out our oodles and oodles of other crafts for kids.
Check our our other Cricut crafts!
This is a sponsored conversation written by me on behalf of Cricut. The opinions and text are all mine.
]]>
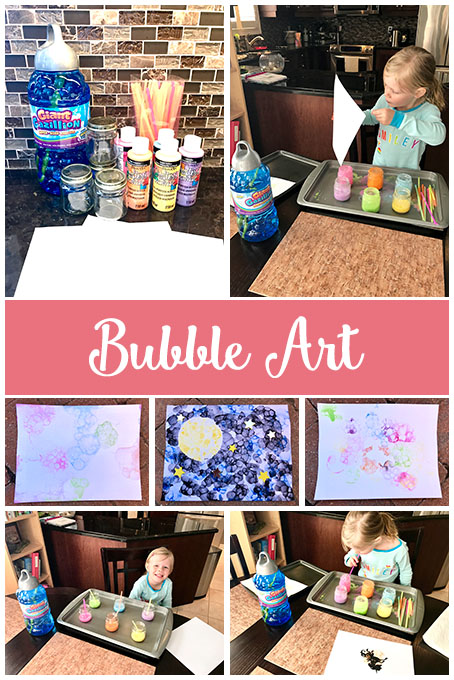
Bubble Art
Summertime is approaching which means it’s almost time for one of our favourite activities: blowing bubbles! While this is a fun activity in itself, I wanted to come up with a fun way for my kids to use our Giant Gazillion jug of bubbles indoors. Miss O loves to paint so what better way to use those bubbles than to make bubble art?! I love-love-love these bubbles as they are HUGE when you use them outside. They have some secret solution that seriously makes for the best bubbles.
What You’ll Need
- Giant Gazillion Bubble Solution
- acrylic paint in a variety of colours
- straws
- small cups (I used empty baby food jars)
- cookie sheet
- white cardstock – plain paper won’t be able to handle the wet solution
Make Some Bubble Art
We tried out three different styles for our bubble art, some using shapes added to the page. Here are the basic instructions for any style of bubble art.
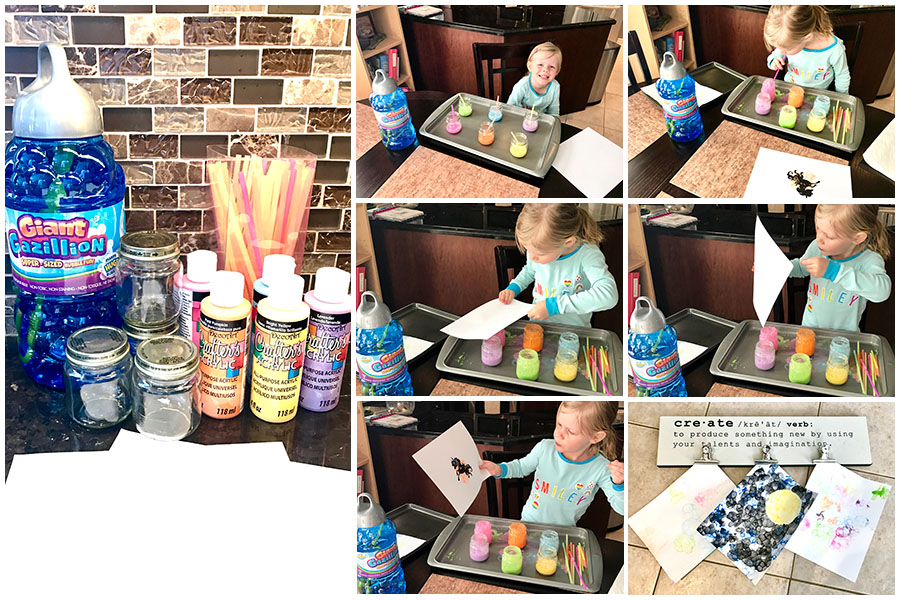
Pull out that cookie sheet and place your containers on it. Choose your colours and squirt a fair amount of paint into it. It’s not an exact science but the bubbles will reduce the colours significantly. I pressed hard on the bottles for about 5 seconds to give an idea. Put in a splash of bubbles. You don’t need nearly as much as you think, especially when using Giant Gazillion Bubbles.
You can see in the photos that I originally trimmed the straws; don’t do this! As you blow into the jars, the bubbles explode in your face! Keep a full-length straw in there to keep the bubbles & paint out of their mouths.
Stir up the solution a bit to mix it. Now it’s time to blow bubbles which will make the paint blend into the bubbles. Blow into the jars until they are overflowing with bubbles. Take your sheet of paper and touch it to the bubbles, trying to avoid the rim of the container. Do this with all sorts of colours and experiment with a little bit of bubbles, lots of bubbles, have fun with it!
Basic Bubble Art

This is the easiest style to do. Just choose some colours and touch them all over the page and see how they splatter. You will see that a lot of the bubbles will remain on the page. The kids can either pop them or just leave them to see what happens. This is a great way to start before getting into the other designs.
Unicorn Bubble Art

This was a fun spin on the basic bubble art that I designed with Miss O in mind. She loves all things rainbows and unicorns. Using my Cricut Explore Air™ 2 machine, I cut out a unicorn shape from some black cardstock and used a bit of tape to lightly attach it to the paper. You can do this with any shape! Just pop the bubbles all around the image. It turned out very faint as the details were a bit too small on the unicorn. I suggest a larger, simpler shape.
Outer Space Bubble Art
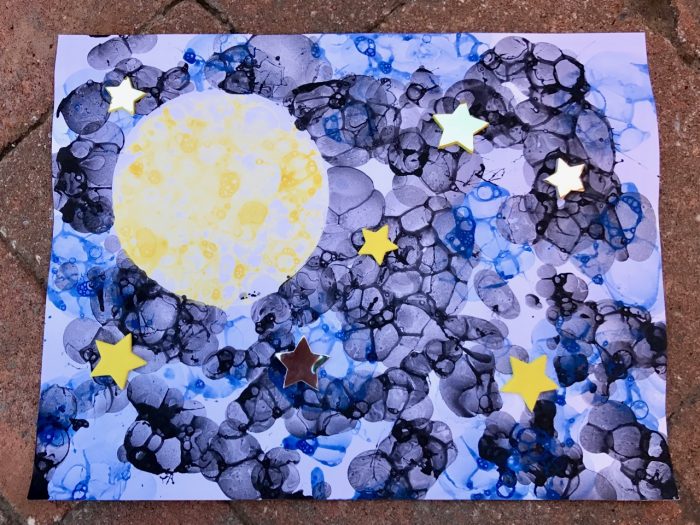
This was a fun piece of art that I made! Miss O had enough after the basic art and the unicorn art (as 4 year olds are apt to do) so I decided to have a little bit of fun. It was a two-step process to do this art. You will need to cut a circle from a same-size sheet of paper in just the spot you want it. Do this carefully as you will be using both the circle and the excess sheet of paper.
Take the excess sheet with the circle removed and place it over your main artwork sheet. Blow some yellow bubbles to fill in the circle. Once you’re happy with your moon, remove that sheet and put the circle over the moon to help protect it from the dark colours you are about to use. As the wet bubbles make it difficult to adhere the circle, I just held onto it carefully while I worked. Blow some blue & black bubbles and press them all over the remainder of the page.
Let your artwork dry completely. Add some fun star stickers – Miss O helped me out with this step!
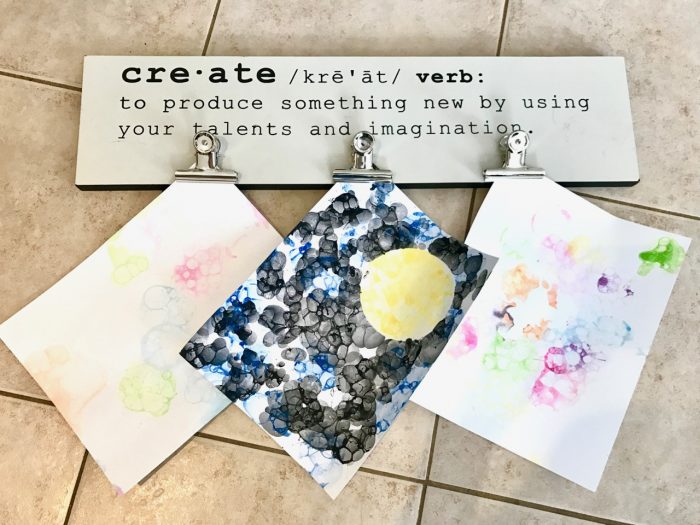
And there you have it: brightly coloured bubble art to display around your home. It’s a great way to brighten up those rainy April day with thoughts of warm summer days ahead. I can’t wait to get out into the sunshine and try out the Giant Gazillion bubbles to maximum effect!
Looking for more crafty ideas to do with your kids? We’ve got you covered.
Disclosure: This post was sponsored by Giant Gazillion Bubbles. Our family received bubbles product samples. All the views and opinions are our own.
]]>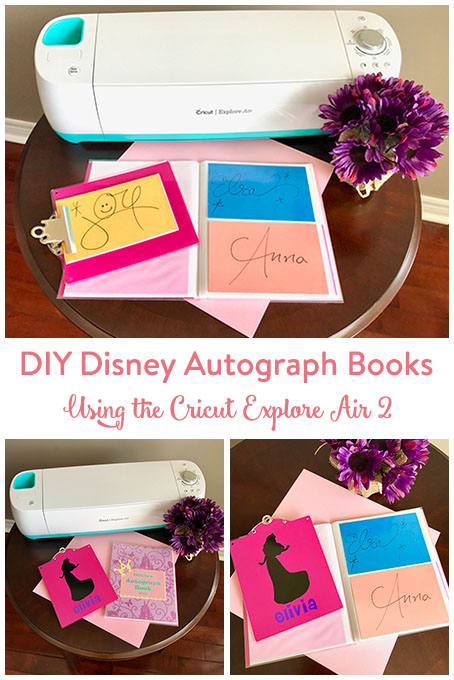
DIY Disney Autograph Books
Recently, we embarked on a trip to Disney World in Florida. The kids are only 2.5 & 4.5 but I couldn’t let them miss out on an opportunity to get autographs of all their favourite characters. Being the crafty mom that I am, I just couldn’t bear to hand them one of those Disney autograph books to have signed. Knowing that they won’t necessarily remember the trip being so young, I wanted something fun, personalized and with an area for photos.
Enter the Cricut Explore Air™ 2 machine.
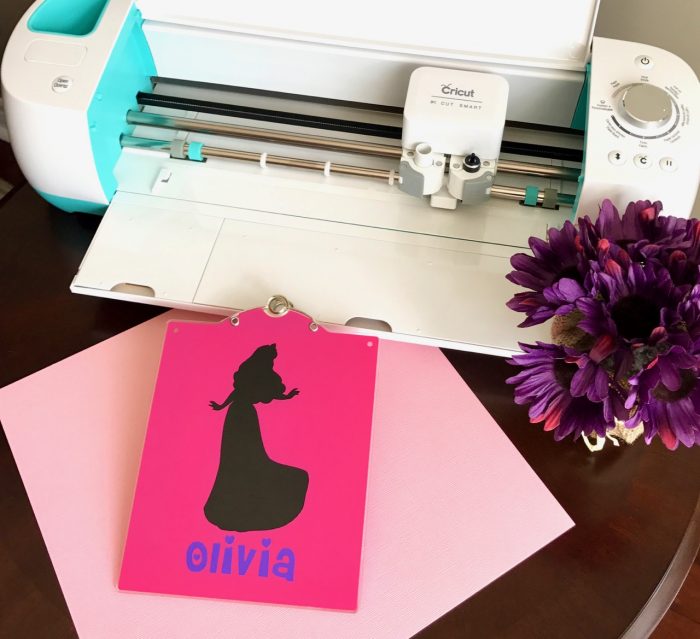
I wanted a simple way for them to carry the paper to have signed and a cute place to store the signatures and photos. As I have recently delved into the world of Cricut Vinyl, I knew this would be my chosen medium so I used it to decorate some cute little clipboards I picked up at Michaels.
Disney Autograph Clipboards
-
- Small clipboard that will hold paper cut to 4×6″
-
- One piece of Vinyl in Midnight
-
- Some Vinyl in Grape
-
- A pack of 12″ x 12″ Cardstock, Wildflowers
For the clipboards, you will need to open up Cricut Design Space™ and insert a silhouette of Aurora (aka Sleeping Beauty) or any other favourite Disney character. There are many Disney® Cartridges available in Design Space and you’re sure to find the perfect character. In order to only cut the silhouette, you will need to hide all the other layers as you can see in the image below.
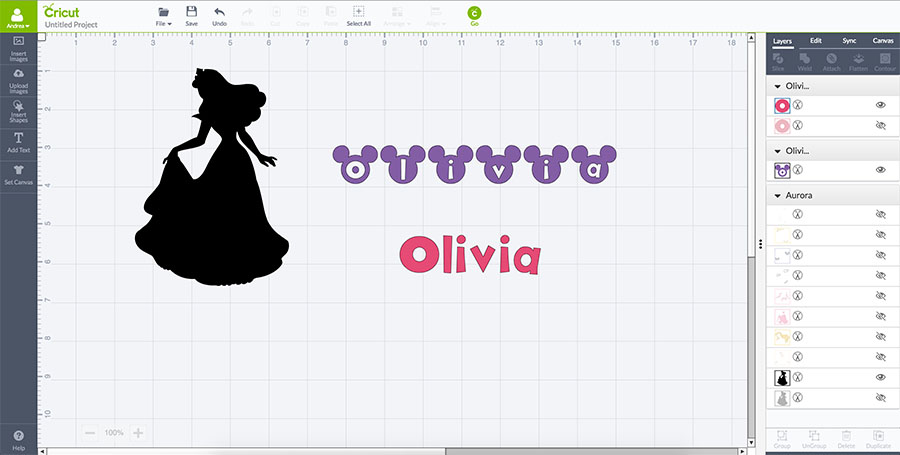
You will also need a Disney-themed font such as Disney Mickey – Mickey Tag (pictured above/top) or Disney Mickey (pictured above/bottom) available in the Disney® Mickey Font Digital Set or your favourite font. Edit your character & letters accordingly to fit nicely on the back of your clipboard. Once you’re happy with the design, it’s time to cut! Set the machine to vinyl, lay the first sheet onto the mat and cut away.
Assembling the Disney Autograph Books
Once the design is cut, you will need to weed. In order to save the excess vinyl, remove the entire sheet from the mat and just cut around your character shape and your name. Stick those two things back to your mat to make it easier to weed (remove excess vinyl). Once you have weeded all the little pieces you don’t need, it’s time to transfer. Cut a piece of Transfer Tape about the same size as your design. Peel off the backing and lay it over the design. Use the scraper to adhere the vinyl to the tape and lift slowly, ensuring you pick up all the letters. Decide on your placement on the clipboard and press it down. Use the scraper again to adhere the vinyl to the clipboard. Slowly peel away the transfer tape, ensuring you leave all the vinyl behind on the board.
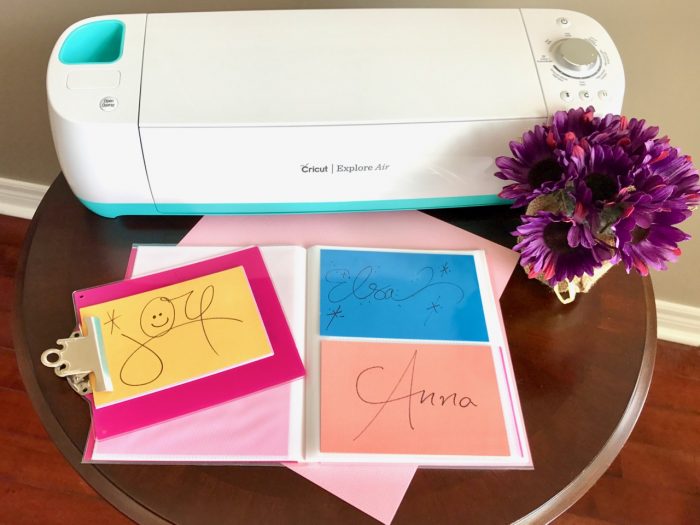
Once you have finished the clipboard, you will need to cut some paper. 12×12″ paper will give you exactly 6 cards when cut on a paper cutter. I had high hopes of using the Cricut to do this but there is a margin of error on the machine and it will not allow you to cut all the way to the edges. It was very quick and easy to just use the Cricut® 12″ Portable Trimmer to do this. I ended up cutting 6 different colours of cardstock for a total of 36 sheets. My books only hold 24 autographs but I wanted extras just in case.
Disney Autograph Books
For the photo books, check out your local dollar store. I found a book that holds two 4×6 photos horizontally on each page which is perfect for displaying a photo of my daughter getting the autograph as well as the autograph itself. The book had a random picture inside the front cover which I removed to create my own.

I picked up a pack of Disney Princess themed paper from Michaels for the background and cut it to fit inside the cover of the book. Choosing coordinating cardstock in yellow & pink, I cut out the Princess Party – NameTag image. Using Cricut® Vinyl in Caribbean (one of Miss O’s favourite colours), I personalized it with her name and the year. A really nice font in Cricut Design Space for a Disney Princess theme is Nursery Rhymes.
Cut everything using a Cricut® 12″ x 12″ LightGrip Adhesive Cutting Mat for the cardstock and a Standard Grip Mat for the vinyl and the correct settings for each on your machine. I like to use the transfer tape to apply the vinyl to the cardstock before attaching all the layers together in case I make a mistake. Once the vinyl is centred on the top layer of cardstock, affix all your layers using your chosen adhesive. Once assembled, tuck it into the front cover of your photo book.
Bring along a large, black permanent marker for all the characters to sign the cards!
Be sure to check out our collection of awesome homemade gift ideas.
If you need some ideas for costumes for your upcoming trip to Disney, check out our DIY Disney Costumes for Kids.
This is a sponsored conversation written by me on behalf of Cricut. The opinions and text are all mine.
]]>
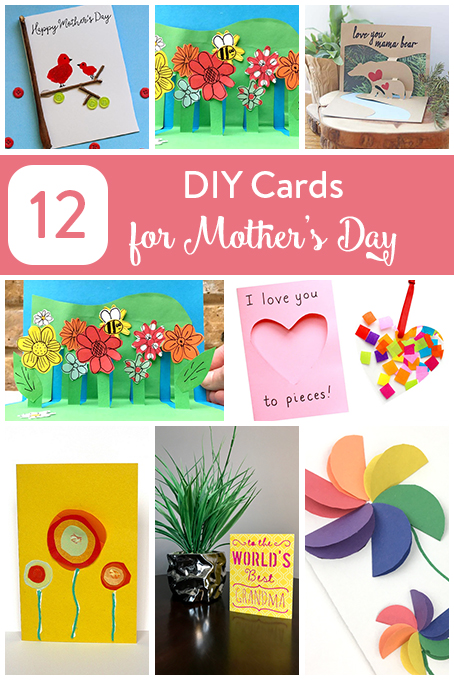
Mother’s Day Card Ideas To Try
It’s that time again: Time to celebrate the wonder and magic that is a mother. There is something special about handing your mom or grandma a homemade card. Even as an adult, I still feel compelled to put some effort into not only the gift but also the card. Now that I’m a proud owner of a Cricut Explore Air™ 2 machine, I can customize the perfect card just for all the moms on my list. We have hand-selected a collection of Mother’s Day card ideas that you and your children can make together for the many mom, grandmas and more this Mother’s Day.
12 Beautiful Cards for Mom & Grandma
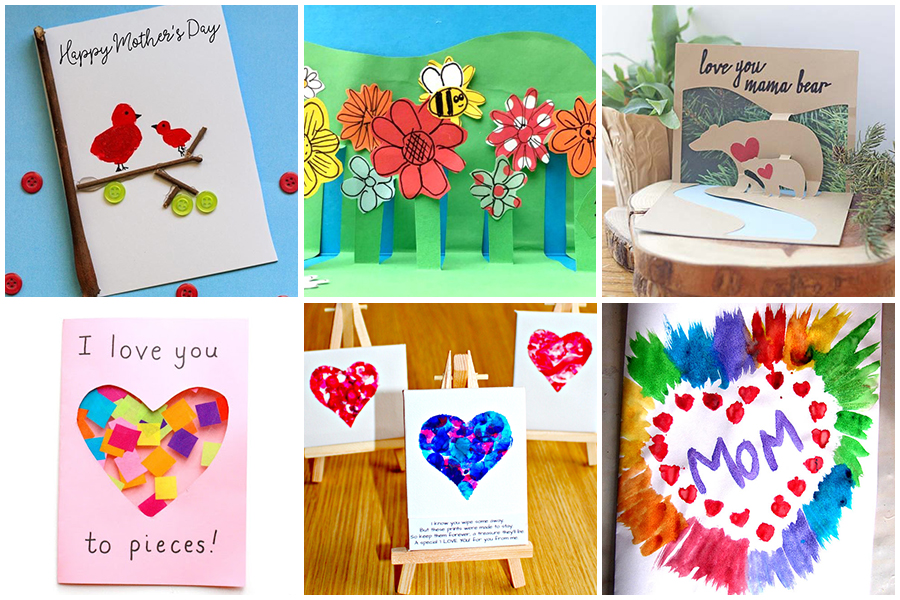
- Teeny little fingers make for the cutest crafts and this Fingerprint Bird Mother’s Day Card is no exception.
- It’s time to get crafty with this 3D Flower Card. This is a great card for older kids to make.
- Make Mama Bear smile with this beautiful Love You Mama Bear card made with the Cricut.
- This Love You to Pieces Suncatcher Card includes a gift to treasure long after Mother’s Day.
- Another idea that can be used as either a gift or on a card is this Fingerprint Heart Keepsake.
- This Simple Mother’s Day Card is so crafty! I definitely want to try this one out.
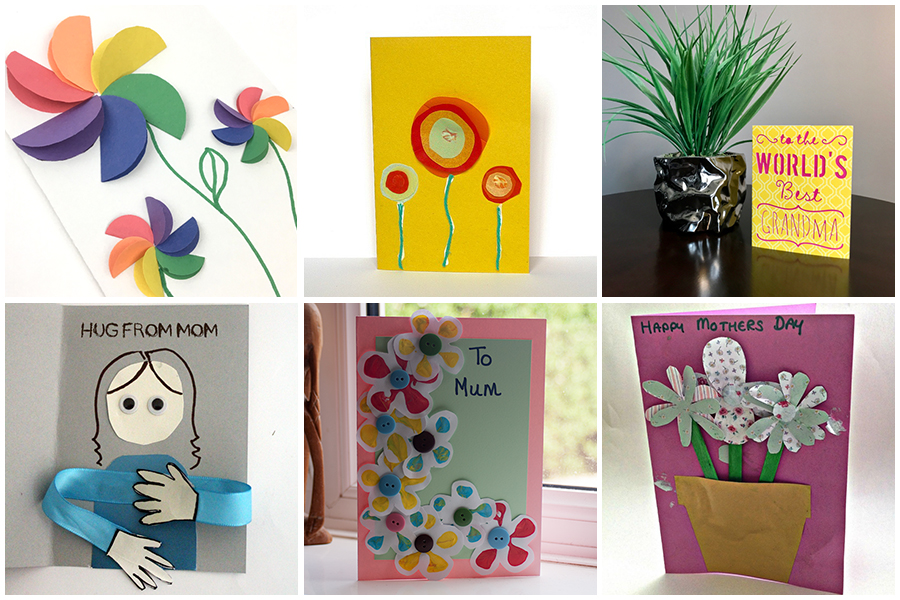
- This Rainbow Flowers card just makes me smile. Simple yet stunning!
- Who doesn’t love a free printable? You’ll find one here for this Homemade Mother’s Day Card.
- Don’t forget to make this Cricut card for the World’s Best Grandma!
- This Huggy Mother’s Day Card is darn near the cutest thing ever.
- Reuse a pop bottle in a fun way for this Simple Printed Mother’s Day Card.
- Let the kids get crafty for this adorable flowerpot Mother’s Day Card.

For more great crafts, homemade gifts and meal ideas for Mother’s day, visit here.
]]>
DIY Mother’s Day Cards
DIY Mother’s Day Cards are my favourite to receive on the day. I cherish the handmade little cards that my kids have come up with, and I try to send cards to the grandmothers and all the wonderful women in my life. Being a mom is no small feat, so we need to take these little celebrations where we can!

How To Make DIY Mother’s Day Cards with Cricut Explore Air 2
Recently, our friends at Cricut sent me a Cricut Explore Air to add to my creative sparkle to. It’s been a long time since I’ve played with Cricut. I used to visit a local scrapbooking store to use a machine many years ago to cut out alphabet letters. At the time, you could only cut with dies that you already owned or alphabet shapes. Although there were some sweet designs, I couldn’t always make them work for my projects. Things have come a long way since then, baby! You can cut over 60+ kinds of medium, upload your own images, or get inspired by the Cricut Design Space.
Although I can’t wait to try some more advanced projects (go big or go home), I started with simple cards to cut out for mother’s day. Since I already have an intense amount of cardstock (thanks scrapbooking), I had most of the items on hand that I needed!
Andrea (the Inspired Cricut expert) gave me tips on how to get started, and we chatted away happily as we both made a few of the designs.
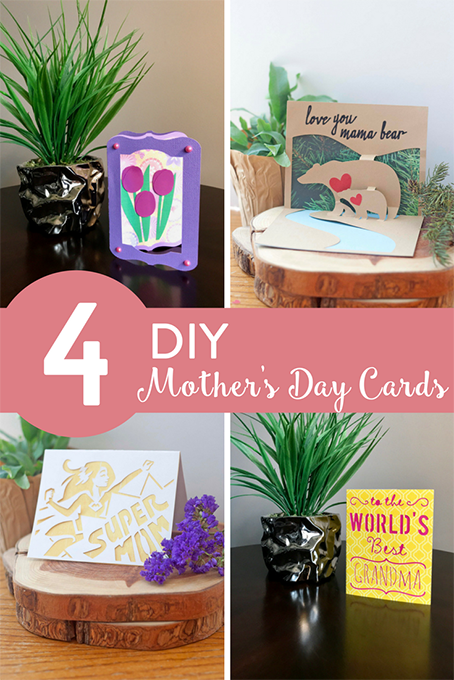
DIY Mother’s Day Card: Tulips
This beautiful bi-fold card is perfect for any woman in your life this Mother’s Day. It’s the perfect base for adding your own bit of flair with these spring-like tulips. Not pictured is the matching envelope included with the file.
Items Needed
- Cardstock in your base card color (I chose lilac)
- Green cardstock (stems)
- Cardstock for your tulips & envelope (I chose a bright purple for both)
- Coordinating patterned paper for behind the tulips
- Adhesive
- Decorative stickers, glitter, anything to spruce up the card (optional)
Visit the Cricut Design Space for the instructions on how to put this together!
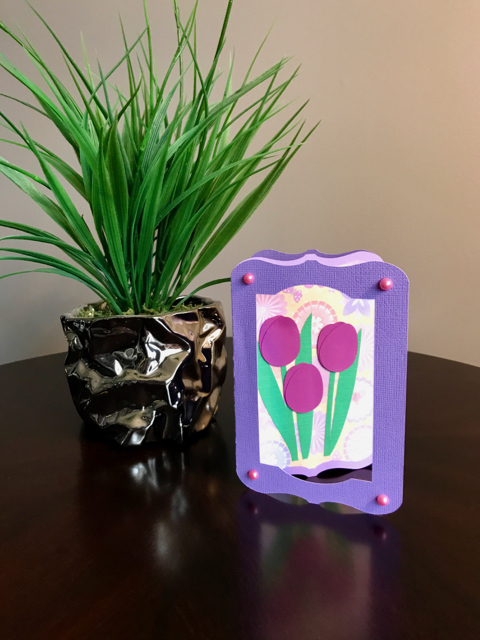
DIY Mother’s Day Card: Mama Bear
Mama bears protect their cubs fiercely. Show your mama bear some love this Mother’s Day with this mama bear pop-up card!
Items Needed
- Light blue cardstock
- Patterned paper
- Adhesive
- Brads (optional)
Visit the Cricut Design Space for the instructions on how to put this together!
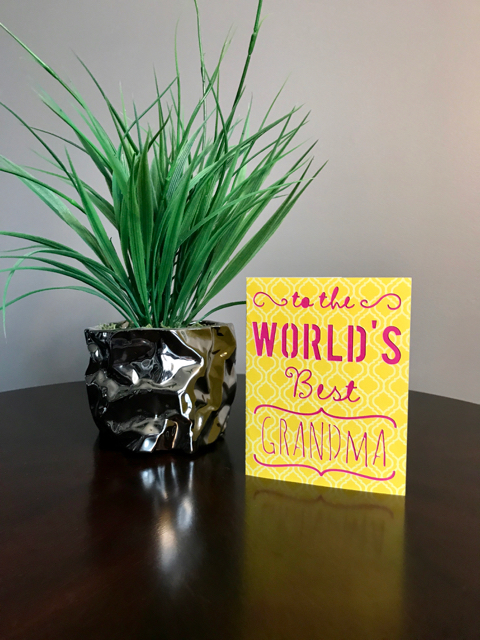
DIY Mother’s Day Card: To The World’s Best Grandma
A simple and customizable card perfect for all the grandma’s!
Items Needed
- Patterned Yellow Cardstock
- Pink cardstock for inside to make your letters pop
- Adhesive
How To Make This DIY Mother’s Day Card
This is a super-quick project that will take you almost no time at all!
- Pop the scoring stylus into your machine.
- Using your LightGrip mat, lay on your cardstock for your card base. Cut away!
- Gently remove the card and the scraps left behind.
- Add the bright cardstock for the inside. Cut!
- Use a basic glue stick to adhere the bright piece to the inside cover of the card.
- Voila!
Free with Cricut Access in the Simple Holiday Cards Cartridge

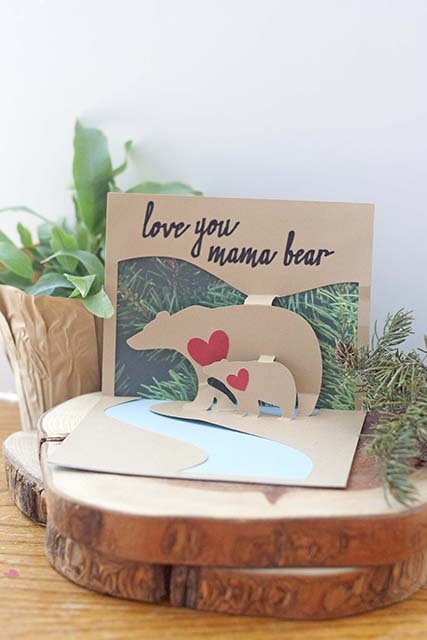
DIY Mother’s Day Card: Super Mom
Show your mom she is SUPER with a Mother’s Day card. The finished card measures 4.25 x 5″.
Items Needed
- Yellow Cardstock
- Glue
Visit the Cricut Design Space on instruction on how to put this together.
For more great crafts, homemade gifts and meal ideas for Mother’s day, visit here.
DIY Mother’s Day Cards
DIY Mother’s Day Cards are my favourite to receive on the day. I cherish the handmade little cards that my kids have come up with, and I try to send cards to the grandmothers and all the wonderful women in my life. Being a mom is no small feat, so we need to take these little celebrations where we can!
How To Make DIY Mother’s Day Cards with Cricut Explore Air 2
Recently, our friends at Cricut sent me a Cricut Explore Air to add to my creative sparkle to. It’s been a long time since I’ve played with Cricut. I used to visit a local scrapbooking store to use a machine many years ago to cut out alphabet letters. At the time, you could only cut with dies that you already owned or alphabet shapes. Although there were some sweet designs, I couldn’t always make them work for my projects. Things have come a long way since then, baby! You can cut over 60+ kinds of medium, upload your own images, or get inspired by the Cricut Design Space.
Although I can’t wait to try some more advanced projects (go big or go home), I started with simple cards to cut out for mother’s day. Since I already have an intense amount of cardstock (thanks scrapbooking), I had most of the items on hand that I needed!
Andrea (the Inspired Cricut expert) gave me tips on how to get started, and we chatted away happily as we both made a few of the designs.
DIY Mother’s Day Card: Tulips
This beautiful bi-fold card is perfect for any woman in your life this Mother’s Day. It’s the perfect base for adding your own bit of flair with these spring-like tulips. Not pictured is the matching envelope included with the file.
Items Needed
- Cricut Explore Air™ 2 machine
- Cricut Design Space™ software
- Cricut® 12″ x 12″ LightGrip Adhesive Cutting Mat
- Cricut Scoring Stylus
- Cardstock in your base card color (I chose lilac)
- Green cardstock (stems)
- Cardstock for your tulips & envelope (I chose a bright purple for both)
- Coordinating patterned paper for behind the tulips
- Adhesive
- Decorative stickers, glitter, anything to spruce up the card (optional)
Visit the Cricut Design Space for the instructions on how to put this together!
DIY Mother’s Day Card: Mama Bear
Mama bears protect their cubs fiercely. Show your mama bear some love this Mother’s Day with this mama bear pop-up card!
Items Needed
- Cricut Explore Air™ 2 machine
- Cricut Design Space™ software
- Cricut® 12″ x 12″ LightGrip Adhesive Cutting Matt
- Cricut® Moccasin Pen
- Cricut Scoring Stylus
- Cream cardstock
- Light blue cardstock
- Red cardstock
- Patterned paper
- Adhesive
- Brads (optional)
Visit the Cricut Design Space for the instructions on how to put this together!
DIY Mother’s Day Card: To The World’s Best Grandma
A simple and customizable card perfect for all the grandma’s!
Items Needed
- Cricut Explore Air™ 2 machine
- Cricut Design Space™ software
- Cricut® 12″ x 12″ LightGrip Adhesive Cutting Mat
- Cricut Scoring Stylus
- Cardstock in your base card colour (I chose a patterned yellow but you can stick with solids if you like)
- Bright cardstock for inside (I chose pink) to make your letters pop
- Adhesive
How To Make This DIY Mother’s Day Card
This is a super-quick project that will take you almost no time at all!
- Pop the scoring stylus into your machine.
- Using your LightGrip mat, lay on your cardstock for your card base. Cut away!
- Gently remove the card and the scraps left behind.
- Add the bright cardstock for the inside. Cut!
- Use your chosen adhesive (I used a basic glue stick) to adhere the bright piece to the inside cover of the card.
- Voila!
Free with Cricut Access in the Simple Holiday Cards Cartridge
DIY Mother’s Day Card: Super Mom
Show your mom she is SUPER with a Mother’s Day card. The finished card measures 4.25 x 5″.
Items Needed
- Cricut Explore Air™ 2 machine
- Cricut Design Space™ software
- Cricut® 12″ x 12″ LightGrip Adhesive Cutting Mat
- White Cardstock
- Yellow Cardstock
- Glue
Visit the Cricut Design Space on instruction on how to put this together.
For more great crafts, homemade gifts and meal ideas for Mother’s day, visit here.
This is a sponsored conversation written by me on behalf of Cricut. The opinions and text are all mine.
]]>
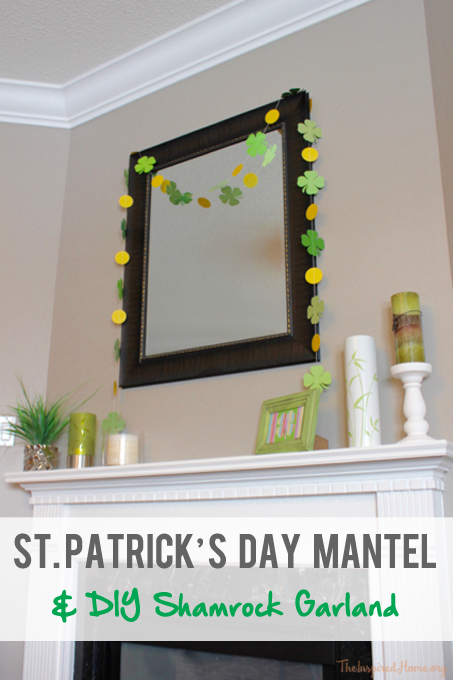
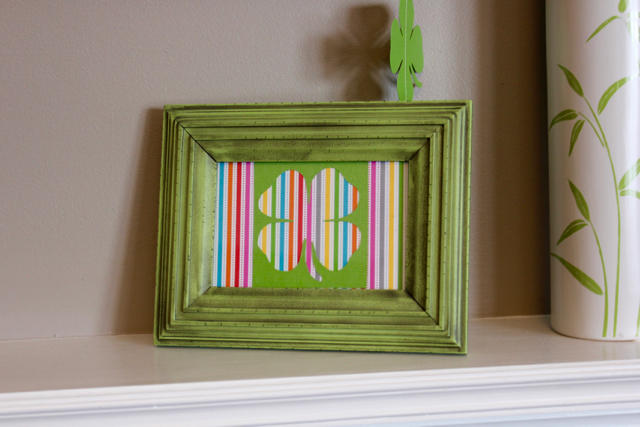
If you are a regular visitor to our website, you have probably figured out by now that I looooooove to decorate my mantel, particularly for the holidays. It is the most cost-effective way to swap out decorations seasonally in my home. You can decorate a mantel with so many items already found in your home. I also adore crafting up something new for every holiday and season to add to my mantel to keep it fresh and exciting.
St. Patrick’s Day is no exception.
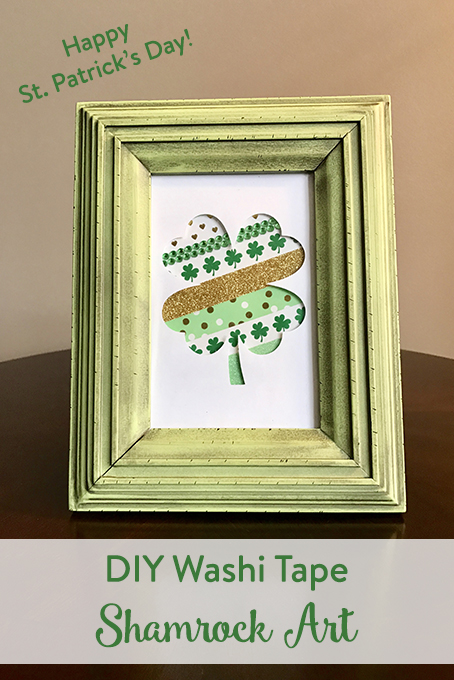
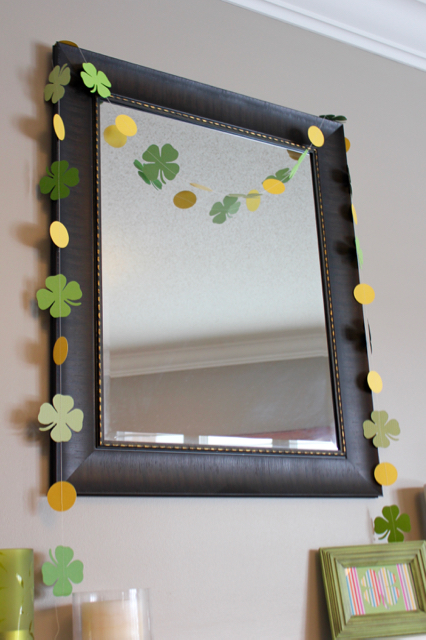
I decided it was time for some new art for my St. Pat’s mantel (because last year’s garland and art just weren’t enough!). Alas, last year’s art didn’t survive 365 days so I whipped up something new for my pretty green frame using a few random craft supplies from my hoard stash.
What You’ll Need
- Picture frame – I have a lovely green one I like to use
- White cardstock cut to fit your frame x2 – mine is 4×6″
- Washi tape – greens, golds and white will do the trick if you don’t have festive tape
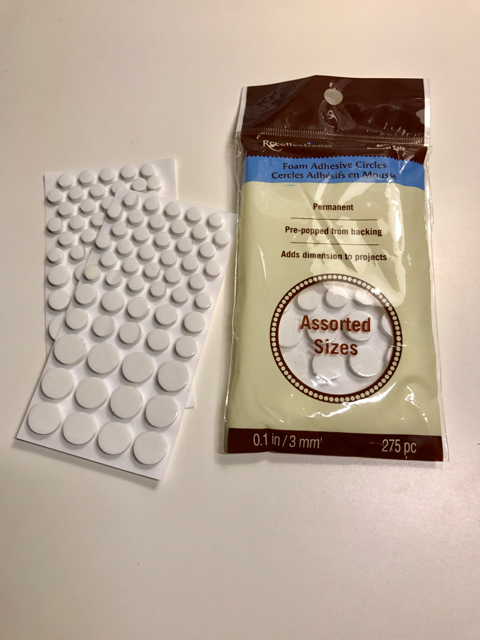
- Adhesive foam circles – don’t have these? No problem, tape will also do just fine.
- Shamrock shape – I used my Cricut but this isn’t necessary – I’ll elaborate below
Let’s Get Crafting!
This is a majorly easy craft that will take you very little time which is my favourite type of craft.
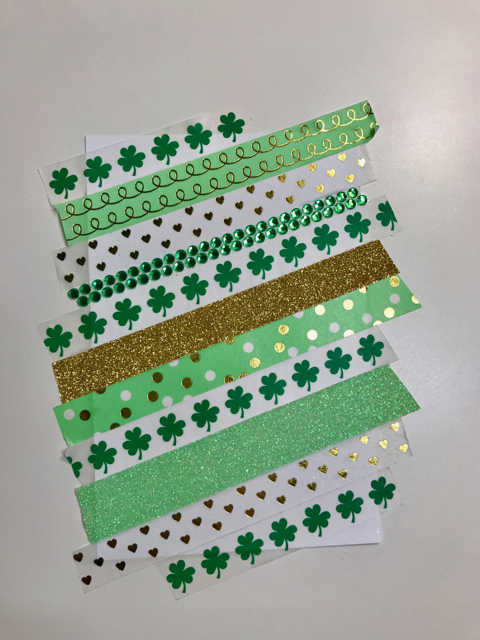
Put your cardstock on a surface that won’t be affected by washi tape being stuck to it – I just used my craft room desk. There is no exact science to placing the washi tape but I started with the shamrock tape in the centre, placed on an angle. From there I worked my way up and down, lining up the edges of the washi tape in a pattern that suited my liking. Having some overhang stuck to your desk is helpful to keep the card from moving around.
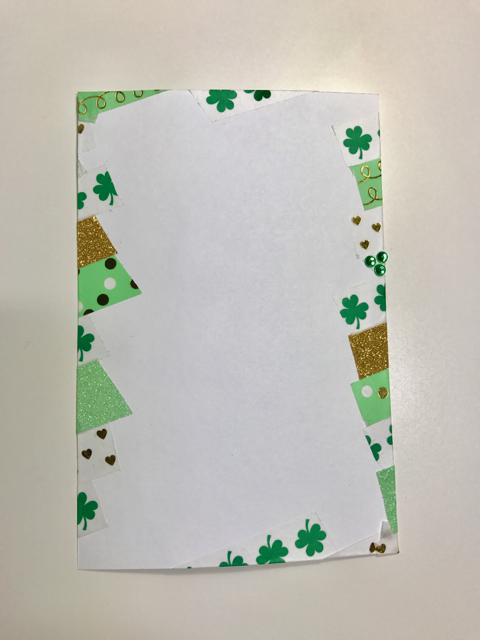
Once you’ve taped your heart out, simply peel the card gently from your surface and wrap the edges around to the back. You’ll want them to be flush with the edges so it fits into your picture frame. Trim any pieces as necessary.
Shamrock Shake
Now it’s time for the top layer: the pretty shamrock. For this, I used my Cricut but this isn’t mandatory. If you are opting to do this by hand, it will take you a bit of patience but I have faith in you! Find a shamrock template that you like online, size it in your preferred word processor to fit your frame and print it out. Cut out the shape and place to your liking on your un-taped piece of cardstock and trace around it with a pencil. Here comes the tricky part: Cut that lovely shamrock from the centre of the cardstock.
If you have a Cricut, lucky you! Make a rectangle the size of your frame. Next, insert a shamrock image and size to fit nicely on your rectangle. Once you’re happy with the placement, select both layers and then select Attach. It’s time to print! Attaching the images should make the machine cut out the rectangle and also cut out the shamrock from the centre of the rectangle.
Assembly Time
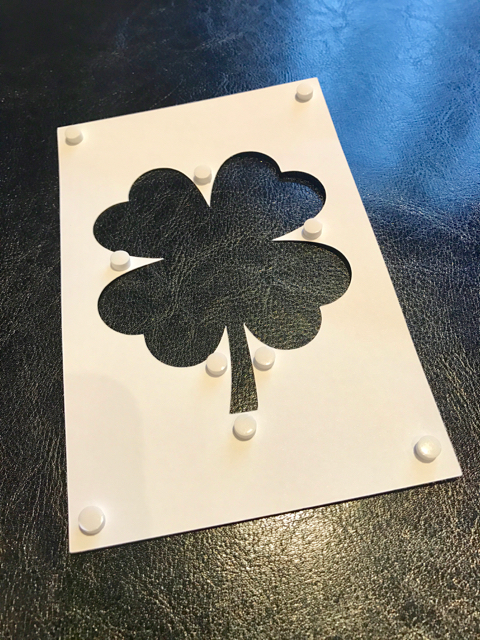
Once you have your shamrock layer all set to go, stick some adhesive foam circles in a variety of spots on the back of it. I tried to put them on all of the cuts between the leaves & stem and near each of the four corners. Once you have stuck those on, peel off the other side of the stickers to expose the adhesive. Line it up over your washi tape-covered card and stick it on.
You did it! You made your very own festive St. Patrick’s Day washi tape art! Pop it in that frame and display it for your family and friends to enjoy. Erin go Bragh!

Looking for more great ideas on crafts, activities and food to celebrate St. Patricks Day: check these out.
Looking for a yummy green drink to enjoy on St Patrick’s Day? Try our Dairy-Free Shamrock Shake.
]]>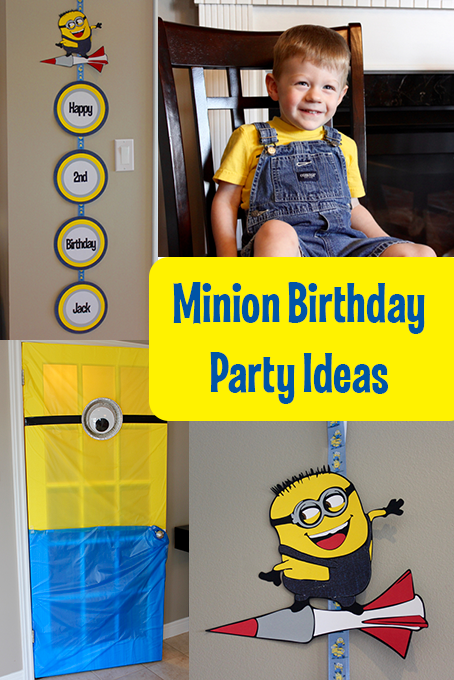
To say that Little J likes the Minions would be an understatement. This kid is OBSESSED. It is Despicable Me everything in this house. More importantly, he is obsessed with Gru, the main character. I think we own every single book/toy/shirt/shoes with a Minion theme. So it only made sense to throw him a Despicable Me-themed birthday party for his 2nd birthday. Like usual, I went over the top. I pulled out my trusty Cricut Explore Air and crafted my little heart out. Here’s a sampling of his dream party!
Minions Birthday Party Ideas
Invitation
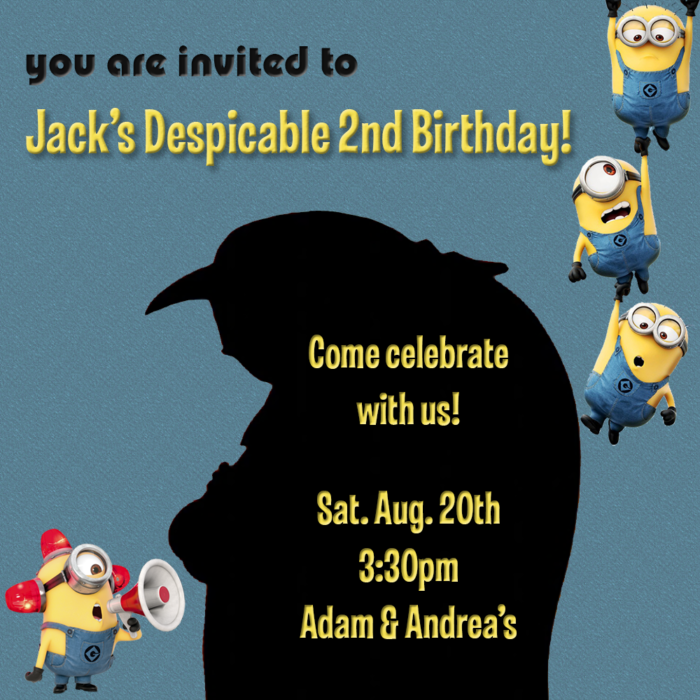
This is the birthday invitation I made for Little J’s Minion birthday party. I simply email a photo to family members so it was easy to create. I just used a few various images found around the internet. The font is called Las Vegas and is the perfect Despicable Me font! The ‘you are invited’ font is called Pump and it resembles the Minions movie title font.
Door Decoration
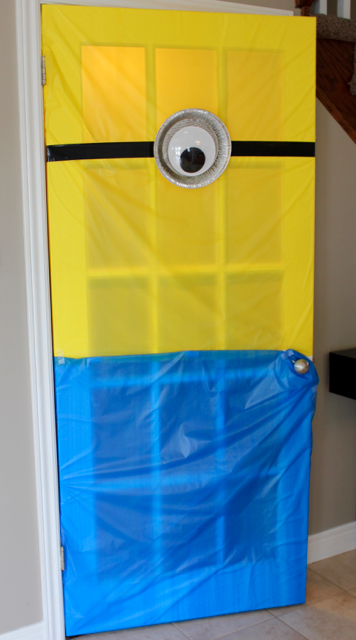
I couldn’t resist decorating the door into the basement like a giant Minion. It was ridiculously simple to make and used items I already had. I bought rolls of tablecloth sheeting from a party store – 1 in yellow, 1 in blue to cover the food tables and used those to make the Minion. The eye is a large pie plate from the dollar store, a giant googly eye from a local craft store and some black duct tape. Voila! I also used a bit of scotch tape to attach the sheeting.
Birthday Banner
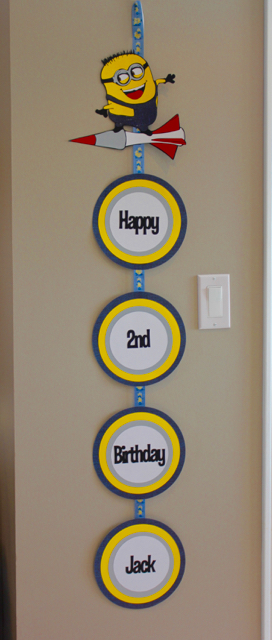
This banner was a labour of love. I used my Cricut Explore Air to assemble everything. My house doesn’t lend itself well to horizontal banners so I need to get creative for parties and make vertical banners. It’s made with cardstock and some Minion ribbon. If you don’t have the patience for the Minion on the rocket, you can make the rest of the banner quite simply. It’s a circle of denim-patterned paper (but regular blue will also work), a circle of yellow, a circle of silver paper and a circle of white paper. It looks like a Minion!
Minion Vase
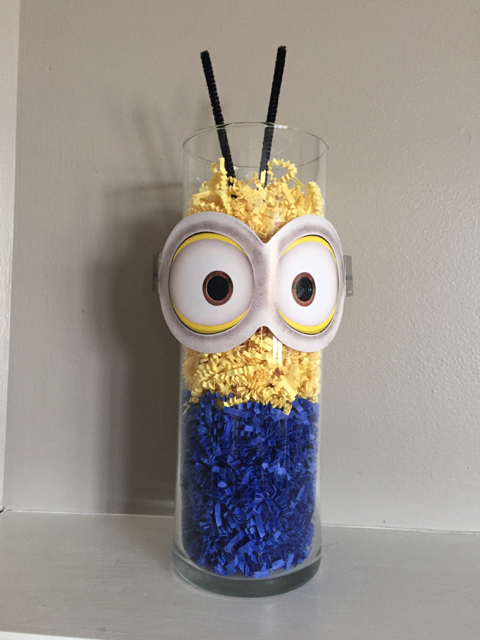
These Minion vases could not have been easier to make. I’m sure you have some tall vases kicking around your house you could use (don’t we all?). I bought some basket stuffing from the dollar store in blue and yellow. The hair is simply a black pipe cleaner bent in half. The goggles were also from the dollar store – it’s a package of 8 masks from the party section. I put a piece of black tape behind the eye holes to give the appearance of pupils and taped it onto the vase.
Cupcakes
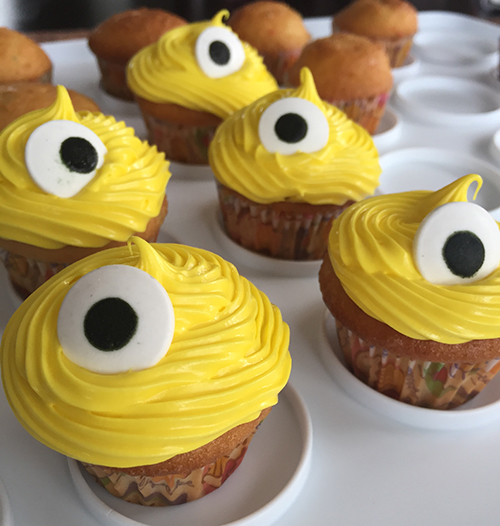
Silly me forgot to take a picture of the larger cupcakes I made for Little J’s party but I managed to snap a photo of the mini cupcakes I made for a little get-together we had with friends a few days prior. These are made from a boxed cake mix and a container of vanilla icing that I added yellow food colouring too. They were very easy to make. The eyes are candies from the baking section of my local craft store. So easy! And delicious.
Fruit Tray

While it’s not the best representation of a Minion, I’m sure you can get the general idea from the formation of the pineapples & blueberries in my fruit tray. It was a fun little twist to add to an otherwise basic fruit tray.
Gifts
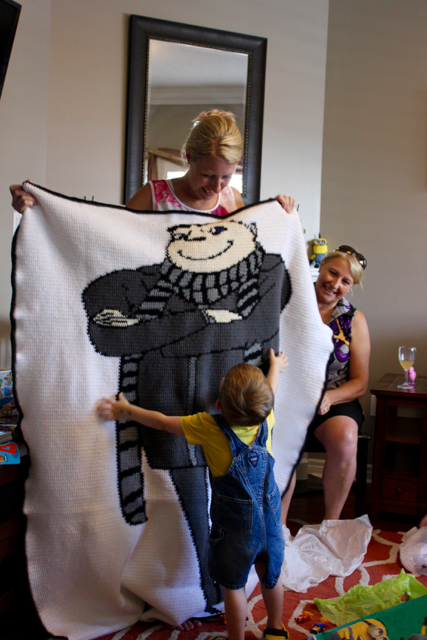
My mother (sitting down in the photo) loves to crochet. She especially loves to crochet things for her grandbabies. A lot of love and effort went into making this gorgeous Gru blanket for Little J and you can see just how happy he was with his blanket! He likes to lay it on the floor and snuggle with Gru. And yes, I totally dressed him like a Minion for his birthday party 🙂
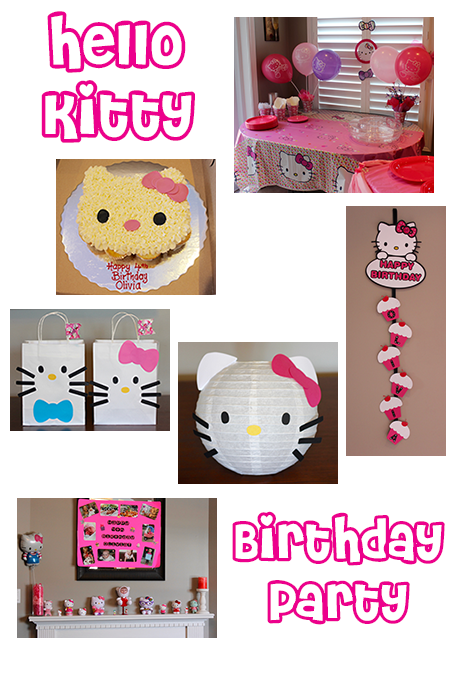
Miss O recently celebrated her 4th birthday. Can you believe it? It feels like just yesterday I was throwing her very 1st birthday party.
This year’s theme request of Hello Kitty was a lot easier than last year’s Princess Peach Party. While I absolutely love coming up with crafty ways to decorate instead of the store-bought stuff, it was nice to be able to pick up a few things this year. But that doesn’t mean I didn’t still get creative!
Loot Bags
This was the first year that Miss O had a birthday party with her friends instead of just her family party (lucky girl got TWO parties!). For her pint-sized guests which included both boys and girls, I decided to make some fun loot bags for them instead of buying store-bought as you can only get very girly Hello Kitty loot bags. I used my Cricut Explore Air to whip up some Hello Kitty and Dear Daniel faces for the bags. They were filled with goodies such as sidewalk chalk, Play-Doh, stickers, a Kinder Egg, mini colouring books & crayons, glow necklaces, a balloon on a stick and a few other small items. I had some Hello Kitty Duck Tape that I used to do the name tags.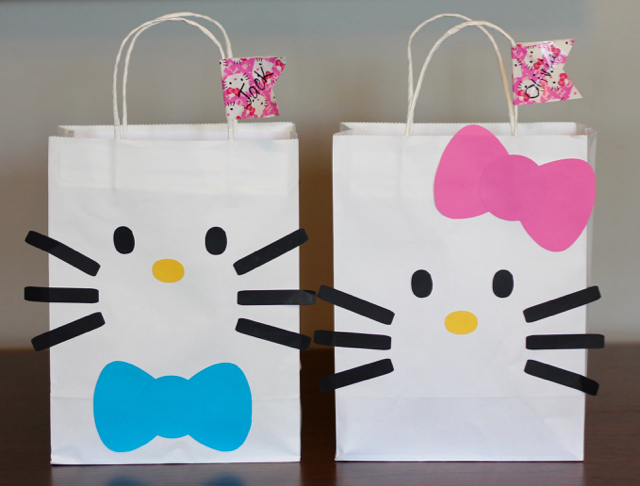
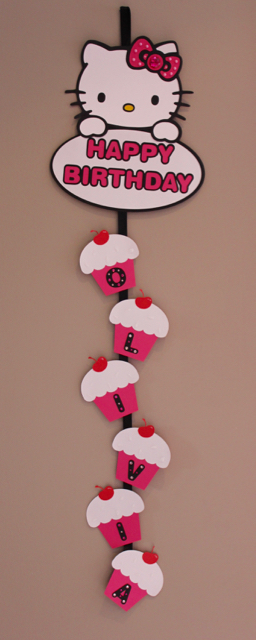
Decorations
I also made a Happy Birthday banner for the birthday girl using my Cricut. This banner was used at both parties. It was painstakingly created in the Cricut Design Space software. I find it difficult to find the space in my house to hang a horizontal banner each year so I opted for a vertical banner this year. I added a bit of bling here and there with some stick-on gems.
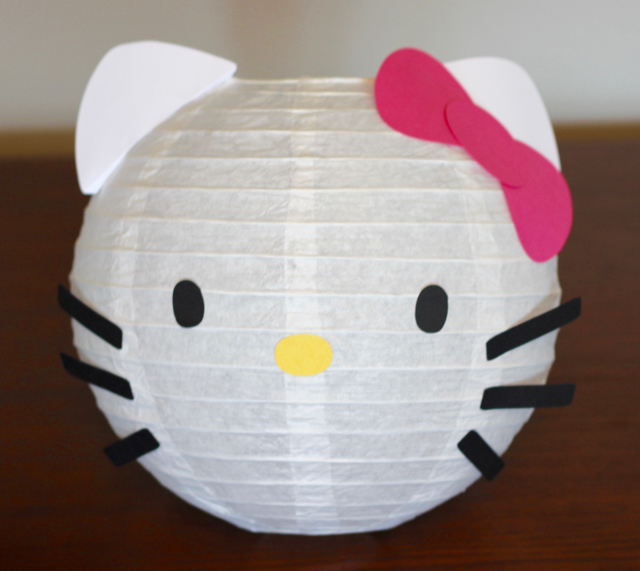
Next up were the paper lanterns. I made 3 in total using the same Cricut design as on the loot bags. I also cut out ears for the lanterns. I picked up some basic white paper lanterns from a local dollar/party store. They weren’t designed to hold candles or anything, simply as hanging decoration which was perfect. I hung one from the ceiling lamp in my living room, one in the kitchen and simply placed the third on a shelf.
Miss O has amassed quite the collection of Hello Kitty toys in her 4 years so I used many of them to decorate the fireplace mantel. The doll in the centre has her face on it! It was something I picked up at a local craft show. I also did a very simple vase decoration – I stuffed different colours of tissue paper into it and stuck in a balloon! On the mirror is a poster I had made for her birthday celebration at preschool – they ask the parents to do up a little something to show the class different pictures throughout the years of your child. Of course I made use of the Cricut once again to do the lettering!
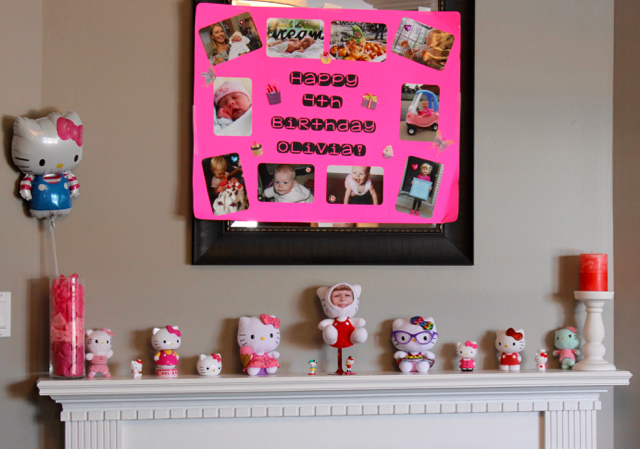
Table Setting
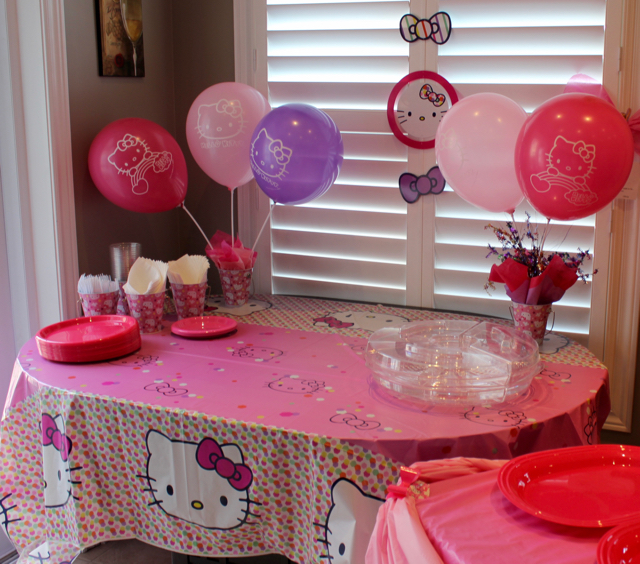
I love to decorate the food tables in fun ways. My mother had picked up a tablecloth and some hanging decorations. I acquired a few metal buckets adorned in Hello Kitty faces that I filled with pink tissue paper and a piece of floral foam. I inserted some Hello Kitty balloons on sticks into the foam. The other buckets were used to hold the forks and napkins. I completed it all with pink plates!
The Cake!
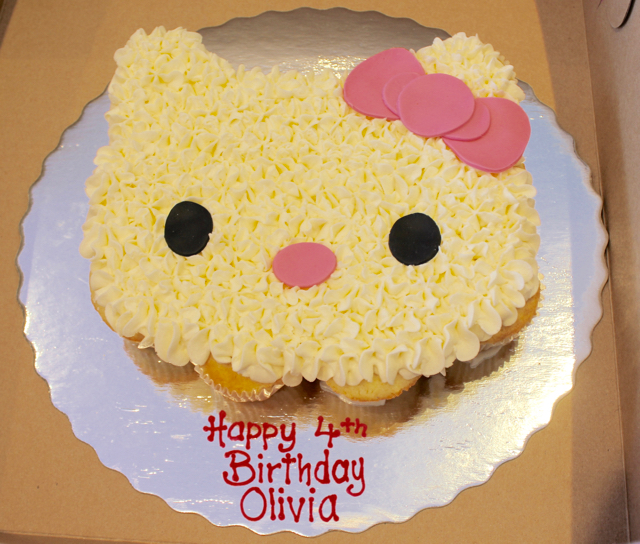
Last but not least was the cake. I find that at her family party, not a lot of people eat the cake or cupcakes so I wanted something simple but fun. I visited my favourite local cupcake store (conveniently located behind my house!) and asked if they could make a cake out of cupcakes. Boy did they deliver! It was a dozen cupcakes squished together in the shape of her head and iced with their delicious vanilla icing. Cupcake cakes are awesome because you don’t have to cut them – simply pull them apart! Like usual, we had a few left over and I was quite happy about that. Yummy!
Like usual, I put in a lot of time and effort into her parties. I simply love being crafty and birthday parties leave me with no shortage of opportunities. Being crafty also helps me save money on the exorbitant prices of store-bought items. I hope you can use some of these Hello Kitty birthday party ideas for your little lady. Miss O loved seeing it all in action. She got spoiled with gifts like usual. She’s a lucky little girl! Now to get started on Little J’s Minions party in August…
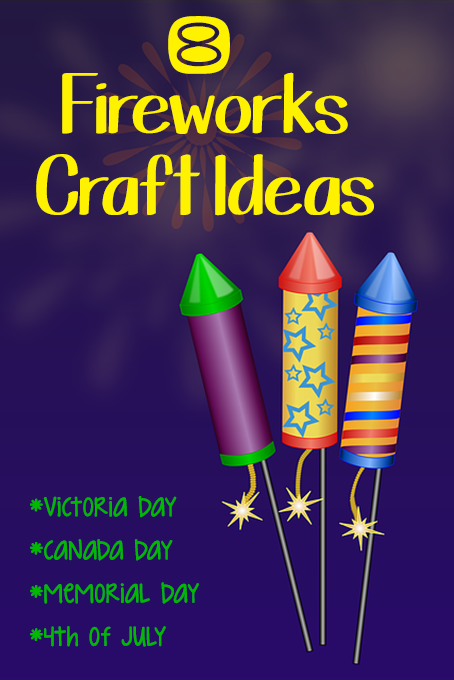
With a number of holidays coming up that are known for fireworks, it’s time to get crafting our own fireworks during the day! Victoria Day & Canada Day are approaching quickly, along with Memorial Day & the Fourth of July in the USA. Here are seven delightful crafts for all different ages to celebrate these joyous holidays in true fireworks spirit. While many of these crafts feature a red, white & blue theme, they can all easily be altered to feature different colours such as red & white for Canada Day or a rainbow of colours for Victoria Day. These are a great collection of craft ideas to make all summer long! Decorate your next long weekend party in style with the kids.

Patriotic Pinwheels from Weekend Craft

Coffee Filter Fireworks Pom Poms from The Suburban Mom

Tie Dye Tablecloth from Home Made Interest

Firework Blocks from Making of a Mom

Glow in the Dark Fireworks Decoration from Earning & Saving with Sarah Fuller

Popsicle Stick Fireworks from The Suburban Mom

Kid-Friendly Firecracker Holder from Ribbons & Glue
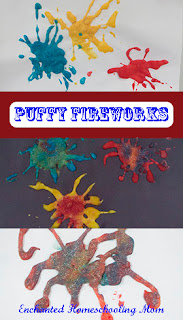
Puffy Fireworks from Enchanted Homeschooling Mom
]]>
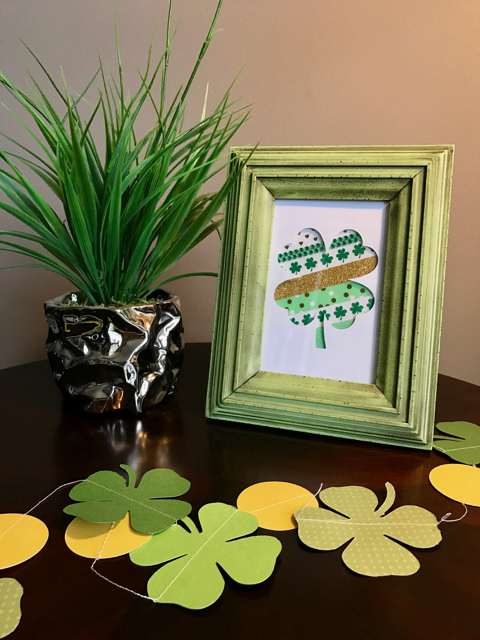
I love an excuse to decorate my fireplace mantel! Any holiday or season change will suffice. This year we have such a small gap between Valentine’s Day, St. Patrick’s Day and Easter but that won’t stop me. The Valentine’s mantel came down on Feb 15th and up went my St. Pat’s decor. I kept it simple this year as it won’t be up for very long. Easter is nice and early this year with Good Friday falling on March 25th.

To decorate my St. Patrick’s Day mantel, I went with a simple green theme. I used a variety of items from around my house but crafted a few small touches to kick it up a notch. I used a fake potted plant, a variety of candles & candle holders, a vase and a green picture frame.
To add a little bit of colour to my mantel, I cut out a 4×6″ piece of rainbow scrapbook paper to put in my green picture frame. To give it a little bit o’ Irish, I added a shamrock cut-out. This was a scrap from my shamrock garland which I’ll explain below. I used a bit of double-sided tape to attach it to the rainbow paper and put it in the frame.
This garland was a cinch to make. I used a few handy tools to create this which made it go a little quicker but this can still be made by hand. My secrets are a Cricut Explore Air and my trusty Husqvarna sewing machine.
I pulled up a shamrock template in the Cricut software and sized it to 3×3″ (it worked out a little bit longer on the side with the stem). I also did up some circles that were 2×2″ for the coins.
I pulled out a few pieces of cardstock from my scrapbooking collection. Two of them were shiny green, one was embossed with little polka dots and I had a piece of yellow-gold for the coins. I suggest using double-sided cardstock or at least one with green on both sides. My shiny green papers were only shiny on one side but still green on the other. Your garland will inevitably spin and sway wherever you hang it and having green on both sides keeps it festive!
With three types of green paper, I cut out 5 shamrocks from each with the Cricut. This gave me 15 shamrocks. If your paper isn’t double-sided, simply cut out twice as many shamrocks and you can sew them together. I cut out 14 gold coins from the yellow cardstock.
You can very easily use a shamrock stencil or even a cookie cutter to draw an outline onto your paper and simply cut by hand; the Cricut just speeds up the process a little.
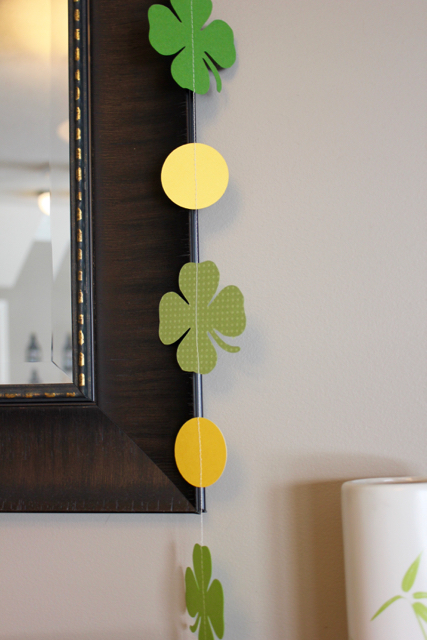
Next, I pulled out my sewing machine. I opted for a cream-coloured thread as I didn’t want green thread across my gold coins. Set your stitch length a little bit longer than normal so you don’t perforate your paper shamrocks and coins – I set it to 4. You don’t need to change any other settings. Holding your ends, start sewing with nothing in the machine to make your tail. Slide in a shamrock to stitch in and keep going to make more of your string. Next, slide in a coin, pull through to make a line and move onto the next shamrock. Keep going until you’ve finished your garland. Now it’s ready to put on display! If you are just hanging it as I did, you can trim your tails – if you want to tie it to something, you’ve got the ends to do it with.
The sewing part can probably be done by hand if you don’t have a machine but it may prove a bit more difficult. I’ve never attempted it it so let me know how it goes.
To store your garland, wrap it around a piece of cardboard to keep it from getting tangled.
How do you decorate your house for St. Patrick’s Day?

Looking for more great ideas on crafts, activities and food to celebrate St. Patricks Day: check these out.
]]>
I love throwing themed parties. My son’s first birthday was no exception. I opted to do a robot party theme which was perfect as his nursery is already a robot theme. This meant I had most of the decorations that I already needed for the party.
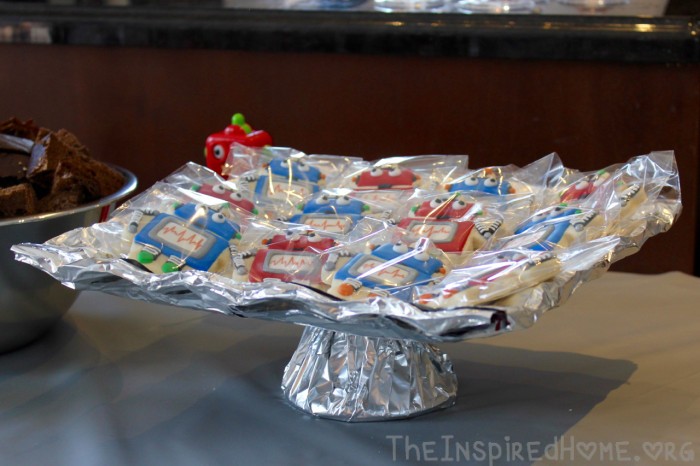
To add a little more spice to the food setup, I made robot fruit and veggie trays using dollar store items. It was a great way to really tie into the theme. I found a few other ways to turn his party decorations up a notch at minimal cost.

First up was a cake stand, or in this case, it became a cookie stand. I had some awesome robot cookies made for the party but I needed somewhere to display them. I didn’t really want to go out and buy a new one so I found a way to repurpose the pink one from Miss O’s pink party. All it took was a little tin foil! I had to use a few pieces of tape to secure a few of the edges due to the shape of the glass tray but they were underneath and not noticeable.
Another bit of spice added to the party decorations was in the form of gears. For Miss O’s pink party, I did a banner of photos from each of her first 12 months. I wanted to make one for Little J so I printed out his monthly photos and punched with a large circle punch. I attached them to some gears I cut out using my Cricut Explore Air but you could easily print out a template, draw them on some paper and cut them out. I also cut out black circles just a bit larger than my photos to add a bit of pop.
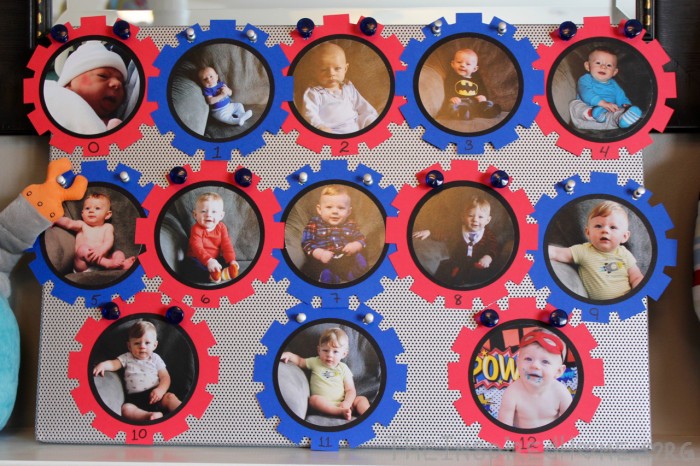
I had this silver bulletin board and some blue & silver thumbtacks – everything just worked out perfectly! You could also string them together in a line or attach them to a piece of grey or black bristol board. For the months, I simply wrote the numbers on with a black marker.
]]>
I love to throw birthday parties. I constantly go over the top and spend weeks crafting, creating and arranging parties. I search around Pinterest for fun ideas then I take the time to put my own spin on them. I pull out the Cricut and get crafting with my oodles of craft supplies. I have even sewn things for parties!
Miss O has had 3 birthday parties and I went the extra mile for all of them. Her 1st birthday was all pink. I started planning that party when she was 6 months old! Her 2nd was a Dora theme which included a 5′ tall Dora balloon that I swear followed me around the house. For her 3rd, she came up with the fantastic theme of Princess Peach.
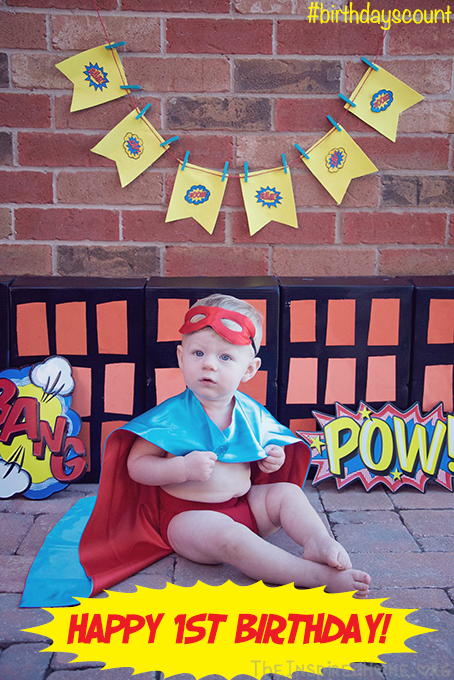
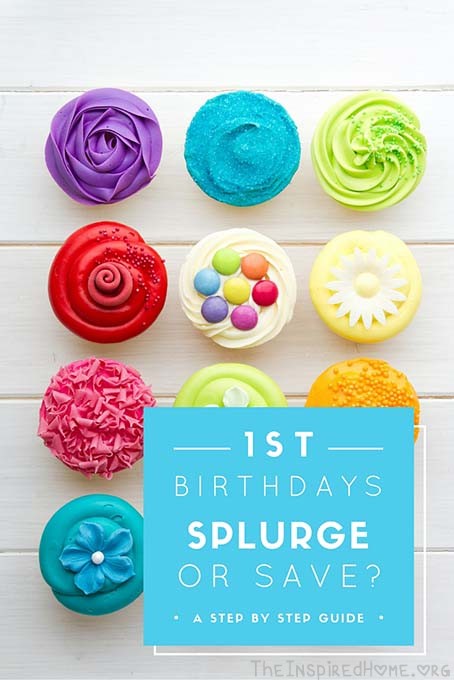
When it came time for this handsome man’s party, I was exhausted. I had just finished with the Princess Peach party and my grandma’s big 80th birthday party celebration. Although I love putting in the energy to each party, I decided it was time to reevaluate where to save money and where to splurge. You can’t do it all realistically without weeks of preparation, which I did not have. I simplified my decorations and my menu and pulled it all off in about two weeks. And you know what? It was still a totally awesome 1st birthday party. Once he’s old enough to remember, I will pull out all the stops for his birthday party. For the first couple of birthdays you can relax a little bit and figure out what works and what doesn’t for you in terms of party planning.
Decorations
Save
Choose a theme for your party that is easy for you to work with. Choose a theme that you already have decorations for. If your kids is already rocking a nursery full of robots, use that. The normal decorations can double as party decorations. Another easy way to save on decorations is to stick with a colour for your theme as I did with Miss O’s pink party.
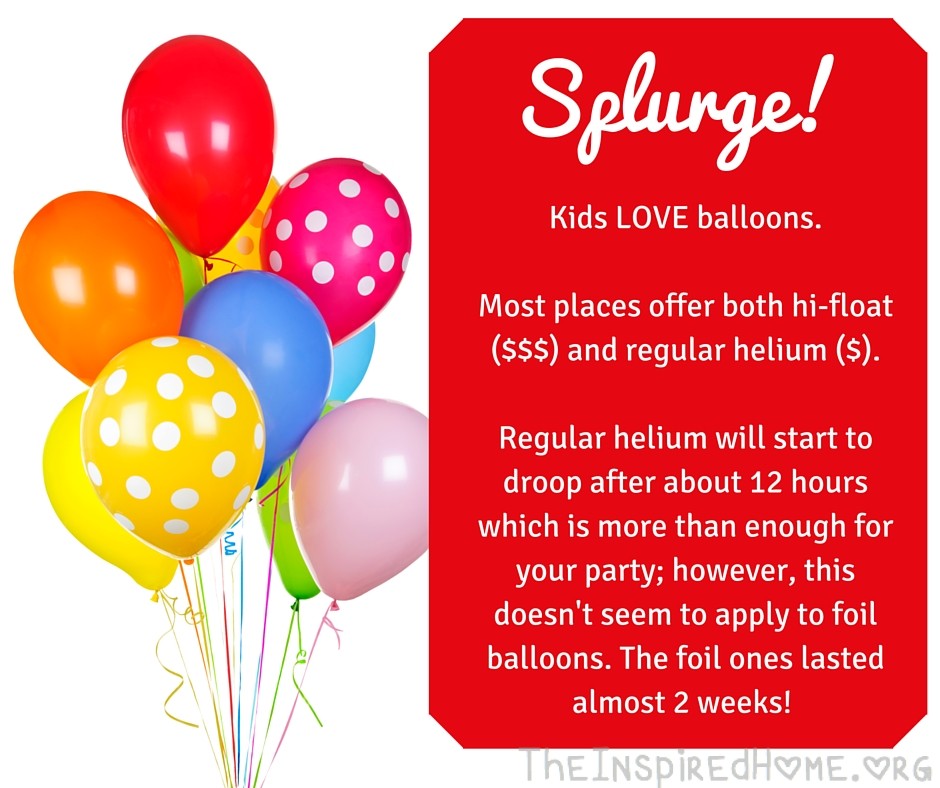
Splurge
Balloons! Kids LOVE balloons. Find a local party store in your area that isn’t part of a chain and you’ll still save while you splurge. Most places offer both hi-float ($$$) and regular helium ($). Regular helium will start to droop after about 12 hours which is more than enough for your party; however, this doesn’t seem to apply to foil balloons. The foil ones lasted almost 2 weeks! So they provide more than just a pretty centrepiece for your party. Little J drags them around with him wherever he goes.
Food
Save
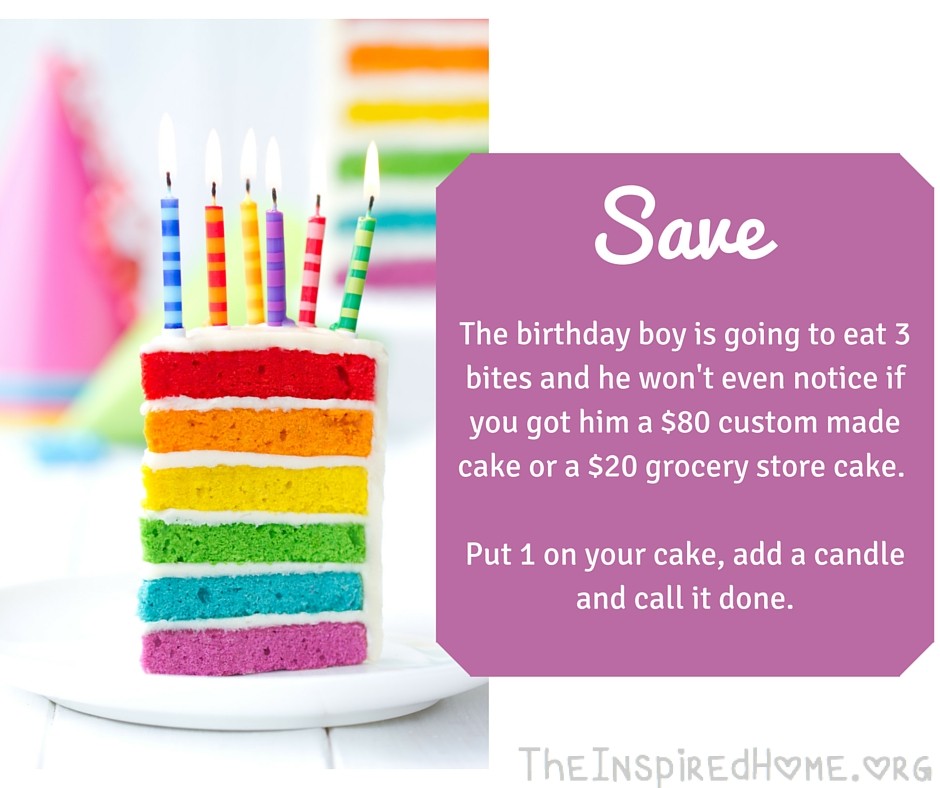
The cake.
I’m serious, save your money when it comes to the cake. The birthday boy is going to eat 3 bites and he won’t even notice if you got him an $80 custom made Thomas the Tank Engine cake or a $20 grocery store cake. They will still write anything you want on the cake. I went with a simple strawberry shortcake and had them put a big 1 on it. He didn’t know the difference and we all got to enjoy a delicious strawberry shortcake!
Splurge
Spend the money on prepared foods. Don’t spend all morning cutting up fruit & vegetables and assembling them perfectly on a platter. Spend that extra bit of money on pre-made platters of food so you can spend your day hanging out with the birthday boy instead of standing in the kitchen
Everything Else.
Save
- Invitations. I stuck with simple evites. They’re free and help you keep track of the guest list. Unless there are older family members coming who do not use the internet, there’s no need to send paper invites. I usually print a copy of the invite I made online and deliver it to them.
- Loot bags. Unless your family has a ton of kids, there’s no need to provide loot bags.
- Presents. Be honest: what does a one year old truly need? A few small toys and some books are my go-to gifts!
Splurge
- Cake smash! This one really depends on the child. Miss O did not like any sort of mess as a baby. Little J on the other hand LOVES mess. So we hired Elle Dee Photography and gave J a wonderful blue cake to have fun with. The results were AMAZING. I supplied all of the props as well!
- Splurge on giving your one year old baby a ton of love and snuggles today! At the end of it all, this day is truly about your special little guy or girl on their very first birthday.
Enbridge, a company that has been delivering natural gas to Ontarians for over 165 years, recently conducted a survey about birthdays. The most important part about birthdays to Canadians is sharing it with family (87%). One of the simplest ways to make birthdays more meaningful is simply by paring down the guest list and adding your energy where it really matters – celebrating and being present at the event.
Enbridge certainly did so recently when they brought over 100 people of all ages to celebrate. The video below is them blowing out their birthday candles. Check it out!
Tell us below what your favourite birthday memory is below.
For more birthday inspiration, check out our Pinterest board:
Follow The Inspired Home’s board Birthday Parties on Pinterest.
Disclosure: I am part of the PTPA Brand Ambassador Program with Enbridge and I received compensation as part of my affiliation with this group. The opinions on this blog are my own.
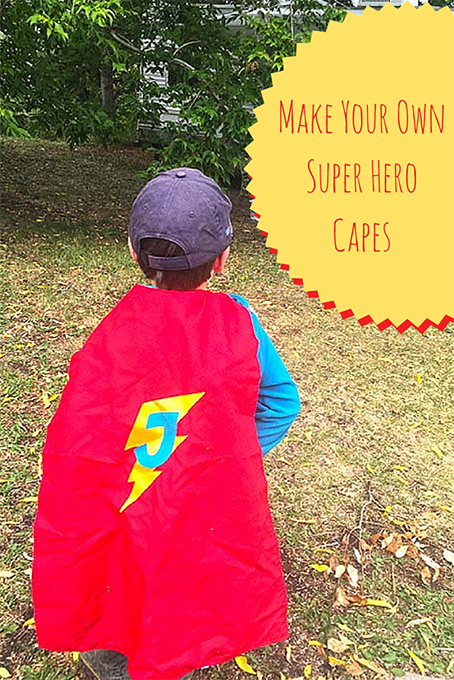
Faster than a speeding bullet, it’s Super J……Flying high in the sky, it’s Super P!
When we went to pack my kids up for the big move, each of them chose a few toys to bring with them. Both of them chose their capes.
The Super Hero capes arrived in the mail several weeks earlier from Andrea, to celebrate their birthdays. It’s been a few months, but they have yet to lose their appeal to both of my kids. They love to pretend to be superheroes saving the world, or flip the capes over to the reversible side where they can be pirates, or magical rainbow creatures.
I love them, because they make them use their imagination and there is never a dull moment listening to what they have come up with next. The capes have been everything you can imagine from tent covers to Super Dogs and table cloths. My husband and I have even picked up the kids on our shoulders and flew them around like the super heroes they are.
So looking for a great gift that is going to spark imagination & creativity… here it is… Andrea explains below how to make your very own!
Make Your Own Superhero Cape

To make a cape for your little superhero, you only need basic sewing skills. You can do this, Super Creator!
I can easily complete one of these in an evening after the kids have gone to bed. I found it helpful to make a template to cut out the front & back of the capes. I grabbed a piece of craft paper from my daughter’s easel, drew on the correct lines and cut it out. It stays rolled up nicely when not in use. The tutorial I work from is Super Hero Capes from How Does She? I like to add a custom logo to one side of the cape.
What You’ll Need
- 1 yard each of coordinating fabric for the front and back – I use a patterned on one side and solid on the other
- Small scrap of yellow fabric for the lightning bolt (approx. 9″ long x 7″ wide)
- Small scrap of fabric in your colour choice for the child’s initial (approx. 5″ long x 4″ wide)
- Heat n’ Bond or other similar fusible fabric
- Iron
- Matching thread
- Basic sewing supplies
- Avengeance Mightiest Avenger font (free)
- Lightning bolt image (download one from Google images)
How-To
The first step is to cut out your cape front & back following the tutorial from How Does She? or using your template if you prepared one as I have.
The next step is to print out your lightning bolt & initial in the correct size. I do the bolt 8″ long and the initial about 3.5-4″ tall. If you have a Cricut Explore, this step is easy to do in their software. Once you have printed your shapes, cut them out.
You will need to adhere the fusible fabric to your 2 scrap pieces following the package directions. Once this is done, pin your shapes to the fabric and cut them out. Once this is complete, lay out your solid fabric and place in the centre about 1/3 of the way down the cape. Iron on following the package directions. Next you’ll want to applique with your sewing machine. Just do a very small & tight zig-zag stitch all the way around the letters. This helps keep it attached and adds a little pop.
Once this is complete, put your fabric right-sides together and pin. Sew together, leaving a 3″ opening to flip at the bottom of the cape. Snip your corners & around the neck. Flip it, poke out the corners and sew a finishing seam all the way around the cape, ensuring that you close the gap.
Voila! You have a gorgeous cape – the perfect gift! You can custom the fabric on the one side to reflect the Super Heroes taste. On the flip side of the ones for Holly’s kids, I added Jake & the Neverland Pirates fabric for Mr J and rainbows for Miss P. The owl cape was another one I made for my friend’s son.
Now get out there & fight some crime!
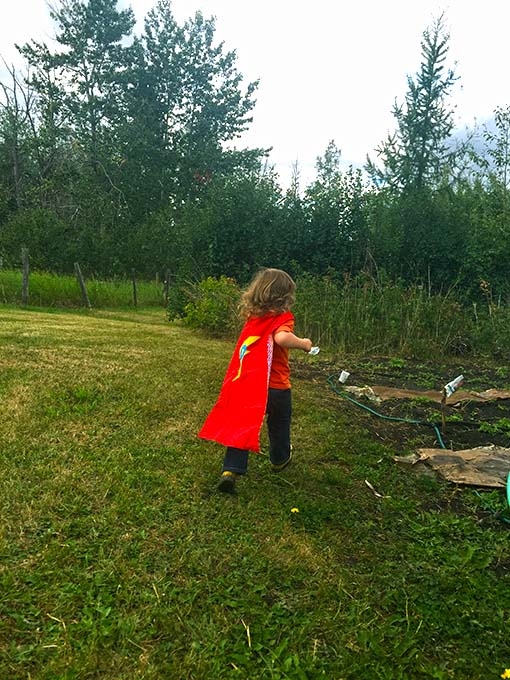

It’s time for another alphabet craft! This time it’s D is for Duck. Don’t forget to check out A is for Apple, B is for Bear and C is for Caterpillar.
I like to use my Cricut Explore Air to complete these alphabet crafts but it is definitely not a necessary tool. It’s just a really fun one with so many uses! If your child is old enough to handle a pair of scissors, it’s a great idea to let them cut out the letter and the shapes. Simply draw and outline on the page for them and let them cut away!
You will need:
- cardstock or construction paper in yellow & orange (plus a base colour – I used white)
- feathers
- googly eyes
- glue
You can either cut out the letter & shapes for the kids or you can let them cut out shapes you have drawn onto the paper if they are a bit older. Stick the D on the page, add the beak, wings and feet, some googly eyes and attach the feathers!
Here are some fun books about ducks!


Don’t miss the other letters in the Alphabet Craft series!


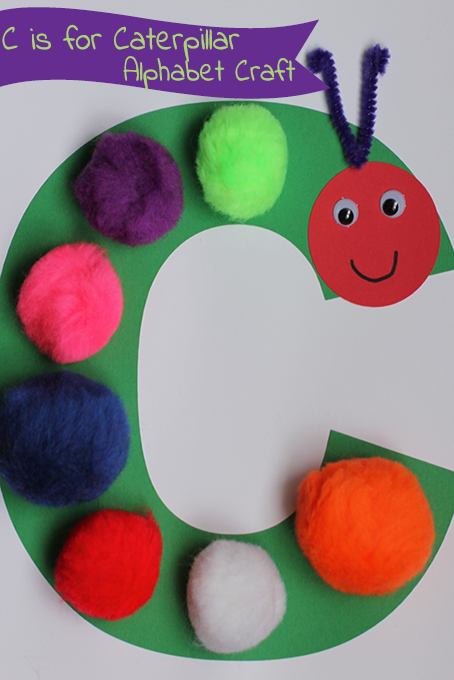
*This post contains affiliate links.
]]>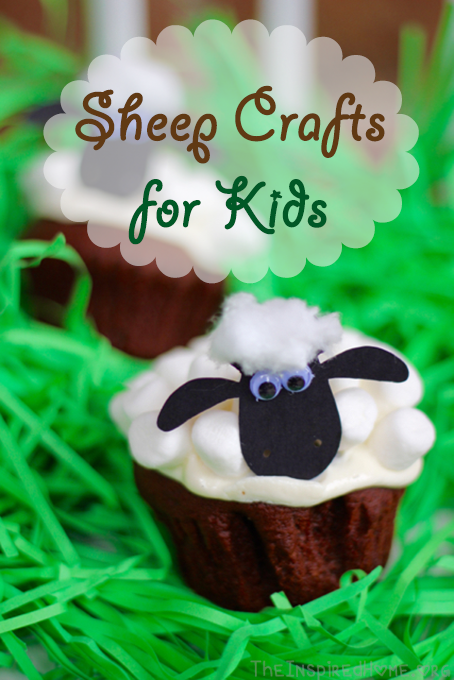
After the bitter cold winter we had this year, I love getting the family out into the summer sunshine. Visiting places like the raspberry farm gives us a chance to view farm animals like sheep. Many farms will have lots of adorable baby sheep right now. Be sure to explore local farms in your area to see what different types of animals they have!
Photo credit: JennyFig Photography
Photo credit: JennyFig Photography
After visiting the baby sheep, we came home and decided to do some colouring. I printed out a few Shaun the Sheep colouring pages for Miss O and let her go to town.
Have you met Shaun the Sheep? He’s the mischievous yet lovable sheep who originated in the Wallace & Gromit cartoons and earned his own hilarious spinoff cartoon. You can check out the video here: https://goo.gl/YxsbiY
After colouring we decided to bake some cupcakes. We decorated them to look like Shaun the Sheep! It required only a few simple ingredients and Miss O had lots of fun. Holly and I are big advocates for getting toddlers involved in the kitchen. Cupcakes from a box are one of the easiest things you can make with kids. And who doesn’t love decorating them after??
To make the Shaun the Sheep heads, I pulled out my Cricut Explore Air. I put a picture of his head into the software and cut the shape out of black cardstock. After that I glued on part of a cotton ball for the hair and attached some googly eyes. You definitely don’t need to have a Cricut; simply print off a picture of Shaun’s head that’s about 2″ tall and cut it out with scissors. The cotton and googly eyes will add a bit of pop but are not necessary. Using a piece of scotch tape, attach a toothpick to the back and stick it into your cupcake!

Shaun the Sheep Cupcakes
Ingredients
- 1 box of chocolate cake
- 1 container of french vanilla icing
- Ziplock bag
- Mini marshmallows
Instructions
- Prepare your cupcakes according to the box directions. Most boxed cake mixes should include the directions for making cupcakes.
- Allow cupcakes to cool completely before decorating.
- Put some of the icing into a ziplock bag and seal shut. Snip a tiny corner off the bag to form a makeshift icing piping bag.
- Ice the top of the cupcake - only cover about half of the surface area as the marshmallows will push it down the sides.
- Put in your sheep head (instructions above in post).
- Stick the marshmallows into the icing.
- Let harden enough for the marshmallows to set before eating.
Pom Pom Sheep
While the cupcakes were cooling, I had to keep Miss O busy. We decided to make a simple sheep craft using some supplies I always have on-hand. I saved one of the Shaun the Sheep heads so we could make a pom-pom sheep! I pulled out a piece of green cardstock to represent a field of grass. She glued on the head and I drew her a big circle of glue in the shape of a sheep to stick white pom poms onto. I had a variety of sizes which is why I opted for pom poms instead of the classic cotton balls.
I cut out four legs from the leftover black cardstock and she stuck those on the page. From there you could set a whole scene on the page including a barn and even more sheep.
Another way to do this craft is with buttons but white buttons are the one colour lacking in my collection! I’m sure Miss O would have been very happy to make a pink sheep though. She prefers to sing “Baa Baa pink sheep, have you any wool?” She’s my little girly-girl!
Have you made any fun sheep crafts lately?
]]>
We are talking about MomCaves – a quiet place where mom can go and relax and unwind after a busy day. That place you go to get back to center and kick back with a few snacks to refresh and recharge. Taking time to rejuvenate is essential. Even more so with the multi-tasking we are all doing on daily basis. MomCaves are also all about you – they delight and inspire us.
So without further ado, we are sharing ours.
Andrea’s MomCave
My cave is pretty typical: It’s my office. Although I usually refer to it as my craft room. Crafting is my zen. I can craft just about anywhere with any medium and I’ll be happy but nothing beats the silence found in your own dedicated space. I only recently moved my craft room into this space as it was formerly the nursery so there still isn’t anything on the walls. This is just another place for me to get my craft on and get decorating!

I love my giant desk. As you can see, it holds a lot of stuff: an iMac perfect for blogging away or searching the latest pins on Pinterest. It also holds my coveted sewing machine and my Cricut Explore Air. There’s always a notebook on-hand as I just can’t escape the joy I get from writing down thoughts as they come. Holly and I have always been big advocates for putting pen to paper.
I also enjoy snacking while I work – I’m constantly eating something. When the salty craving hits, I often sneak away with a bag of Twistos Bites. I recently tried out the new Smoked Gouda Barbecue and they were delicious. When I’m hiding out in my MomCave, I can eat whatever I want without having to share!
Holly’s MomCave
My cave is not the typical room in my house. I find peace and rejuvenate in nature. For me that usually means hitting a trail for a walk or bike with my dog. (He never says no, that blessed adventure dog!)

The plus of this is – my MomCave can be found anywhere there is a little spot of nature. Near my last house, there was a terrific trail for this contemplation that stretched out with a small elevation gain and offered up spectacular views. Depending on the day and how much contemplation is necessary, you could easily walk a quick 2K loop or an even longer 5-8K route if you needed a little more time.

The rushing creek that runs right along the trail offers off several picturesque spots to sit and grab a snack. My most recent snack attack favourite has been Twistos Garden Thins in Sour Cream and Chive. It’s has the perfect crunch to satisfy your sneakiest of craving with a light cheese taste and real chives baked right in.

So now exploring my new backyard, I have already found several great trails and other outdoor spaces that are inspiring in their own right. I can’t wait to share more of them with you and our outgoing outdoor family adventures!
Enter To Win
Good news Moms! Get a chance to WIN a $2,000 gift card to a contemporary furniture and home décor store:
- Snap a photo of your Mom Cave or the space you dream to put one
- Tweet the pic or share on Instagram with @Janette_Ewen
- Tag the pic with #TwistosMomCave
In the latest instalment of our alphabet craft collection you will find C is for Caterpillar. Don’t forget to check out A is for Apple and B is for Bear.
Once again, I used my Cricut Explore Air Wireless Cutting Machine to cut out the letter C and the circle for the head. Both of these items can very easily be cut out with scissors as well – it’s a great lesson in dexterity for young kids! Aside from that, you only need some big fuzzy pom poms, a pipe cleaner for the antennae and some googly eyes! And of course some glue for attaching everything.
Miss O always loves it when I bust out a craft involving pom poms, particularly the pink ones! Let’s be honest: Who doesn’t love pom poms?
Here are some excellent Caterpillar books ideas including the classic Eric Carle book that I’m sure was the first to come to mind!


This is the perfect craft to accompany any of the books shown above. It’s also really easy to prepare if you’ve left it to the last minute! The items can be picked up at your local dollar store for minimal cost. I use cardstock for the alphabet crafts but construction paper works just as well.
Don’t forget to cut those pipe cleaners in half – that’s all you need to make one set of antennae. Fold in half and make some curly little ends on it! I used a plain black marker to give my caterpillar a little smile. Let the kids go to town with some jumbo fuzzy pom poms in a vast array of colours.
Don’t miss the other letters in the Alphabet Craft Series!
*This post contains affiliate links.
]]>
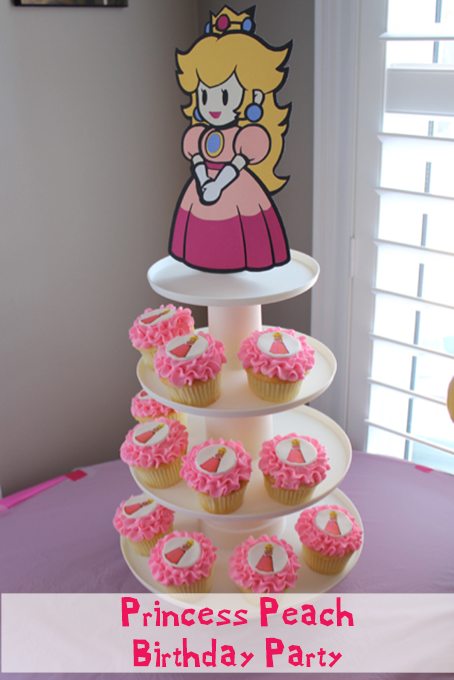
Miss O just turned three. When asked what theme she wanted for her birthday, she requested Princess Peach. Now, Super Mario birthday decorations are difficult enough to locate. Princess Peach is damn near impossible! This meant mommy to the rescue. And I think I did a great job of satisfying her wishes.

This birthday banner features Princess Peach’s crown as the backdrop with letters in a font reminiscent of the Super Mario logo. These were made on sparkly cardstock using my Cricut and strung on a line of yellow ribbon.
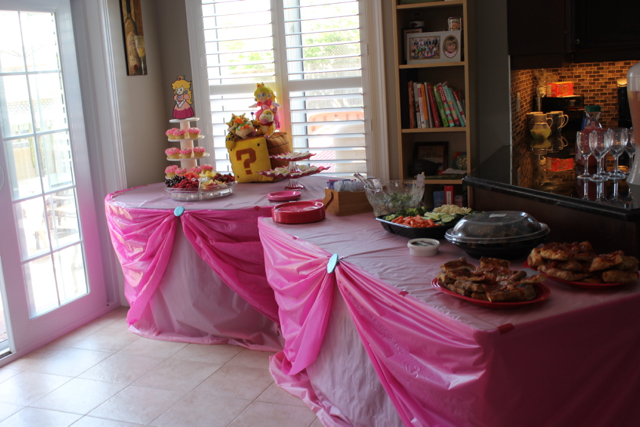
The food tables are done up to resemble Princess Peach’s dress. Using rolls of plastic tablecloth, I did a layer on top in baby pink as well as one that wrapped around the front. I then wrapped a piece of dark pink around the front and gathered it in the centre. I fashioned blue “buttons” to match Peach’s necklace & earrings. I simply found some oversized pins in my house (one is from our trip to Disney) and wrapped blue satin fabric scraps I had handy around it and taped it to the back. The pin made it easy to attach to the dark pink gather and helped cover the tape I used to secure the gather!

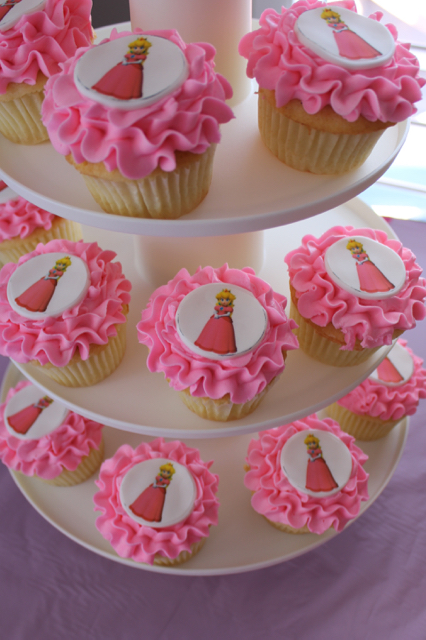
I hired a local cupcake store to make some pink cupcakes with a printed fondant centre. They are made using edible ink. Many cupcake stores will offer this feature which is a great way to accommodate your child’s wildest dreams for their birthday party. The topper on the cupcake stand was a labour of love. I made it using cardstock in my Cricut Explore Air. It took a few hours to design everything in the software and then assemble it all. I only made the one because it took so long to make!
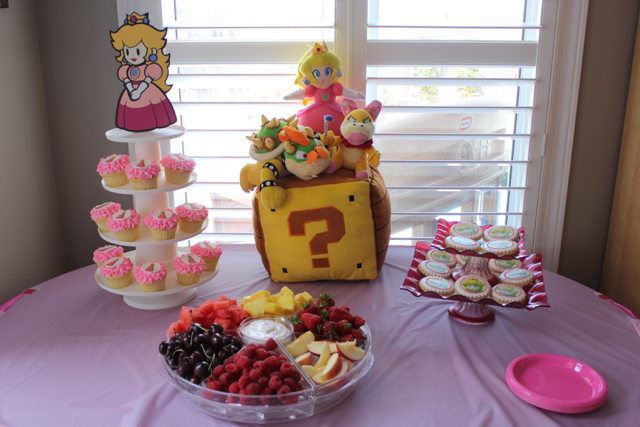
To decorate the table, I used a variety of stuffies we already had around the house. We’re a geeky bunch with a huge love for all things Super Mario. Miss O refers to herself as Peach, she calls Daddy “Bowser” and I am “Cutie Pie” (her actual name is Wendy Koopa but in the old 90s TV show she was known as Kootie Pie). There were other stuffies in various areas around the house as we have an abundance of Princess Peach ones that Miss O has amassed in the past year. We also had some cookies made with a similar process as the cupcake toppers.
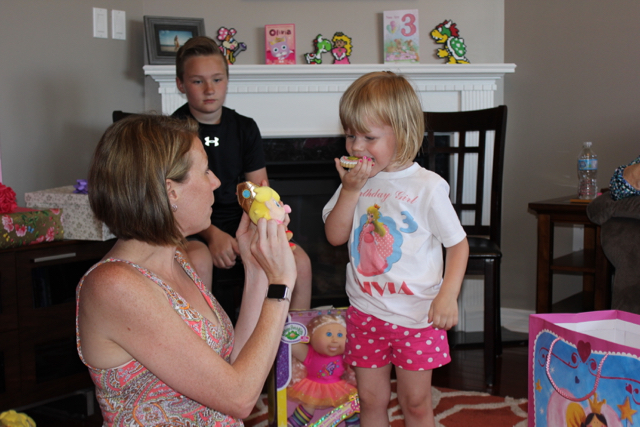
The birthday girl is wearing a custom shirt my mom had made for her featuring none other than Princess Peach herself. Here, she was eating a cookie with Peach printed on it while receiving a Baby Peach stuffy. On the mantel you will notice that I also did some Perler crafts of Peach, Bowser, Kootie Pie and Yoshi – she refers to her little brother as Yoshi. It was like a family picture on the mantel!
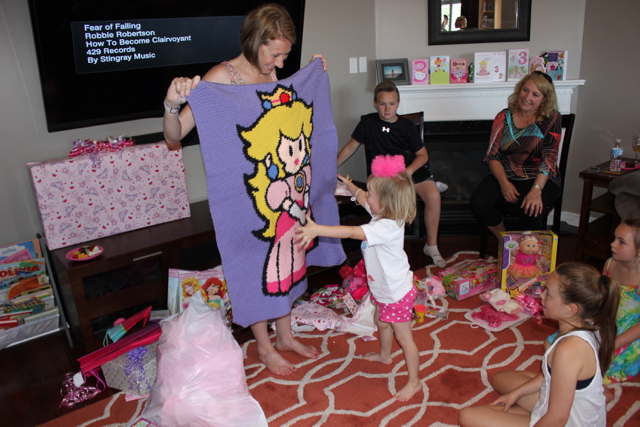
The final gift is a labour of love made by my mother. It is a handmade crochet blanket featuring…you guessed it: Princess Peach. She still has the border to complete but Miss O was over the moon about her beautiful new blanket. We all foresee her carrying it around like the character Linus from Peanuts.
All-in-all, the party was a success. Miss O was overjoyed with all of the Princess Peach goodies she received for her third birthday. By the way, use our how old am i tool to see that 3 years old is also 26,280 hours old! Can’t believe she turned THAT old! All in all, it was a wonderful day spent with family. Since she is a lover of all things pink and has been from the start, I got to reuse many of the items from her first birthday. I hope this party inspires you when your own little geekling requests a Princess Peach birthday party!
It’s time for another addition to the alphabet craft lineup! Be sure to check out A is for Apple as well.
I simply adore these alphabet crafts. They’re a great way to get kids hands-on with learning. These can be done simply as a fun craft or used to complement a book or two on the subject. For the letter B I decided to go with Bear because he just looks so stinkin’ cute!
Books About Bears


For this letter craft, I used my Cricut Explore Air to cut out the letter B and the circles/ovals for the ears, paws and snout. This is also easily done by hand. I did the B in a darker brown and the ears, paws and snout in a lighter brown. I added some googly eyes and used a black marker to add the details – you could also use a crayon, pencil crayon or pen.
I prefer to work with cardstock but you can just as easily complete this craft with construction paper. If cutting by hand, it is much easier to cut the construction paper. You could also have some fun with it and use a paper bag if you don’t have any brown paper handy. If you are working with a Cricut, I like to use Arial Black as the font for my letters.
Another alteration to this craft would be to make a panda bear using black & white paper.
*This post contains affiliate links.
Be sure to check out other letters in the series!
Me: “Do you want to do a craft?”
Miss O: “YEAH!!!!”
The magic words. If she’s driving me batty, I just say the magic words and she will sit down and do just about any craft that I come up with. I recently purchased a Cricut Explore Air
which is pretty much the best thing ever. When I need something quick, I cut out the shape of her favourite character/animal/food/etc. and she will colour it all in. I decided to embark on a more educational project in the form of letters turned into fun crafts. These alphabet crafts are a great way to turn learning into fun.
It only made sense to do A is for Apple. To really get your kids into the craft, start by reading a book that has your subject included. There are a number of books available out there that include apples that your toddler is sure to love.
Ten Apples Up On Top by Dr. Seuss

Johnny Appleseed

Up, Up, Up! It’s Apple Picking Time

Apples Grow on a Tree

For this alphabet craft it only seemed fitting to make the A a nice, bright red so it looked just like a fresh, juicy apple. Including a stem with leaf and a little wiggly worm added a nice touch. They are all cut from cardstock using the Cricut Explore Air. The seeds were drawn on with a black marker.
You can use a Cricut to design your craft or you can simply cut everything by hand. Cardstock is definitely not necessary – construction paper will also work just as well. If you are using your Cricut, I like to use Arial Black as a font. I find it is bold enough for the crafts and is very simple – young children might not understand loopy letters as well as they would a solid, block letter.
Instead of a worm you could also draw some ants to tie in your letter A even more. Once everything is cut out, simply glue it all onto a piece of white paper!
Have you done a letter A craft like this one? I’d love to hear all about it!
*This post contains affiliate links.
Be sure to check out other letters in the series!
We’d love to hear how your experience went if you tried something of ours! You can always comment with your questions or how it went on a post or connect with us on social media: Facebook, Twitter, Instagram, or Pinterest.
CONTRIBUTORS
Fresh & Fast Family Fun Starts Here!
With six kids between ages 2-7, it’s gotta be fast and easy. We understand that you’re flying by the seat of your pants, and balancing priorities. We aim to inspire you to do-it-yourself, get outdoors and add simple homemade recipes that make family life fun and fresh. We’ve tried it – and it works.
Our blog is written by the contributors mentioned above. It started with Andrea, a suburban stay-at-home mom who enjoys all crafty mediums from felt to peeler beads; Holly, a rural farm mom who loves being outdoors, gardening and healthy food and Melanie, a busy working urban mom who loves whipping up new recipes and playing with the latest techy gadgets.
Smashing a computer long ago in grade nine yielded a beautiful friendship. It’s been one of those friendships that has lasted more than a decade. We’ve lasted from ICQ to FaceTime, from not-speaking-to-you-ever-again to hey-there, and from letter writing to blogs. The old adage about friends becoming your family certain rings true.
We’ve always had plenty to share. As teenagers, we got grounded from the phone abundantly, so we creatively purchased ourselves walkie-talkies with the right distance range and would gab on to each other on them every night. (At the time, that was cutting edge electronics).
We founded our first blog in the 90s via HTML, and blogged through teenage angst, flinging pudding (don’t ask), and poetry. It was the days of Tripod, Geocities and Pegasus mail. We have these brilliant phone calls each week where we talk about parenting, crafts, and life in general. Think about our posts as conversations come to life. If we survive these little kid years, we might even do a podcast someday.
Melanie has recently joined our team of awesomeness. She is the missing piece of the trifecta. She is a busy working mom who lives in the heart of Toronto. She’s mom to Mr. S, the 7-year old with a heart as geeky as his mom’s and Miss A, the sweet little girl who has William’s Syndrome, a genetic condition. You can learn more about Melanie’s trials, tribulations and advocacy as the mom of a special little girl at www.mommydo.ca.
Andrea
Hi! I’m Andrea, momma to Miss O (2012) and and Little J (2014). We live in suburbia just outside of Toronto (Burlington, Ontario) where I was born and raised along with the hubby. I’m a thrifty, crafty geek who enjoys all mediums from felt to sewing to perler beads. In the past I’ve dabbled in scrapbooking, jewelry-making, hand-sewing felt projects and more. You name it, I bet I’ve tried it! My latest venture is into the Cricut world. In my free time (when I’m not crafting or working on websites), you will find me at the local mall scouring for deals with Tim Hortons in hand or redecorating my house….again.
I have the attention span equal to that of my children. All things DIY have to be simple and able to be completed in a day. I just don’t have the patience nor the desire to spend months working on a quilt or a weekend refinishing my hardwood floors. My kids keep me on my toes and as such, don’t allow me the freedom to spend an entire day sewing something fancy so it needs to be completed between their bedtime and mine. I change my mind as often as I do my hair so my crafty medium of choice tends to change month to month.
I’m currently learning how to sew, creating more quick recipes, thinking up new and fun ways to entertain my kids and drooling over the newest Cricut.
Holly
In 2009, my husband and I got married, then two weeks later shucked off our Ontarian urban life and made a run for the mountains. We’ve been here in the foothills of the Canadian Rockies ever since. We renovated a 1950’s mill home in our spare time from top to bottom (a little project we like to call HoboChic) over 6 years, and soaked up mountain life.
More recently, we took an even bigger leap of faith and changed jobs & locations again. We have moved on to our biggest project to date – a 1950s farmhouse and 12 acres of land that need a lot of love (and elbow grease) just out of Mayerthorpe, Alberta. This is an incredible change for two suburban Ontario kids, as we discover how to produce food for our family and adjust to rural, country life.
I have been blessed with two beautiful children – Mr J (2011) and Miss P (2013) and one active border collie, Milton. I work full-time at the local Recreation department. In my free moments, I am exploring, geocaching, canning, and gardening (when there’s no snow!). I’m a passionate advocate for growing your own food, and getting children outdoors in nature. We’re an active family who loves swimming, skating, skiing, hockey and camping (just to name a few).
Melanie
Hi, I am Melanie, a busy working mom revelling in the perfect imperfection of the modern world. Born in Northern Ontario, I now live in Toronto with my husband, 2 children Mr S (2009) and Miss A (2012), and Sir Squeaks-A-Lot, the guinea pig. I love hot tea, the latest gadgets, craft beer, sweater-weather and the unexpected beauty in life. At night, I dream about an organized home and self-ironing shirts. My favourite topics to write about are: food from scratch, tech for grownups and kids, special needs parenting, holiday traditions and trying new things.
Sarah
I am a busy mom to 3 kids, so my days are typically filled with tea parties & story books, singing & dancing, crafts (for as long as a 3yo’s attention span will allow) & cuddles. All the while trying to keep up with laundry & cleaning & meals (we have PB&J sandwiches for dinner more often than I’ll ever admit). The days (& weeks & months) seem to speed past so I try to soak up as much as I can each day.
Born and raised in Ontario, my whole life changed in 2011 when I moved to Nova Scotia. Just over a year later I started dating my partner, and soon after we started our family. We have Allie (2013), Emily (2015), and Lindsay (2017) – and I certainly cannot forget our 16 year old black lab, Rocky, who is our biggest baby.
In my spare time I absolutely love baking, enjoy sewing (my machine may be collecting dust at the moment), and write to several pen-pals around the world. I love all sorts of crafts, especially papercrafts – from scrapbooking to cardmaking to paper loop wreaths. I also have a long lost love of photography which quickly fell by the wayside when I started having children, and I am working on making that a priority again.
]]>