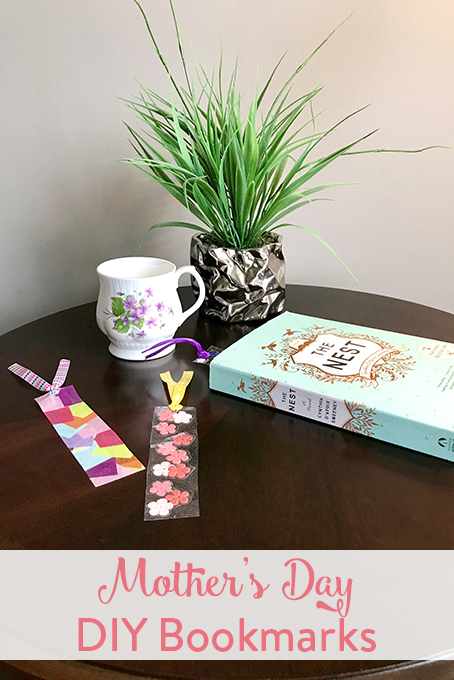
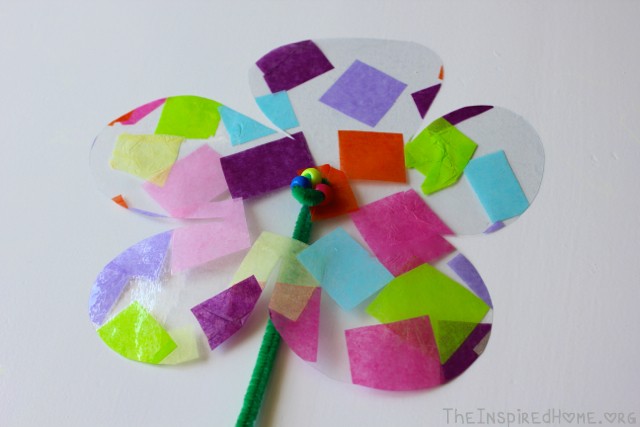
Contact Paper DIY Bookmarks
I love love love contact paper crafts for toddlers. The possibilities are endless and the mess is usually non-existent. The main use for contact paper in our house is to assemble beautiful “stained glass” creations such as rainbows, hearts, shamrocks and more. With Mother’s Day quickly approaching, I came up with the brilliant idea to have the kids make DIY bookmarks for the many avid readers in our lives.
DIY bookmarks can be made by squishing so many cute items between two pieces of contact paper. I have a bevy of craft supplies in my home but if you don’t have a giant stash like I do, head to the dollar store! You can buy everything you need which makes it the perfect dollar store craft. Wander the craft aisle and have the kids pick out something thin to press between the clear sheets. Think sequins, stickers, tissue paper, gems, go to town! You will also need to pick up some ribbon.
Another wonderful thing about these DIY bookmarks is that they require very little prep. This makes for a great last-minute gift for just about anyone for any occasion (ssshhhhh, we won’t tell!)
What You’ll Need
- Contact paper (this is also known as “book cover” in my local dollar store – found near the envelopes)
- Items to press
- sequins
- gems
- stickers
- tissue paper
- fake flowers
- get creative!
- Ribbon
- Scissors
- Hole punch
How-To
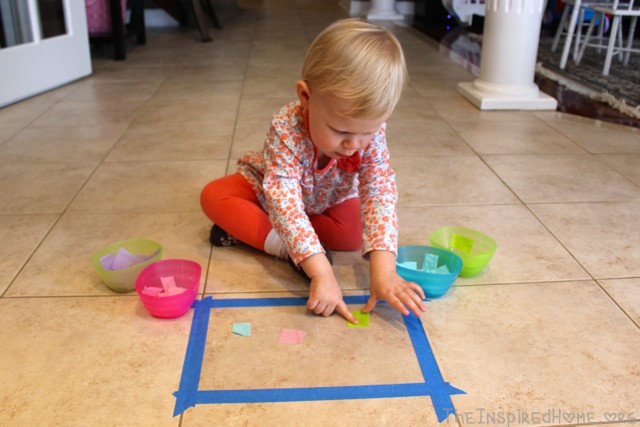
Cut out some strips from the contact paper about 1.5″ wide x 6″ long. You will need two strips for each bookmark you plan to make.
Peel the backing layer from one of the strips. Place it sticky-side up on the table. You can use a bit of painter’s tape to adhere it to the table so it doesn’t move around while your child goes to town sticking all sorts of things to the surface. Once they are complete, remove the painter’s tape. Peel the backing from another strip and place the sticky sides together to press everything between the layers.
Trim around all the edges as necessary to remove any sticky sides which are not lined up. About 1-2cm from the top, punch a hole. Cut a piece of ribbon about 2-3″ long. Use a lighter to slightly melt the ends so it doesn’t fray. Fold the ribbon in half and feed the ends through the hole. Loop the ends through the bottom and pull snug.
And there you have a beautiful, hand-crafted DIY bookmark perfect for mom or grandma. Pick up the latest bestseller for them and tuck the bookmark inside with a little note wishing them a Happy Mother’s Day.

For more great crafts, homemade gifts and meal ideas for Mother’s day, visit here.
]]>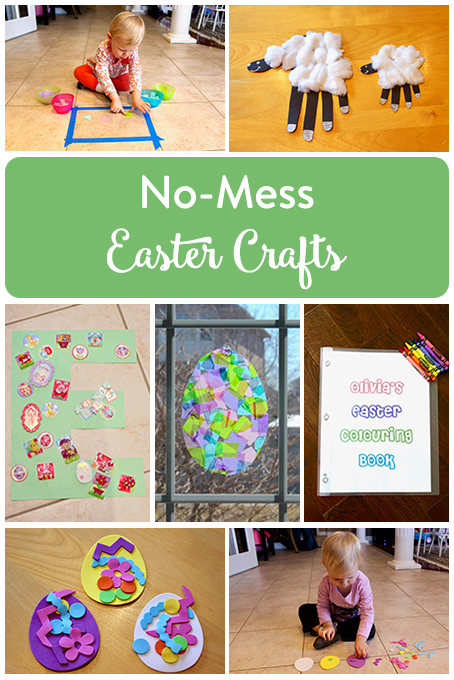
No-Mess Easter Crafts for Kids
If you’re a follower of our site then you are familiar with the fact that my kid hates mess. She detests having anything yucky on her hands. Paint is definitely out of the question. Glue is usually a no-no as well. Finding new crafts for her can be very difficult as a result. If she had her way, she would colour all day, every day. A handful of crayons and a blank sheet of paper are just fine by her but I like her to explore other crafts. Here are some Easter crafts that were a big hit with Miss O. I hope your non-mess-loving kid enjoys them as much as she did.
Stained Glass Easter Egg
Contact paper + tissue paper = delight for my child. The contact paper stickiness doesn’t bother her simply because the sticky remains on the paper, not on her hands. These are two craft supplies that can be applied to just about any season, holiday or event.
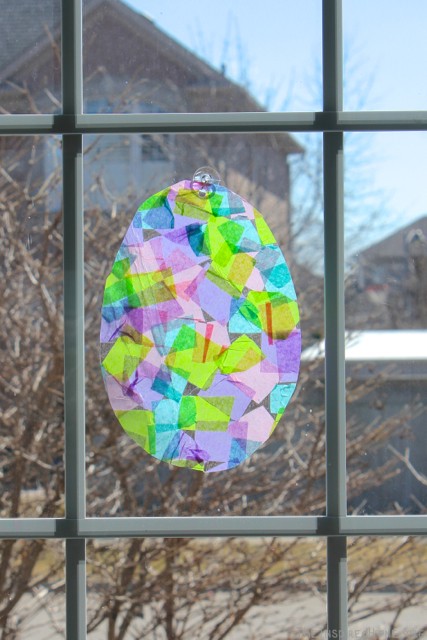
How-To
Cut two equal rectangular pieces of contact paper roughly the size you’d like your egg to end up. Place one piece on a flat surface, sticky side up. Tape it down with painter’s tape. Cut up some little squares of tissue paper in a variety of Easter colours – we opted for pink, lilac, light blue and a bright green. Let your little one put the squares of tissue all over the piece of contact paper.
Once they are happy with their work of art, remove the tape and lay the other piece of contact paper on top, sticky sides facing each other. Next, cut and egg shape out. I did a freehand egg but you can also use a template if you prefer.
Punch a hole in the top of the egg and hang from a suction cup hook or a piece of ribbon or string in your window.
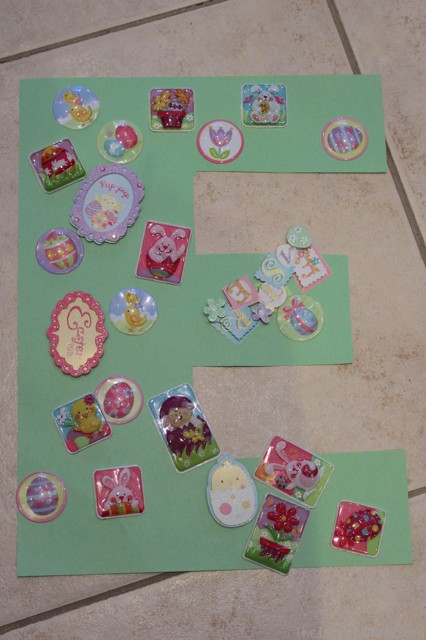
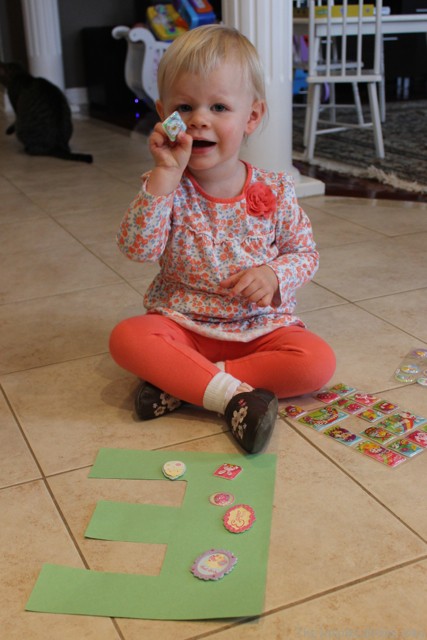
E is for Easter Sticker Art
Why do little girls love stickers so much? I don’t have a little boy so I’m not sure if they feel the same way. Grandma always has a stash of stickers in her purse for Miss O. I try to limit stickers to outside the house only; however, this still backfires. I found a Dora sticker stuck to the inside my coat the other day. Once the stickers come out, it’s mayhem. One thing I learned through this craft was that I need to limit the stickers and not simply hand her 3 giant sheets full of them. When I tried to take them away, a meltdown ensued. Aside from the meltdown, this craft was incredibly quick and easy to prepare and we learned all about the letter E!
How-To
Cut the letter E from a sheet of construction paper. I free-handed this as a capital E is pretty simple especially if you locate your mid-point on the right-hand edge of the page. Give the kids a stack of Easter stickers and let them decorate the E as they wish. Have them tell you what is on the stickers if they can; otherwise, teach them what is on the stickers. We had a selection of egg, flower, bunny and chick stickers from the dollar store.
Younger kids may fare better with puffy, more solid stickers as opposed to lightweight paper stickers. Ours were like giant bubbles and Miss O had just as much fun choosing a sticker and plucking it from the page as she did decided on a place to stick it.
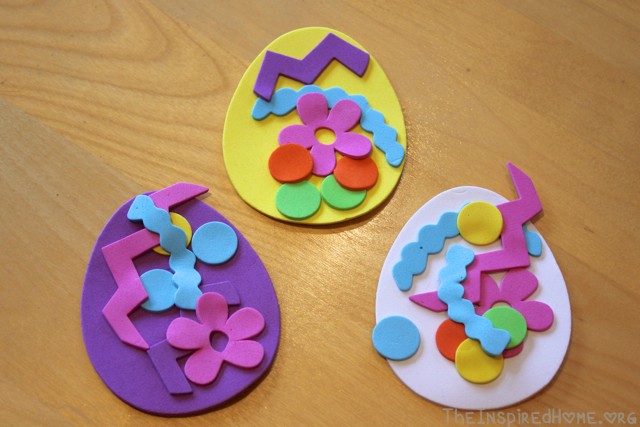
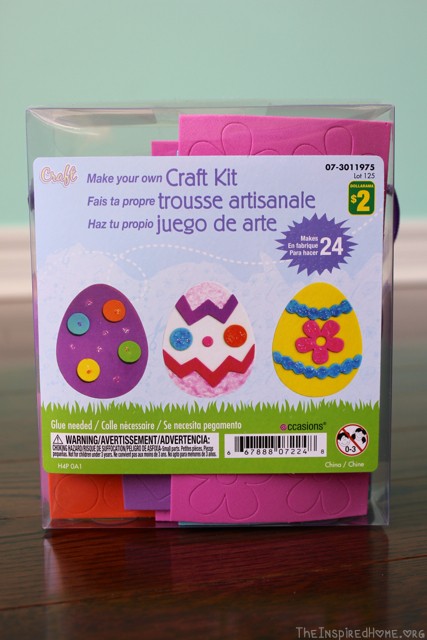
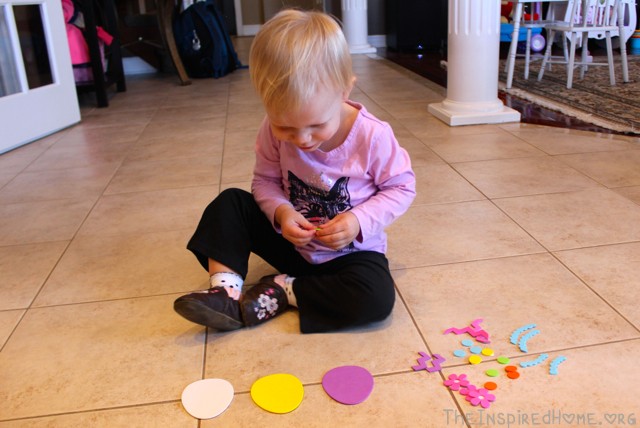
Foam Sticker Eggs
I went to the local dollar store and found a kit with egg shapes and various decorative stickers. As I mentioned above, any craft involving stickers is a huge hit with Miss O. This time I learned to limit the decorative stickers to a select few at a time – just enough to decorate each egg.
How-To
All you need for this craft are some foam egg shapes (these can be found either at your local craft store or else you can cut your own from foam sheets) and some foam stickers. My kit came with various squiggles and dots. You can easily make your own from adhesive foam sheets. Let the kids decorate them to their heart’s content. If you decorate enough of them, you can make a garland from them!
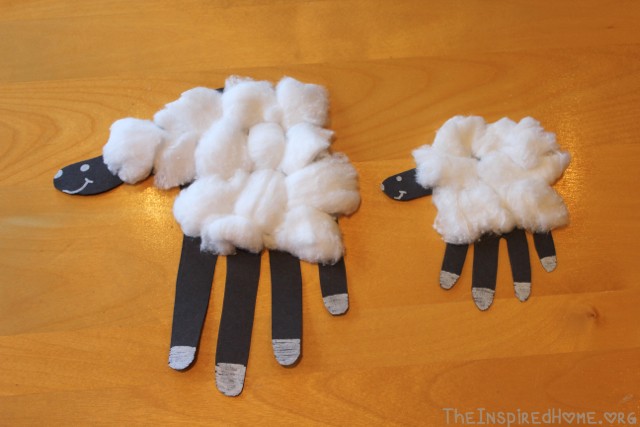
Handprint Sheep
White glue is the stuff nightmares are made of for Miss O (after paint that is). Crafts involving glue sticks tend to go over somewhat better pending she doesn’t actually have to touch the glue. Using cotton balls to adorn our little sheep is a great way to use glue without getting messy.
How-To
Using a piece of black construction paper and a pencil, have your child trace their hand (you may have to help them if they are younger). It will look best if the thumb is way out to the side and the four fingers are evenly spaced. Cut out the hand shape, making it circular at the wrist for the top of your sheep.
Next, put glue all over the body portion of your sheep and let the kids go to town putting cotton balls all over it! Once that is finished, use a white or silver crayon or marker (we used a silver Sharpie) to draw little hooves and a face. Voila!

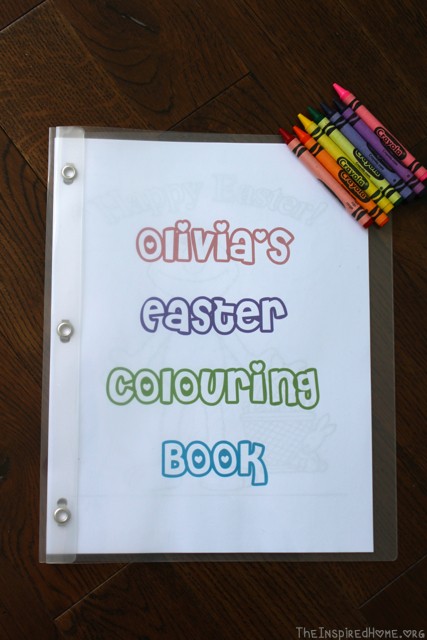
Easter Colouring Book
When Miss O is in a mood, I pull out the colouring books. I decided to make her an Easter colouring book so I could use colouring as a learning experience. It’s pretty easy to find Easter colouring books at your local dollar store but I wanted to cater it to Miss O by including some of her favourite characters as well.
How-To
All you need to make your own colouring book is a printer and a duo-tang or binder. A quick Google search for Easter coloring pages will garner you an endless stream of adorable pages to print. I saved the images to my computer and popped them into a Word file, ensuring each image filled the page. Here are two sites with a collection of cute pictures: Marshmallow Peeps Coloring Pages and Easter Coloring Pages. I decided to add a cover page as my duo-tangs are clear.
This is a great craft before Easter but also a nice non-candy addition to an Easter basket with a new box of crayons. For more no-candy ideas, check out this collection!
Hop on over to our Pinterest for even more Easter craft ideas!
Follow The Inspired Home's board Easter on Pinterest.
Looking for more great crafts, activities, and foods to celebrate Easter? Check these out.
Next, check out our ideas for Easter Baskets for Outdoor Kids.
]]>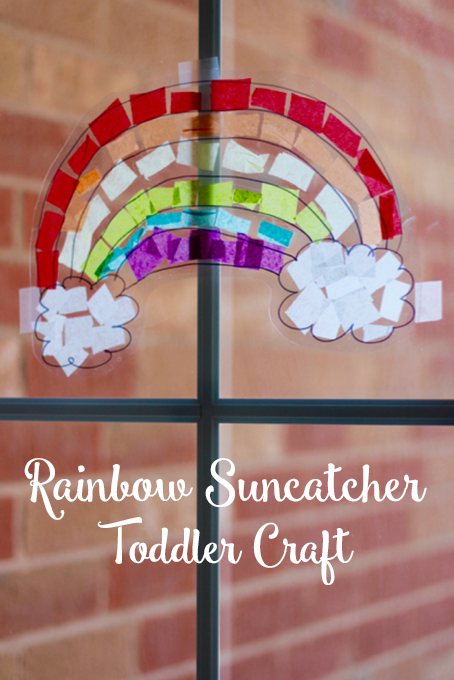
Miss O recently turned 4 and she is definitely a girly-girl. She loves rainbows and unicorns and Hello Kitty. She also loves crafting. Contact paper crafts are one of my favourites as they require little preparation, little mess and most importantly, little cost. Miss O has also really enjoyed the many different contact paper crafts we’ve done so I know that any new idea will be a hit. I always have the supplies on-hand which makes this a great craft to whip up last minute.
What You’ll Need
- Contact paper (dollar store!)
- Tissue paper in a rainbow of colours (dollar store!)
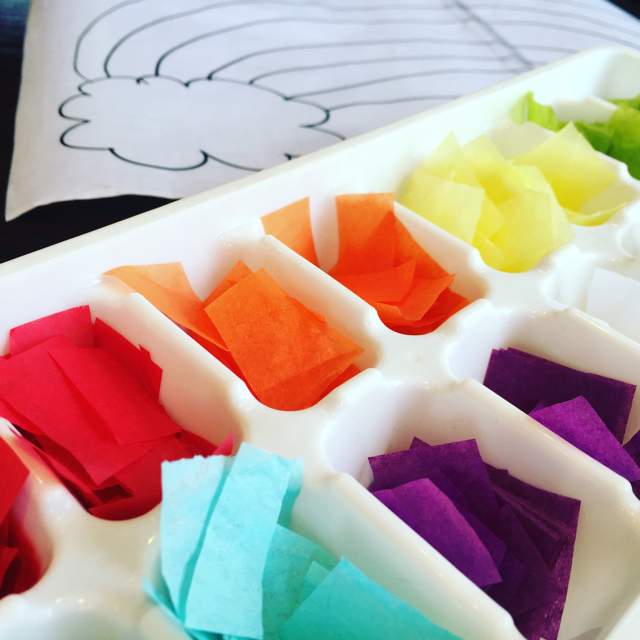
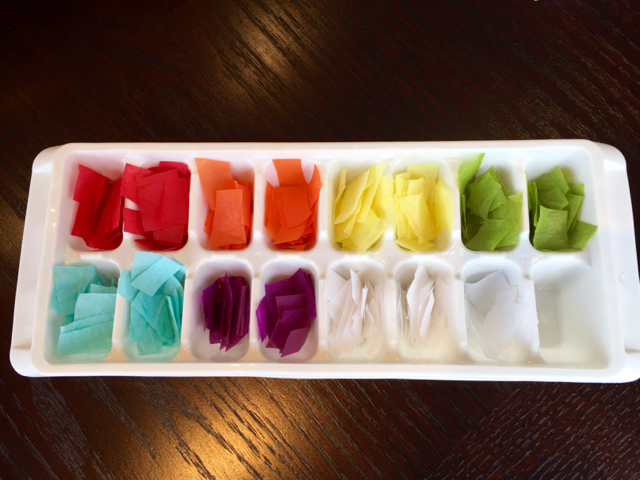
- A container to corral the tissue paper pieces (I use an ice cube tray from, you guessed it, the dollar store!)
- Scissors
- Permanent marker
- Scotch tape
How-To
First, cut two equal squares from your contact paper – I usually cut a rectangle, fold it in half then cut on the fold line. Size isn’t overly important – do it large enough to draw a rainbow.
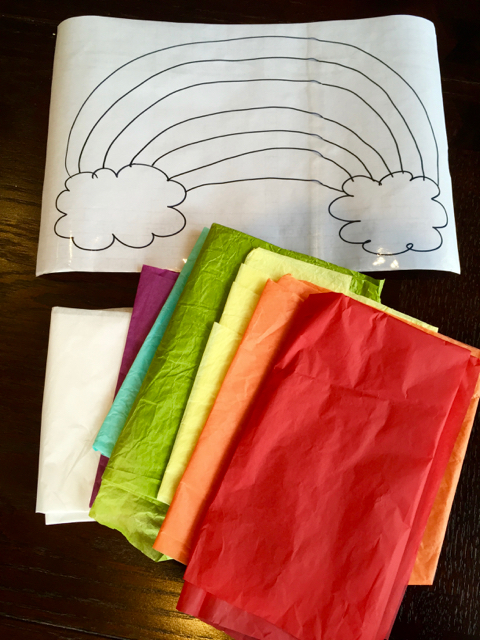
Next, you’ll need to cut up some little squares in each of the colours. I cut two strips about 1″ wide down the long side of the tissue paper and then cut the strips into approximately 1″x1″ squares. I tend to follow the red-orange-yellow-green-blue-purple colour scheme, omitting indigo. You’ll also need white for the clouds. Depending how tissue-happy your child gets and how big your rainbow is, you may need more squares. As you can see in the picture, Miss O doesn’t use very much so I had a lot of excess. If you buy ice cube trays with lids, you can just close it up and save it for the next contact paper craft!
Take one of the contact paper squares and draw a rainbow with clouds on the clear side. Peel off the backing and place the stick side up on the child’s work surface. I like to use a small piece of tape on the four corners to hold it down.
If your child doesn’t yet know the order of the colours in the rainbow, help them out by putting one square of each colour onto the rainbow and a white square in each cloud. You can see in the image below that I helped out Miss O a little bit. She knows all of the colours but tends to forget the order. Then let them go to town!

Once they have completed their rainbow, peel the backing from the other square of contact paper and place over the completed work – this will seal the tissue paper in. Cut around the shape of the rainbow and display it in your window. Now you will have a wonderful rainbow in your window to brighten up even the cloudiest of days.

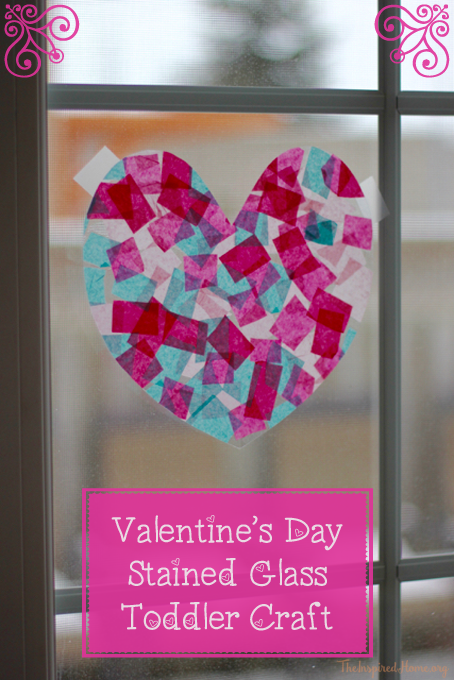
I love a good no-mess craft for my toddler. She feels the same way. She loves crafting but definitely doesn’t love getting messy. This is fine by me! Another dilemma for us is where to put her artwork. We have a stainless steel fridge which isn’t magnetic. I’m not a big fan of taping things to it so I’m left to find somewhere else to display her art. Making stained glass sun catchers is the perfect solution. As an added bonus, they dress up our back door wonderfully.
Another thing I love about stained glass crafts is that I always have what I need on-hand: contact paper, tissue paper, tape and scissors. That’s it! Only 4 things. The craft takes a little bit of prep before you can let your toddler jump in but it’s nothing more complicated than cutting out some squares. I usually do the prep after she has gone to bed but if your little one still naps (I wish!) then you can get this ready during that time. This Valentine’s Day stained glass toddler craft is guaranteed to be a hit with both you and your toddler.
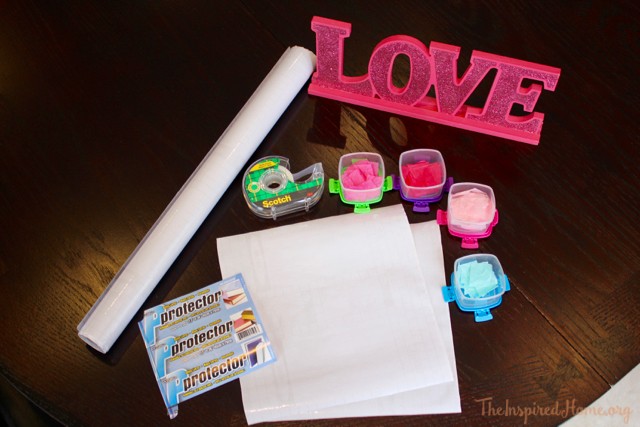
What You’ll Need
- contact paper (I buy this vinyl book protector at my local dollar store near the envelopes & bristol board)
- tissue paper in a few Valentine colours (my daughter loves “aqua” so I added that for her)
- scotch tape
- scissors
How-To
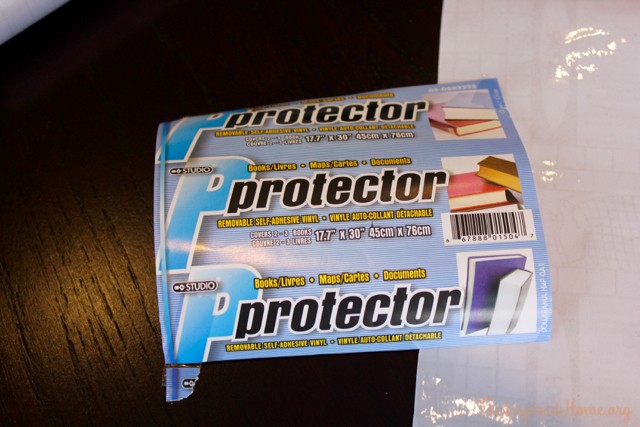
This is the label from the contact paper that I use.
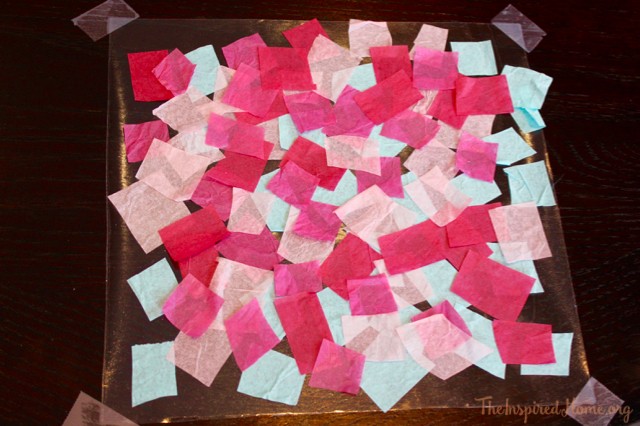
First, you’ll need to cut out two equal-sized squares from your contact paper. I did 10″ x 10″. I decided to set her up with one large heart. You may want to do a whole bunch of smaller ones. You will need two squares for each heart.
Next, cut up a few strips of each colour of the tissue paper into squares. Mine are about 1″ but it really doesn’t matter. Some of the colours I cut larger and others I cut smaller just for some variation.
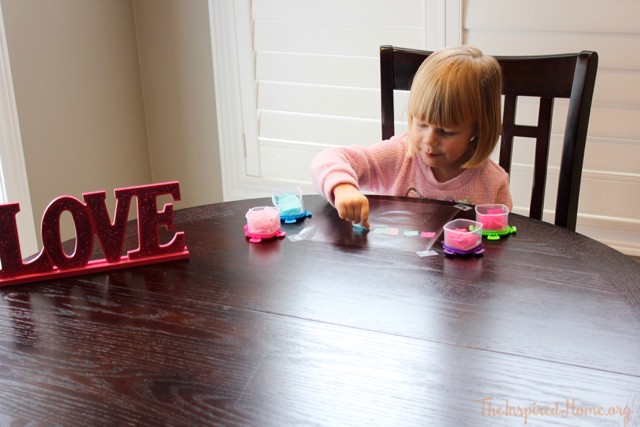
Clear off a workspace for your child on a table or even on the floor. Lay the contact paper with the clear side down. Lift the paper from the corners just enough to put a piece of scotch tape on each corner – you will be putting the sticky tape onto the sticky side of the contact paper. Peel off the paper.
Give your child some little containers full of tissue and let them go to town!
This is her completed work before I added the second layer of contact paper.
Once they have completed their masterpiece, you will need to place the other piece of contact paper on top to sandwich the tissue inside. Peel off the paper and line up the top edge of your square. Press out any air bubbles as you go and smooth it down.
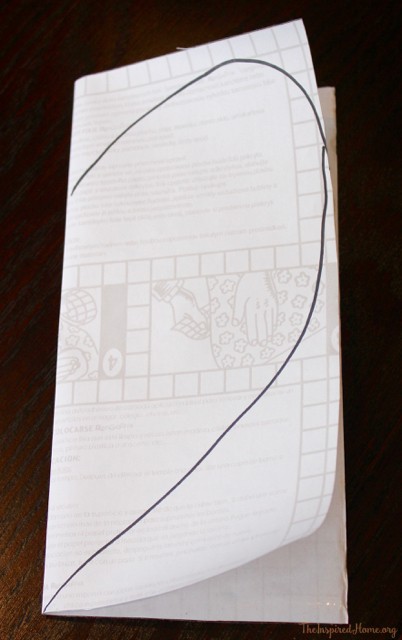
Fold your square in half (don’t give it a sharp edge, just enough hold it with your one hand). You’ll need to cut out a half-heart shape along the edge – you remember doing this in elementary school, right? I drew the half-heart onto the paper of one of the squares as a visual – don’t bother doing this yourself as you’ll be peeling this piece of paper off the vinyl thus losing your paper guide!
Once you’ve cut out the heart, display your toddler’s work of art on a window in your home. I secured it with some scotch tape but you could also punch a hole in it and hang it with some pretty ribbon. Everyone is sure to admire the beauty of this Valentine’s Day stained glass toddler craft.
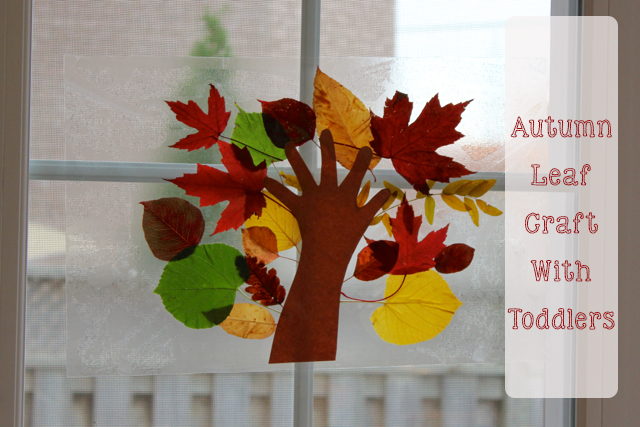
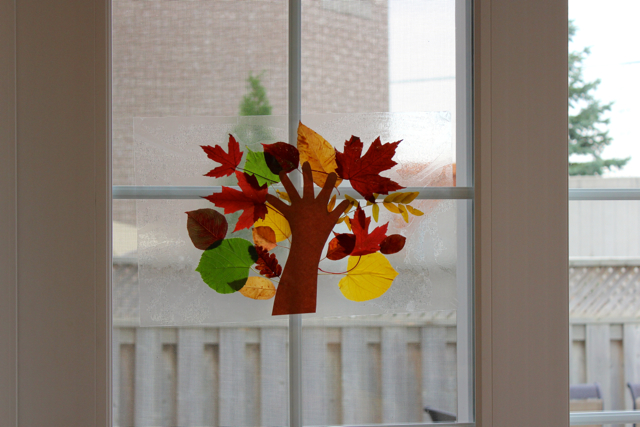
Daddy and Miss O recently went for a walk and collected a bucket full of pretty fall leaves. I wanted to come up with a craft we could do using the leaves. I’m a big fan of contact paper crafts – they are the perfect base for any number of crafts and the ensuing “stained glass” artwork makes my windows look pretty! This is a quick craft you can do any day. Everyone will also get some fresh air while exploring for leaves! Making this autumn leaf craft with Miss O was a great way to kill a little bit of time before I had to get dinner ready and she really enjoyed it.
Items Required
- a variety of leaves from the fall trees
- brown construction paper
- contact paper
- pencil
- scissors
How-To
Trace your little one’s hand on the brown construction paper including part of their arm – this will become your “tree”. Cut out the handprint.
Tape down a fairly large piece of contact paper to a flat surface, sticky side up.
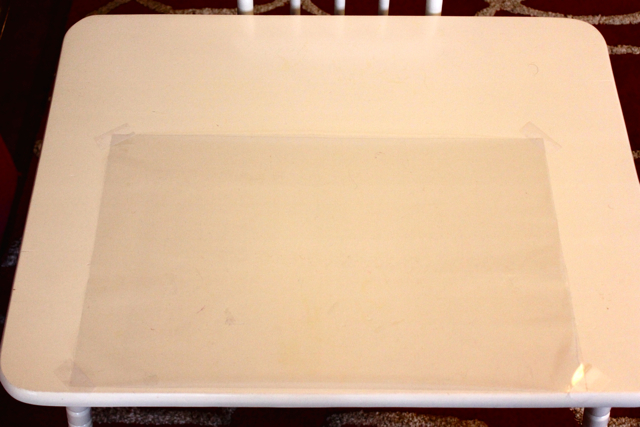
Next, put the handprint tree on the centre of the contact paper with the bottom of the tree at the bottom edge of the contact paper.
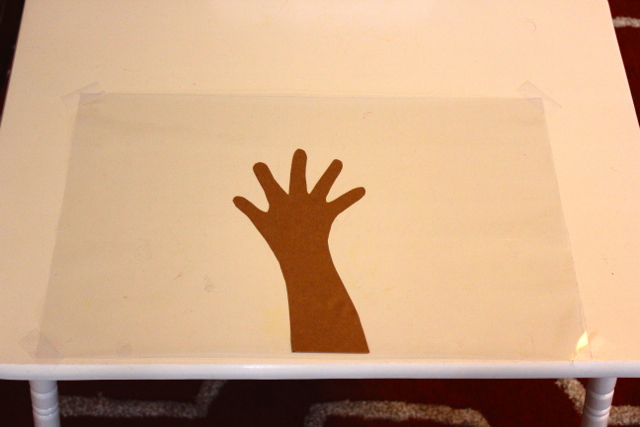
Let your little one stick leaves all around the tree!
Stick their masterpiece to a window in your home. If you prefer, you can lay another piece of contact paper on the back and hang it anywhere in your home.
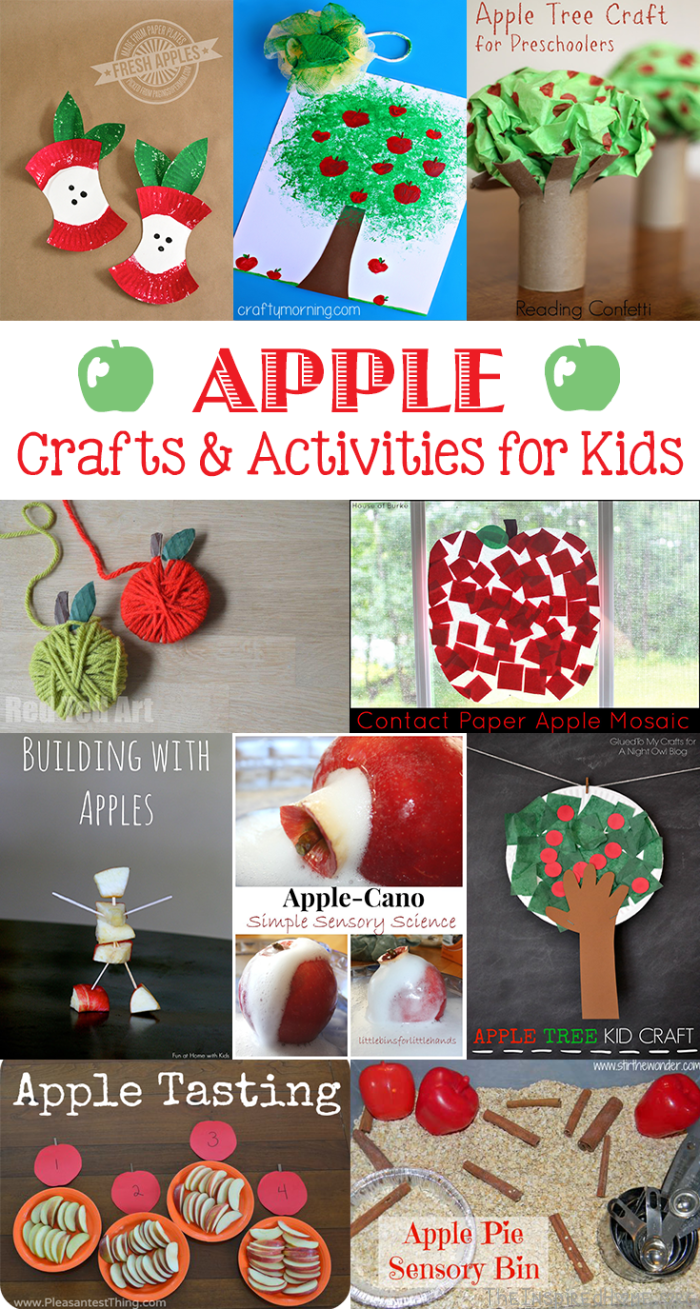
Nothing says autumn like a big bushel of apples. Use this delicious fall fruit to inspire some crafts with kids this season. You’re guaranteed to find a hit in this apple craft idea roundup! There’s a little something for everyone from baby footprint crafts to toddler & preschool crafts to science experiments. There’s even a play dough recipe and a sensory bin idea!

Apple Pie Play Dough from Wendy’s Hat

Paper Plate Apples from Paging Supermom!

Apple Tasting from The Pleasantest Thing
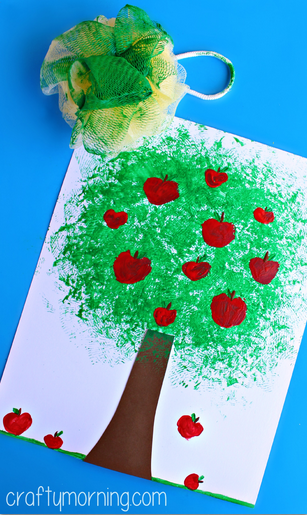
Pouf Sponge Apple Tree Craft from Crafty Morning

Apple Print Art from Teaching 2 & 3 Year Olds
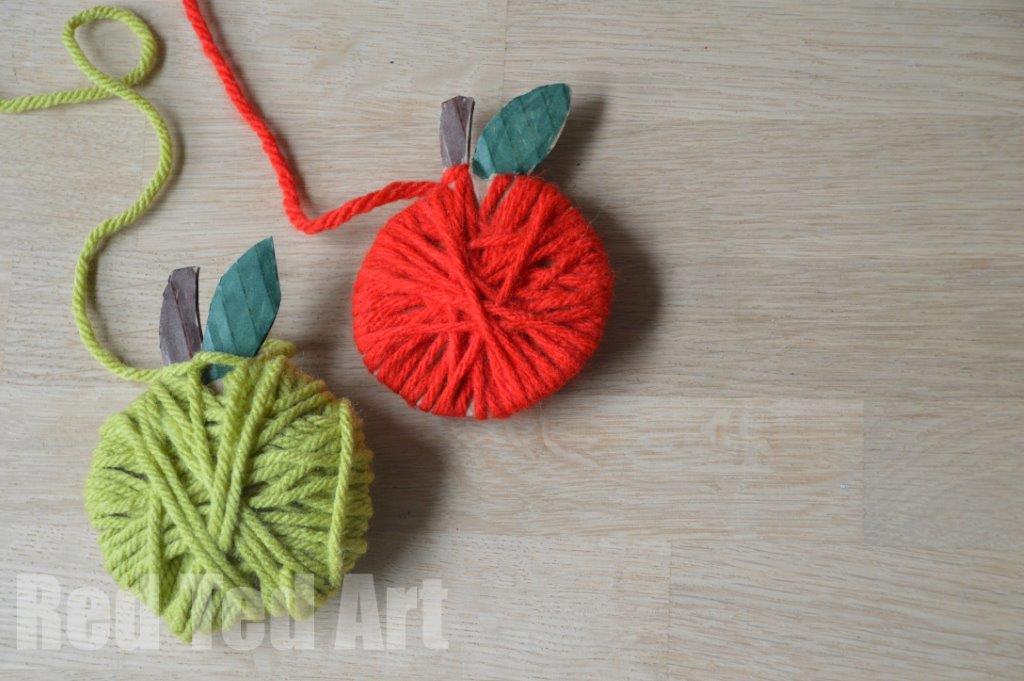
Yarn Apple Craft & Garland from Red Ted Art

Apple Tree Kid Craft from A Night Owl

Apple Tree Print from Motherhood on a Dime

Apple Pie Sensory Bin from Stir the Wonder

Scented & Edible Apple Pie Paints from Blog Me Mom
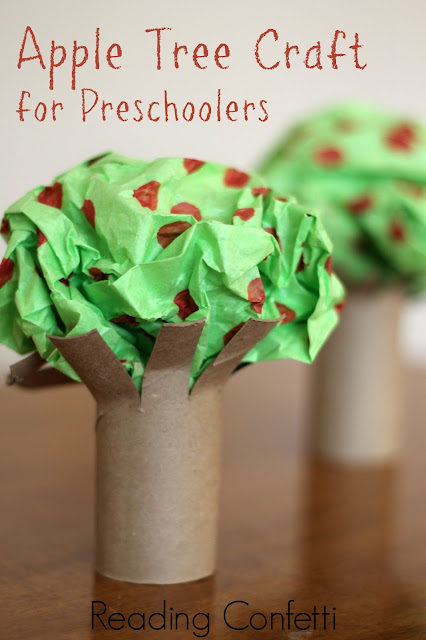
Apple Tree Craft for Preschoolers from Reading Confetti

Contact Paper Apple Mosaic from House of Burke
.jpg)
Building with Apples from Fun at Home with Kids
Apple-Cano Simple Sensory Science from Little Bins for Little Hands
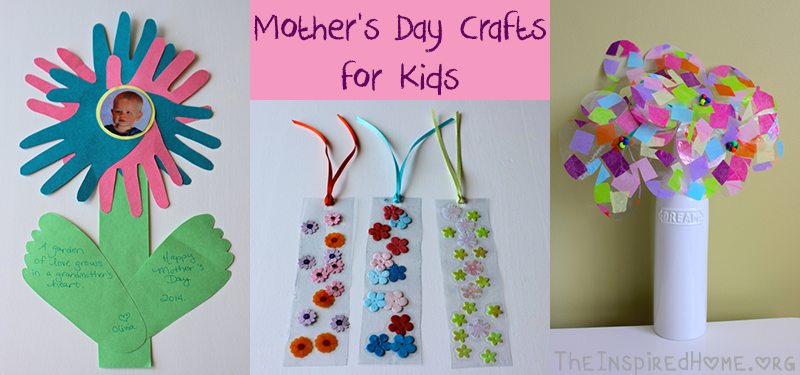
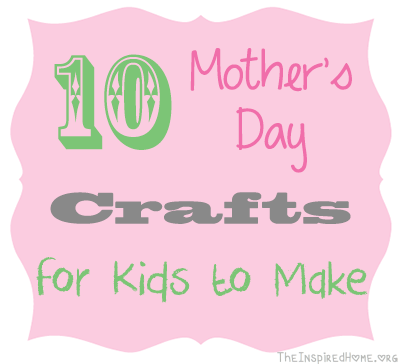
Looking for more inspiration for Mother’s Day Crafts for your kids to make? Miss O and I made these three awesome crafts. Best part is, they took very little time to do so they are great in a pinch. We have lots of grandma’s & great-grandma’s to make Mother’s Day gifts for. I don’t want to give them all the same thing so I like to change it up! These crafts are so simple that even dad can help make them *hint hint!*
Hand & Footprint Photo Flowers
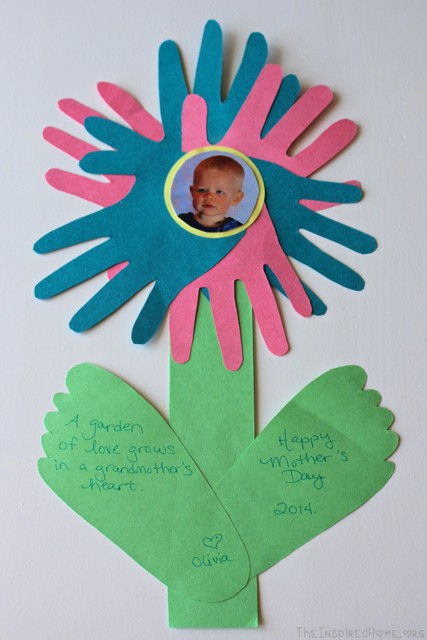
Items Required
- Construction paper per flower: 1 sheet of green, a small piece of yellow for the center and 1 sheet each of two different colours for the flower
- Photo of child
- Scissors
- Pencil
- Glue
Instructions
Trace each foot onto the green paper. On each sheet of coloured paper, trace a hand 3 times for a total of 6 handprints. Cut out all foot & handprints.
Cut a strip of about 2″ wide and 8″ long from the rest of the green paper for the stem of your flower.
Cut the child’s face out of the photo in a circle. Cut a larger circle out of the yellow paper. Glue the photo to the circle.
Arrange the handprints at the top of the stem like a flower, gluing them down as you go. Glue the footprints near the bottom of the stem as leaves. Glue the yellow photo circle to the center of the flower.
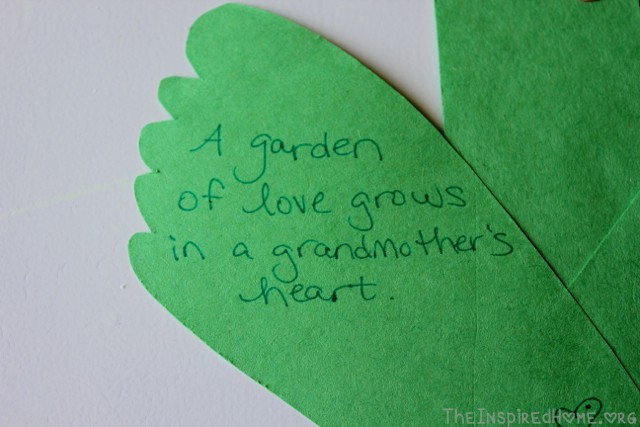
As this gift is for grandma, I added a small quote: “A garden of love grows in a grandmother’s heart.” I put this quote onto the left foot. On the right foot I put Happy Mother’s Day and the year. At the bottom I “signed” it from Miss O.
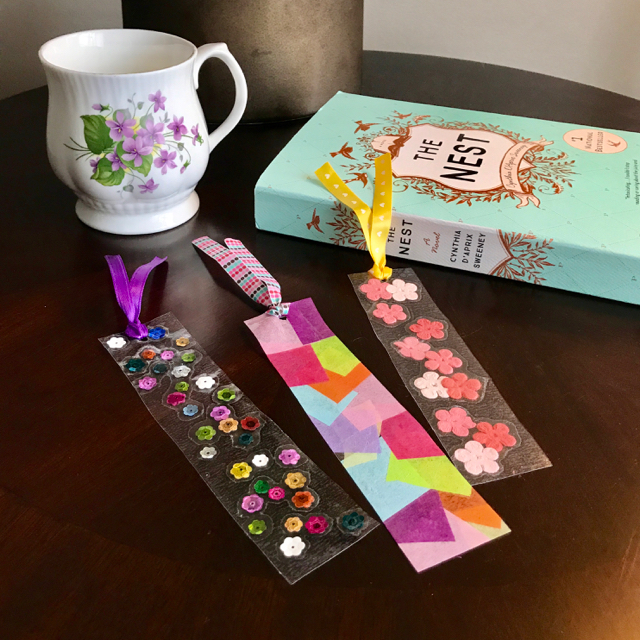
Contact Paper Bookmarks
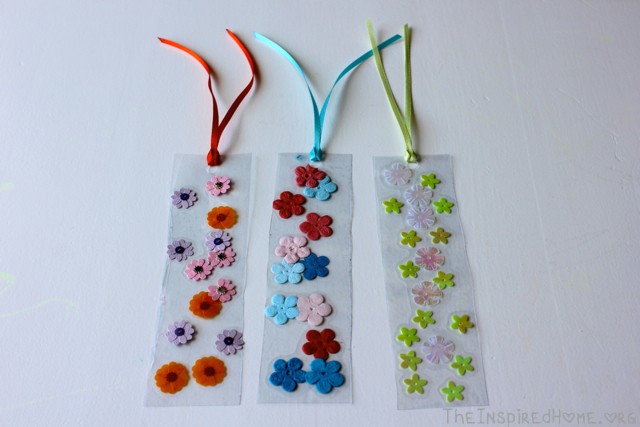
Items Required
- Contact paper: two strips per bookmark approx. 1.5″ wide x 6″ long
- Various embellishments such as small flowers, butterflies, sequins, etc.
- Ribbon
- Hole punch
Instructions
Remove backing paper from one strip (or multiple if you are making more than one bookmark). Use painter’s tape to attach the strips to a flat surface, sticky-side up. Let kids embellish each strip. Once complete, lay another strip of contact paper on top of each bookmark to seal. Punch a hole near the top of each bookmark and loop ribbon at the top for a tassel.
Contact Paper Flower Bouquet
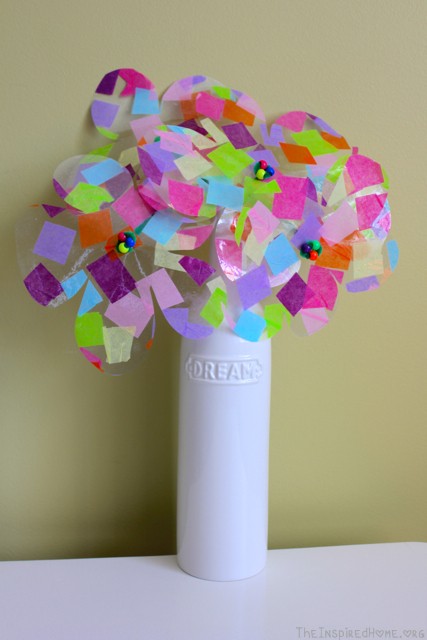
Items Required
- 2 large pieces of contact paper of equal size (depends how many flowers you want to make)
- Tissue paper cut into squares in a variety of colours
- Pipe cleaners
- Pony beads (optional)
- Scissors
- Vase or ribbon
Instructions
Remove backing sheet from one piece of contact paper. Lay on a flat surface, sticky-side up, securing edges with painter’s tape. Let the kids put squares of tissue paper all over. Once they are happy with how it looks (or you’re out of tissue paper!), lay your other piece of contact paper on top, sealing in all of the tissue. Using either a template or freehand, cut out as many flowers as you can. I suggest making them at least 4″ across.
Take a pipe cleaner and push through the contact paper from the back. String on 3-4 beads, if using. Loop the pipe cleaner back around and attach to itself to make a circle for the center of your flower. I just used one green pipe cleaner for each stem but you could use any colour. You could also make leaves!
Place your pretty flowers in a vase and give to mom or grandma on Mother’s Day morning! Instead of placing in a vase you could also tie a ribbon around the bouquet.
Don’t forget to check out some of our other Mother’s Day gift ideas!
]]>
Miss O has a great dislike for anything messy. This makes crafting with her a little bit difficult. She won’t touch paint, ink or anything wet. I gave her a bowl of water beads once and she freaked out. It’s a wonder the kid will take a bath. A few weeks ago we gave her a bubble bath for the first time. She freaked out because the bubbles wouldn’t get off of her hands. The beach was a disaster that lasted all of 10 minutes. I think you get the picture – she’s a very clean kid. Contact paper was a risk I was willing to take as the sticky paper is only sticky to the touch – it doesn’t leave anything on the hands. It turned out to be such a hit that she was sad when it was over! Looks like contact paper is my new best friend when it comes to crafting with Miss O. I’m sure you will have great success with this St. Patrick’s Day craft for toddlers.
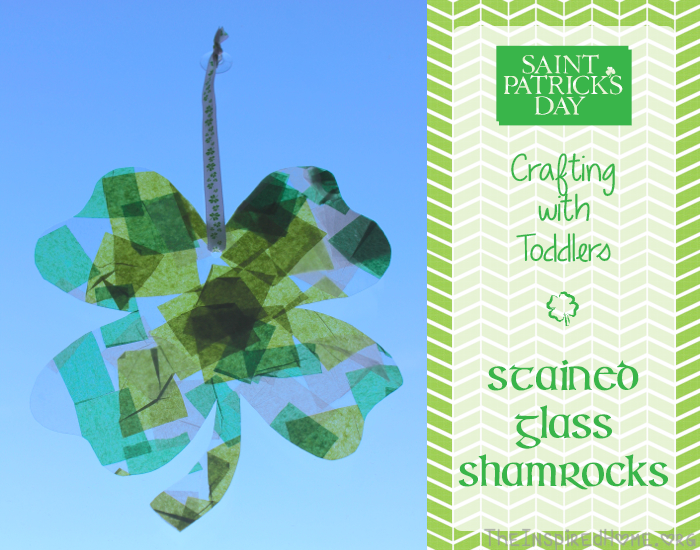
Stained Glass Shamrocks
Items Required
- Clear contact paper
- Green tissue paper cut into squares
- Alteration: Use varying shades of green or use a rainbow of colours
- Hole punch
- String or ribbon (I had some shamrock ribbon in my stash – perfect!)
- Suction cup with hook
How-To
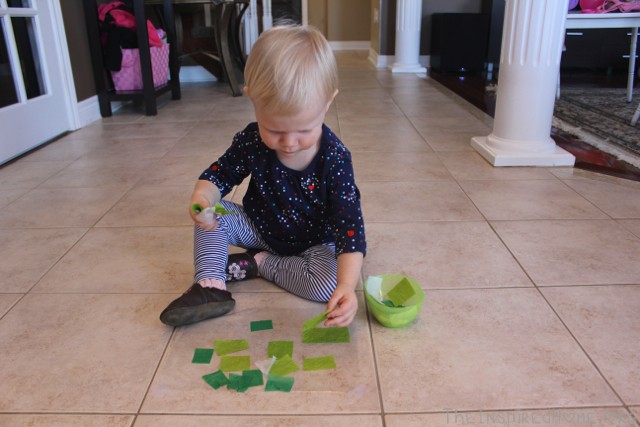
Trace, free-hand, or print a template of a shamrock. Cut two equal pieces of contact paper large enough for your template. Lay one piece of contact paper on a flat surface, sticky side up – you may want to tape it to the surface. Give your little one a pile of tissue paper squares and let them stick those squares to their heart’s content.
Once completed, place the other sheet of contact paper on top to seal the tissue paper. Next, tape your shamrock template to the sealed contact paper and cut out your shape. Punch a hole at the top, make a loop with your string and hang in the window from a suction cup with a hook. Voila! A beautiful sun-catcher.
Want more great ways to celebrate St. Patrick’s Day? Check out our Pinterest board!
Follow The Inspired Home's board St. Patrick's Day on Pinterest.

Looking for more great ideas on crafts, activities and food to celebrate St. Patricks Day: check these out.
Looking for some new St. Patrick’s Day decor ideas? Check out St Patrick’s Day Mantel + DIY Shamrock Garland.
]]>
One of my Hols’ Healthy Habits, (my SMART Resolutions) was about getting (more) organized. I tackled my fridge first and dreaded tackling my pantry. My pantry is definitely huge and as Cooking with Jax would say, “it’s what dreams are made of.” The dimensions span 7 feet by 8 feet and it houses all my ridiculous Costco and bulk buys because frankly when the bulk stuff costs 4x as much in your small town, you buy and you buy big!
Previously, we had a much smaller kitchen cupboard set-up and I had bulk buys in a stockpile room downstairs. Since that room is in the process of becoming Mr J’s new big boy room, it needed to move. My laundry detergent stash moved to the furnace room and all of the food stuffs moved upstairs to my massive pantry. It holds all of my stockpile and then a giant Costco trip. Well done, large pantry, well done.
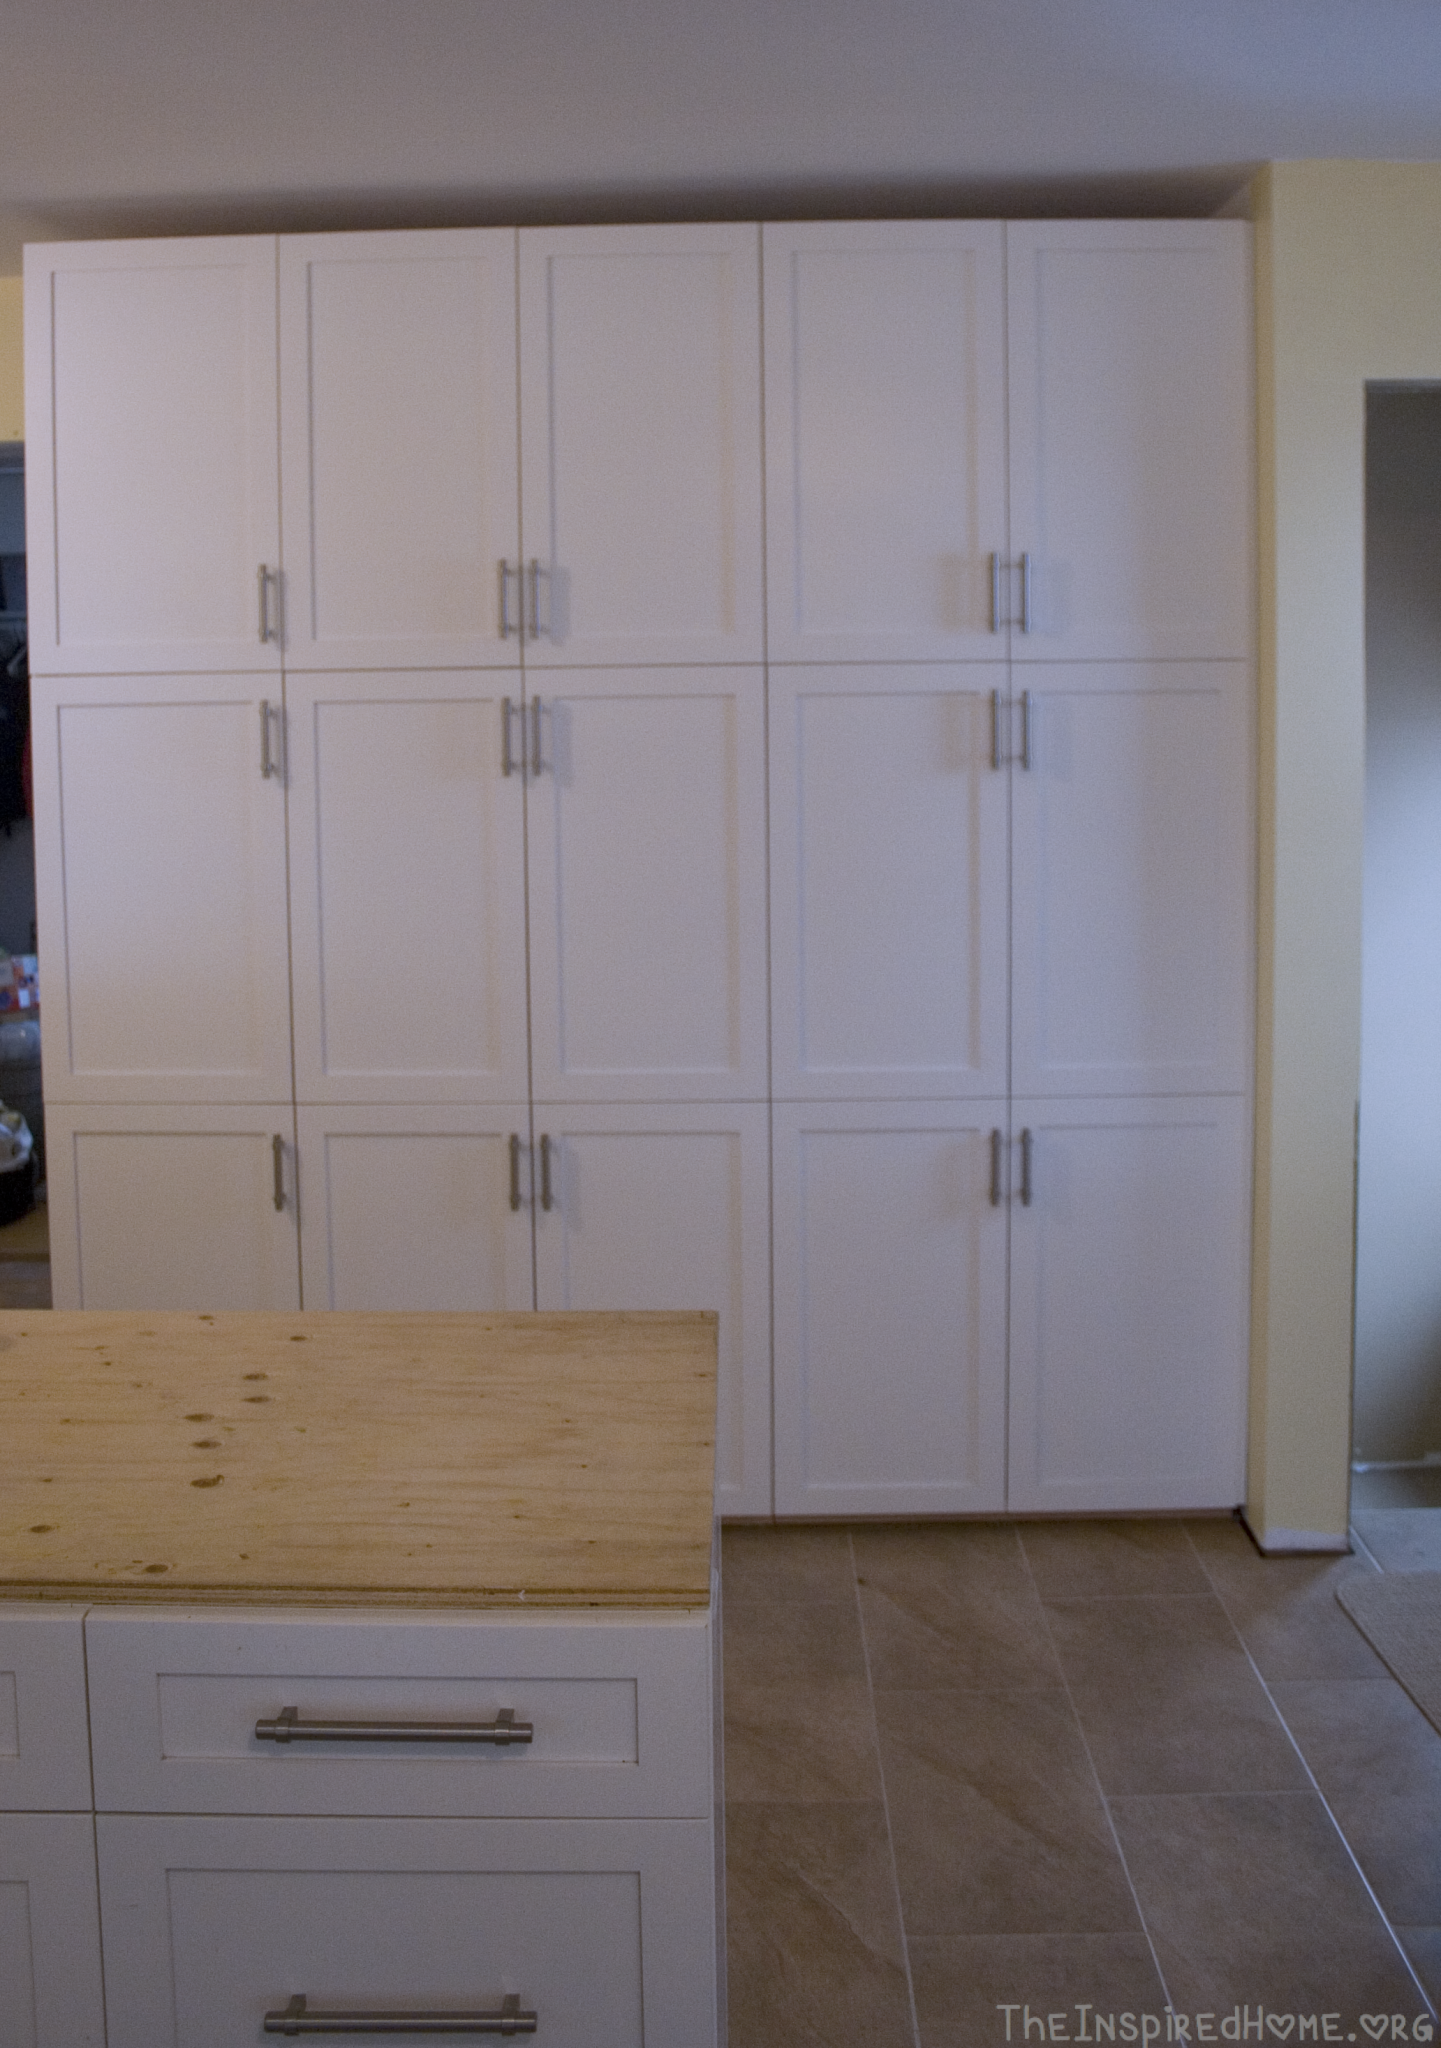
My Healthy Pantry Organization
The Mister and I actually spent a lot of time before we even bought our pantry planning what each shelf would hold. I know it sounds a little anal but this allowed us to customize this large pantry to exactly what we needed. When we installed it, we actually measured all of my jar collection to see what would fit where and adjusted the shelves to maximize shelf space.
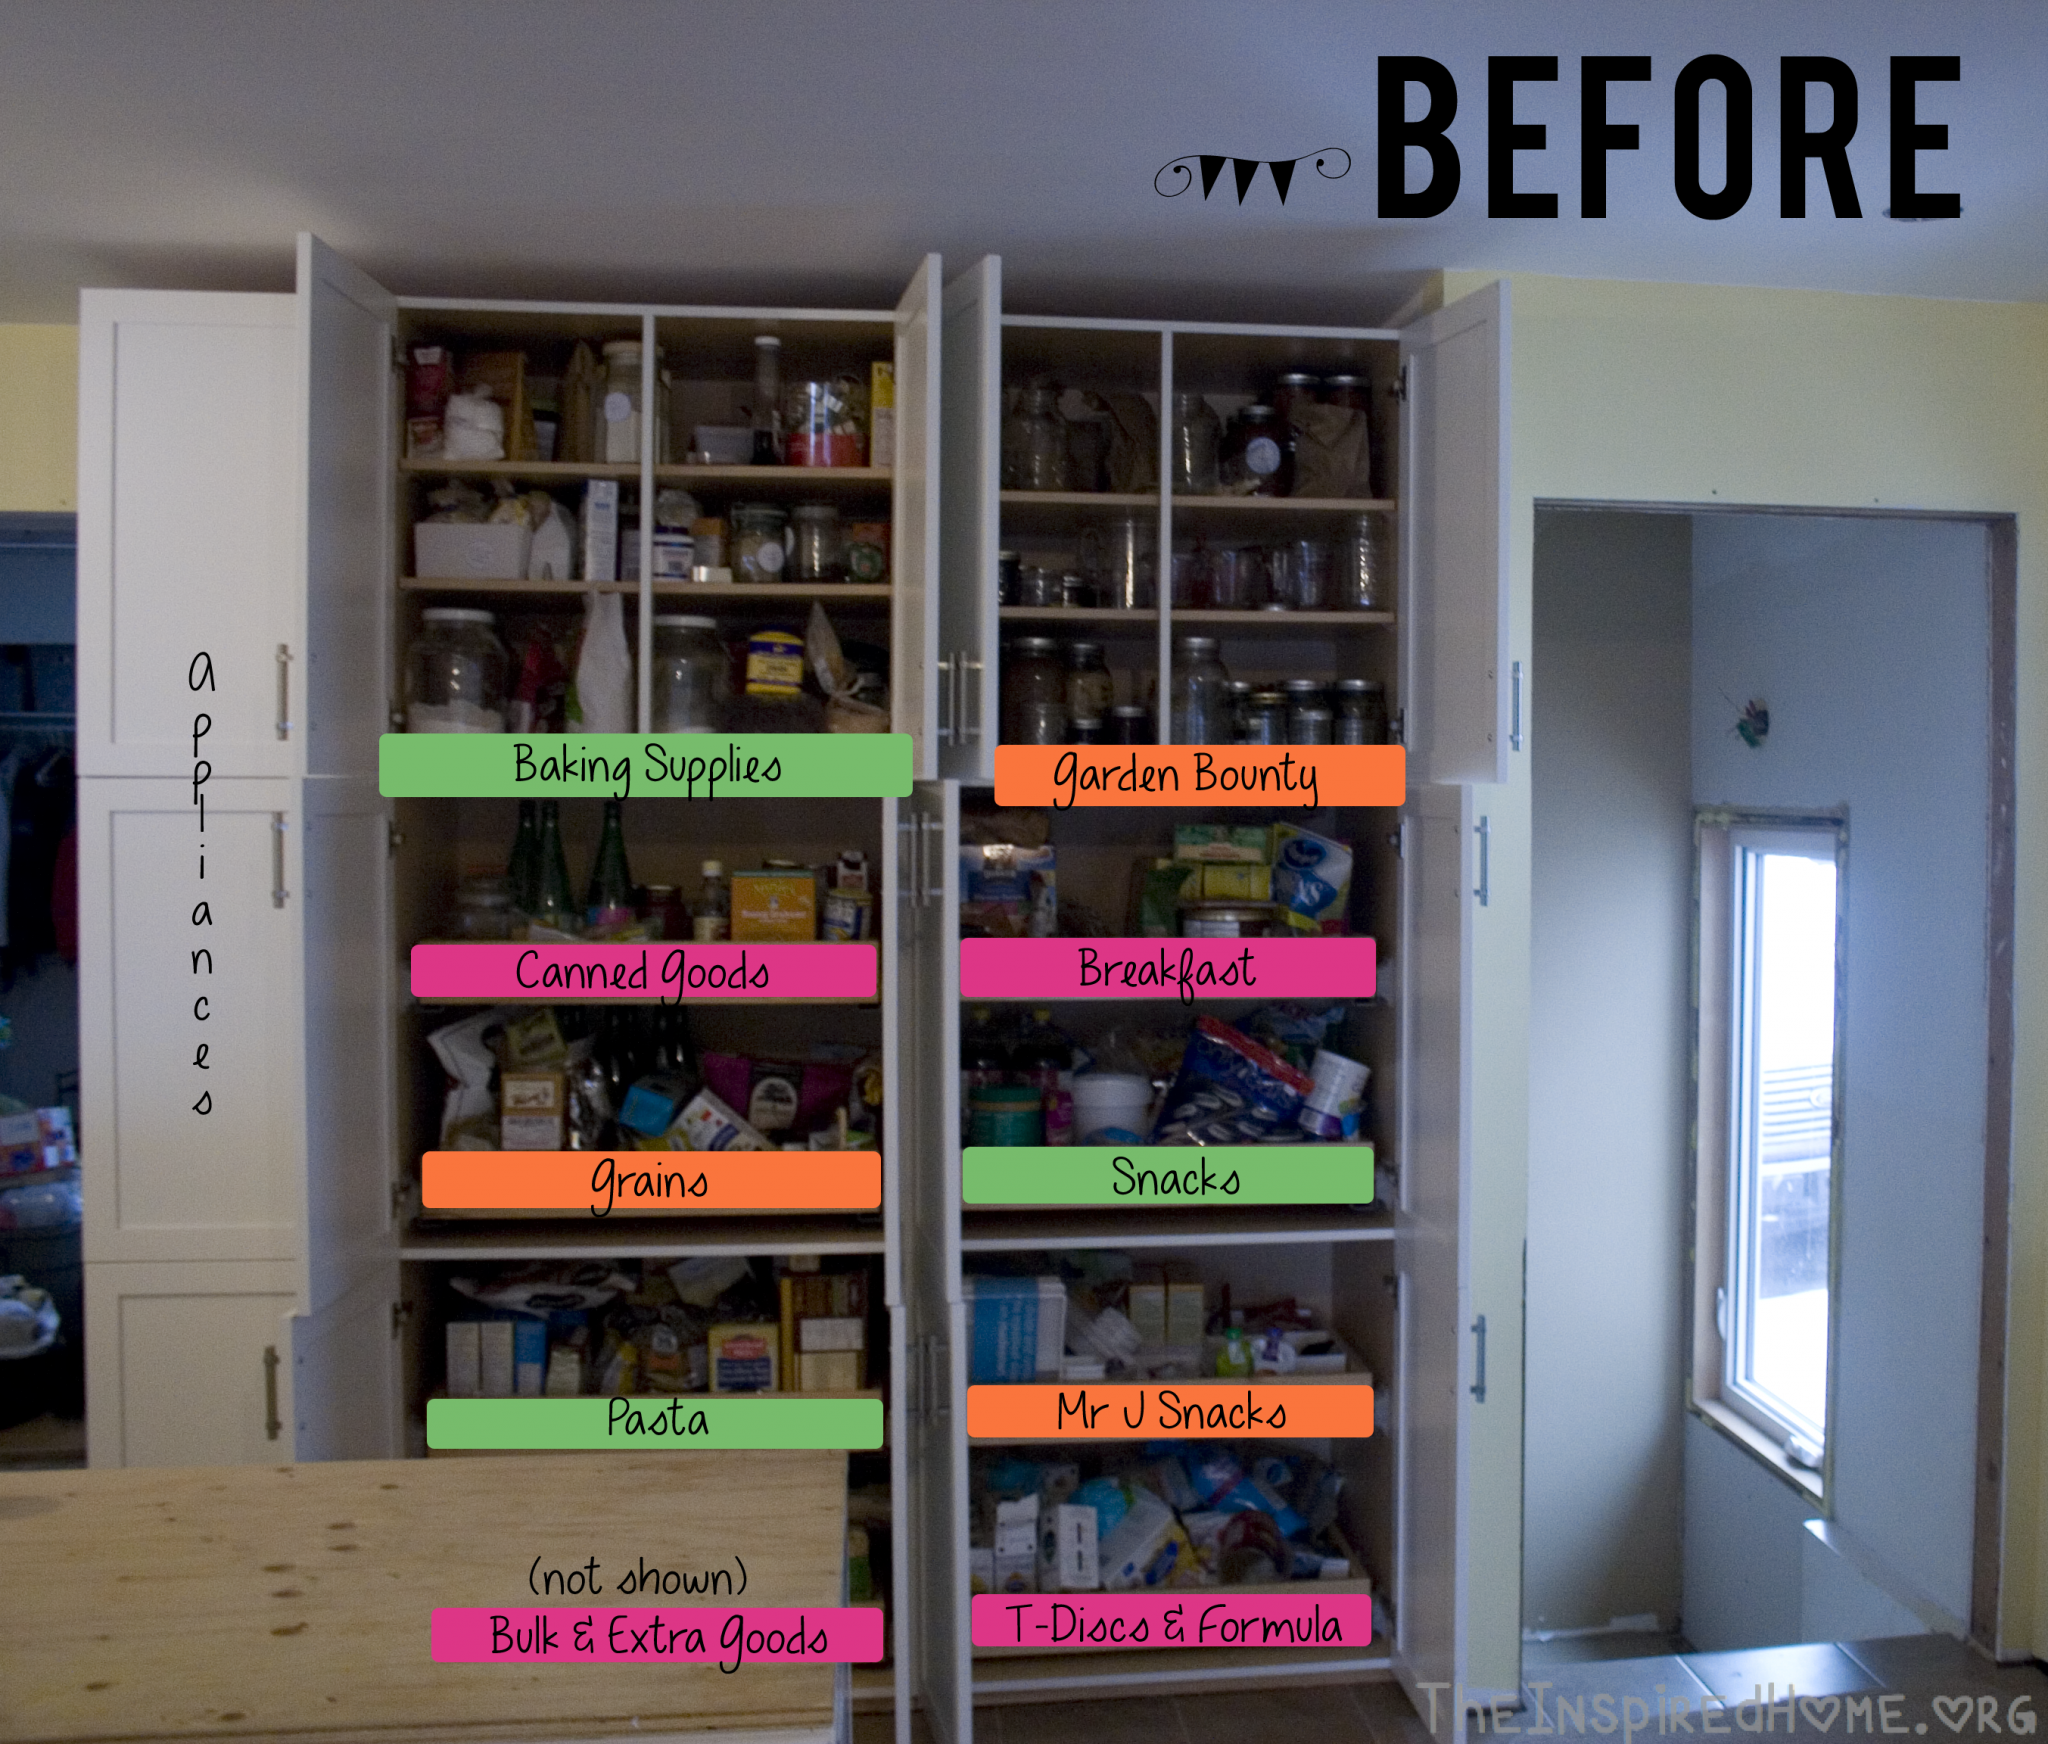
My pantry is divided up as follows:
- Appliances: The entire left side is filled with all of our kitchen appliances (eg. juicer, blender, crockpot, Kitchen Aid Mixer, etc)
- Baking Supplies
- Canned Goods
- Grains
- Pasta
- Bulk & Extra: All the additional bottles (eg. the extra bottle from 2 package of ketchup), extras from baking supplies (eg. small bag of brown sugar that didn’t fit in jar)
- Garden Bounty
- Breakfast
- Snacks
- Mr J Snacks
- T-Discs & Formula
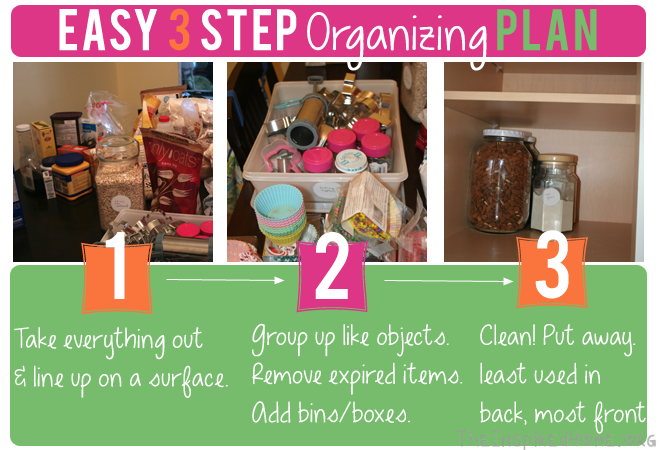
Easy 3 Step Organizing Process
My process for organizing anything is really simple and can be summed up in 3 Easy Steps:
- Take EVERYTHING out: Line it up on a surface or the floor for easy access.
- Group objects that are similar together: Lots of flour, put it together. Obsessed with cupcake wrappers like me? Put them together. Remove anything that is expired that you find in your search. If there is something that isn’t serving you anymore then donate it to charity, give it to a friend or throw it out! Add bins and boxes as need be. I usually dive into my recycling bin for some boxes to help organize or upcycle containers from the local thrift store. This helps corral all of those little things like cookie cutters.
- Clean the space you’re putting things back into – and the things if necessary. Line it with fancy contact paper if you wish or a dust catcher. Put everything you’re keeping back in. Put the most used items at the front of the cabinet and the least used at the back.
Here is my outcome from each side of the cabinet along with a list of what’s contained in each drawer, just in case you need inspiration on what to stock in your own healthy pantry!
Healthy Pantry: Left Side
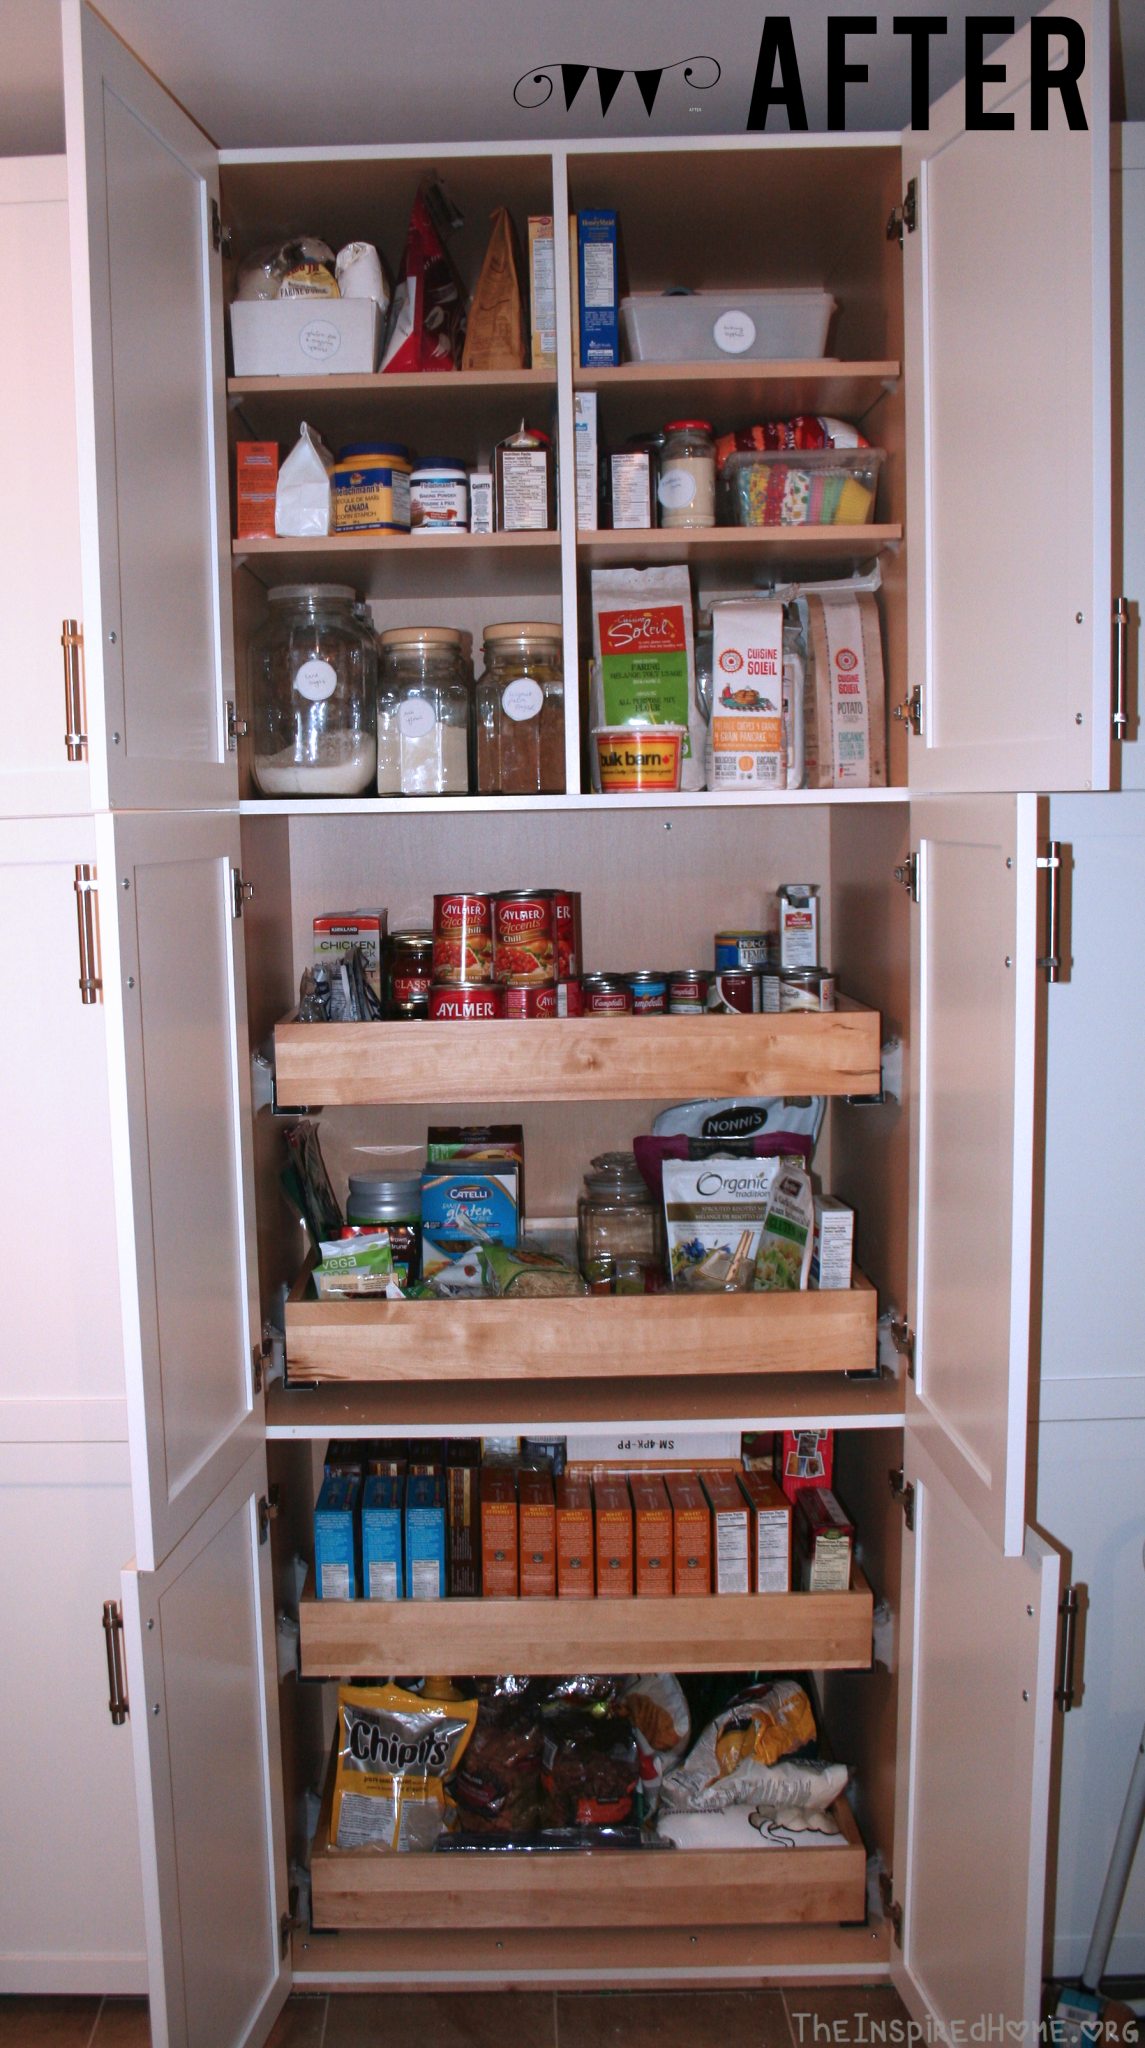
Healthy Pantry Staples: Baking Supplies
- An assortment of gluten-free flours & starches, including my favourite all-purpose gluten-free flour from Cuisine Soleil.
- Ready-to-mix healthy option gluten-free cookies, cakes and brownies
- Baking basics like guar gum, xanthan gum, baking soda, baking powder, corn starch, salt, molasses
- Coconut oil, coconut palm sugar and other bulk specialty items
Healthy Pantry Staples: Canned Goods
- Canned salmon & tuna for a quick protein pick me up
- Kirkland Chicken Broth (gluten-free and low-sodium) for making homemade soups (my recipe coming Saturday!)
- Canned tomatoes & pasta sauce
- Canned beans
- Canned soup (watch the sodium & small portion sizes).
Healthy Pantry Staples: Grains & Pasta
- Protein powder
- Rice wrappers & nori wrappers for sushi & easy lunch rolls (little to no carbs!)
- Gluten-free pasta
- Rice noodles, chow mein noodles
- Couscous, rice, sushi rice
- Sprouted risotto mix, dried bean mix

Healthy Pantry Staples: Garden Bounty
- Canning goodness from the summer & my garden: rhubarb, reduced sugar jam, pickles, tomato sauce, salsa, peaches, pears
- Seed saving to help with next year’s garden
Healthy Pantry Staples: Breakfast
We’re not the brightest in the mornings, so we group all the possible breakfast foods together for easy access.
- Almond butter, reduced fat peanut butter
- Oatmeal, instant oatmeal
- Granola clusters for yogurt
- Local honey
- Box cereals
Healthy Pantry Staples: Snacks (& Mr J Snacks)
- Popcorn kernels with paper bags (easy for the microwave)
- Rice Cakes
- Dried fruit, nuts
- Veggie Straws, Snapea Crisps
- Tortilla chips
- Love Child Organics pouches
- Baby cookies
- Baby organic oatmeal cereal
- Mini water bottles
- Annie’s bunnies & organic animal crackers
- Organic fruit snacks
Whew! What a list. What’s in your pantry? Are you planning to organize yours anytime soon?
]]>
I like to keep things lighthearted around here but sometimes we have to be serious. If you are a parent or know someone with a small child then this post is for you. If there is only one thing you ever take from this site, let this be it.
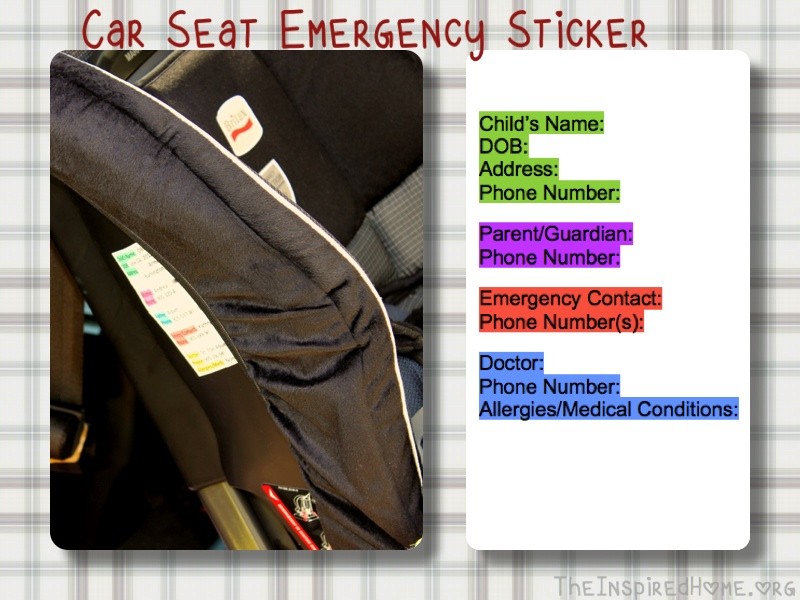
Heaven forbid you are ever in a car accident. Your little one is strapped in nice and snug in the back but you are injured and unable to give the rescue workers the answers they require. There is a simple little thing you can do for peace of mind: Put a sticker on your little one’s car seat listing all important information that any rescue worker would need to know about your child that they may be unable to tell them.
The only items you need to prepare this sticker are a computer, a printer (preferably with color ink) and a full-sheet label. You can buy these labels anywhere from Staples to Walmart. I had Avery White Full-Sheet Shipping Labels handy in my label supply. You could also just print onto a piece of paper and use clear packing tape to affix it to the car seat.
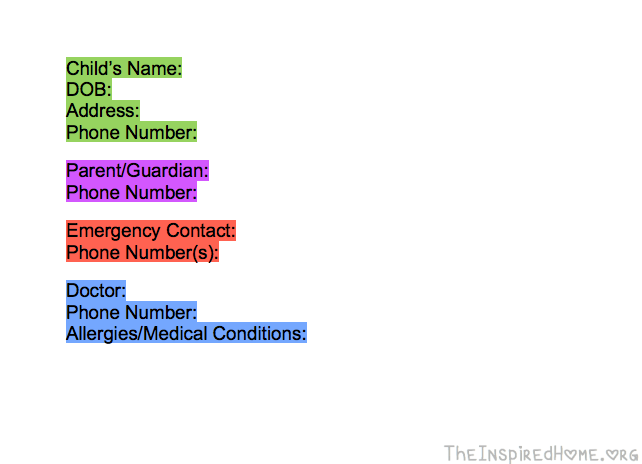
Car Seat Emergency Sticker Information
Child’s Name:
DOB:
Address:
Phone Number:
Parent/Guardian:
Phone Number:
Emergency Contact:
Phone Number(s):
Doctor:
Phone Number:
Allergies/Medical Conditions:
I suggest finding the best spot on your car seat to affix these labels (one on each side) and measuring how much space you have to work with as every car seat is different. Simply use the rulers shown in a program like Microsoft Word as your guide. I wanted the label to stand out so I highlighted the listed words above in various colors. If you do not have a color printer you can always print onto a brightly colored sheet of paper.
I hope you never, ever have to use this sticker for its intended purpose but it’s nice to know that your child can be well cared for in the event of an accident. Please pass this along to all of your friends and family members with children.
Note
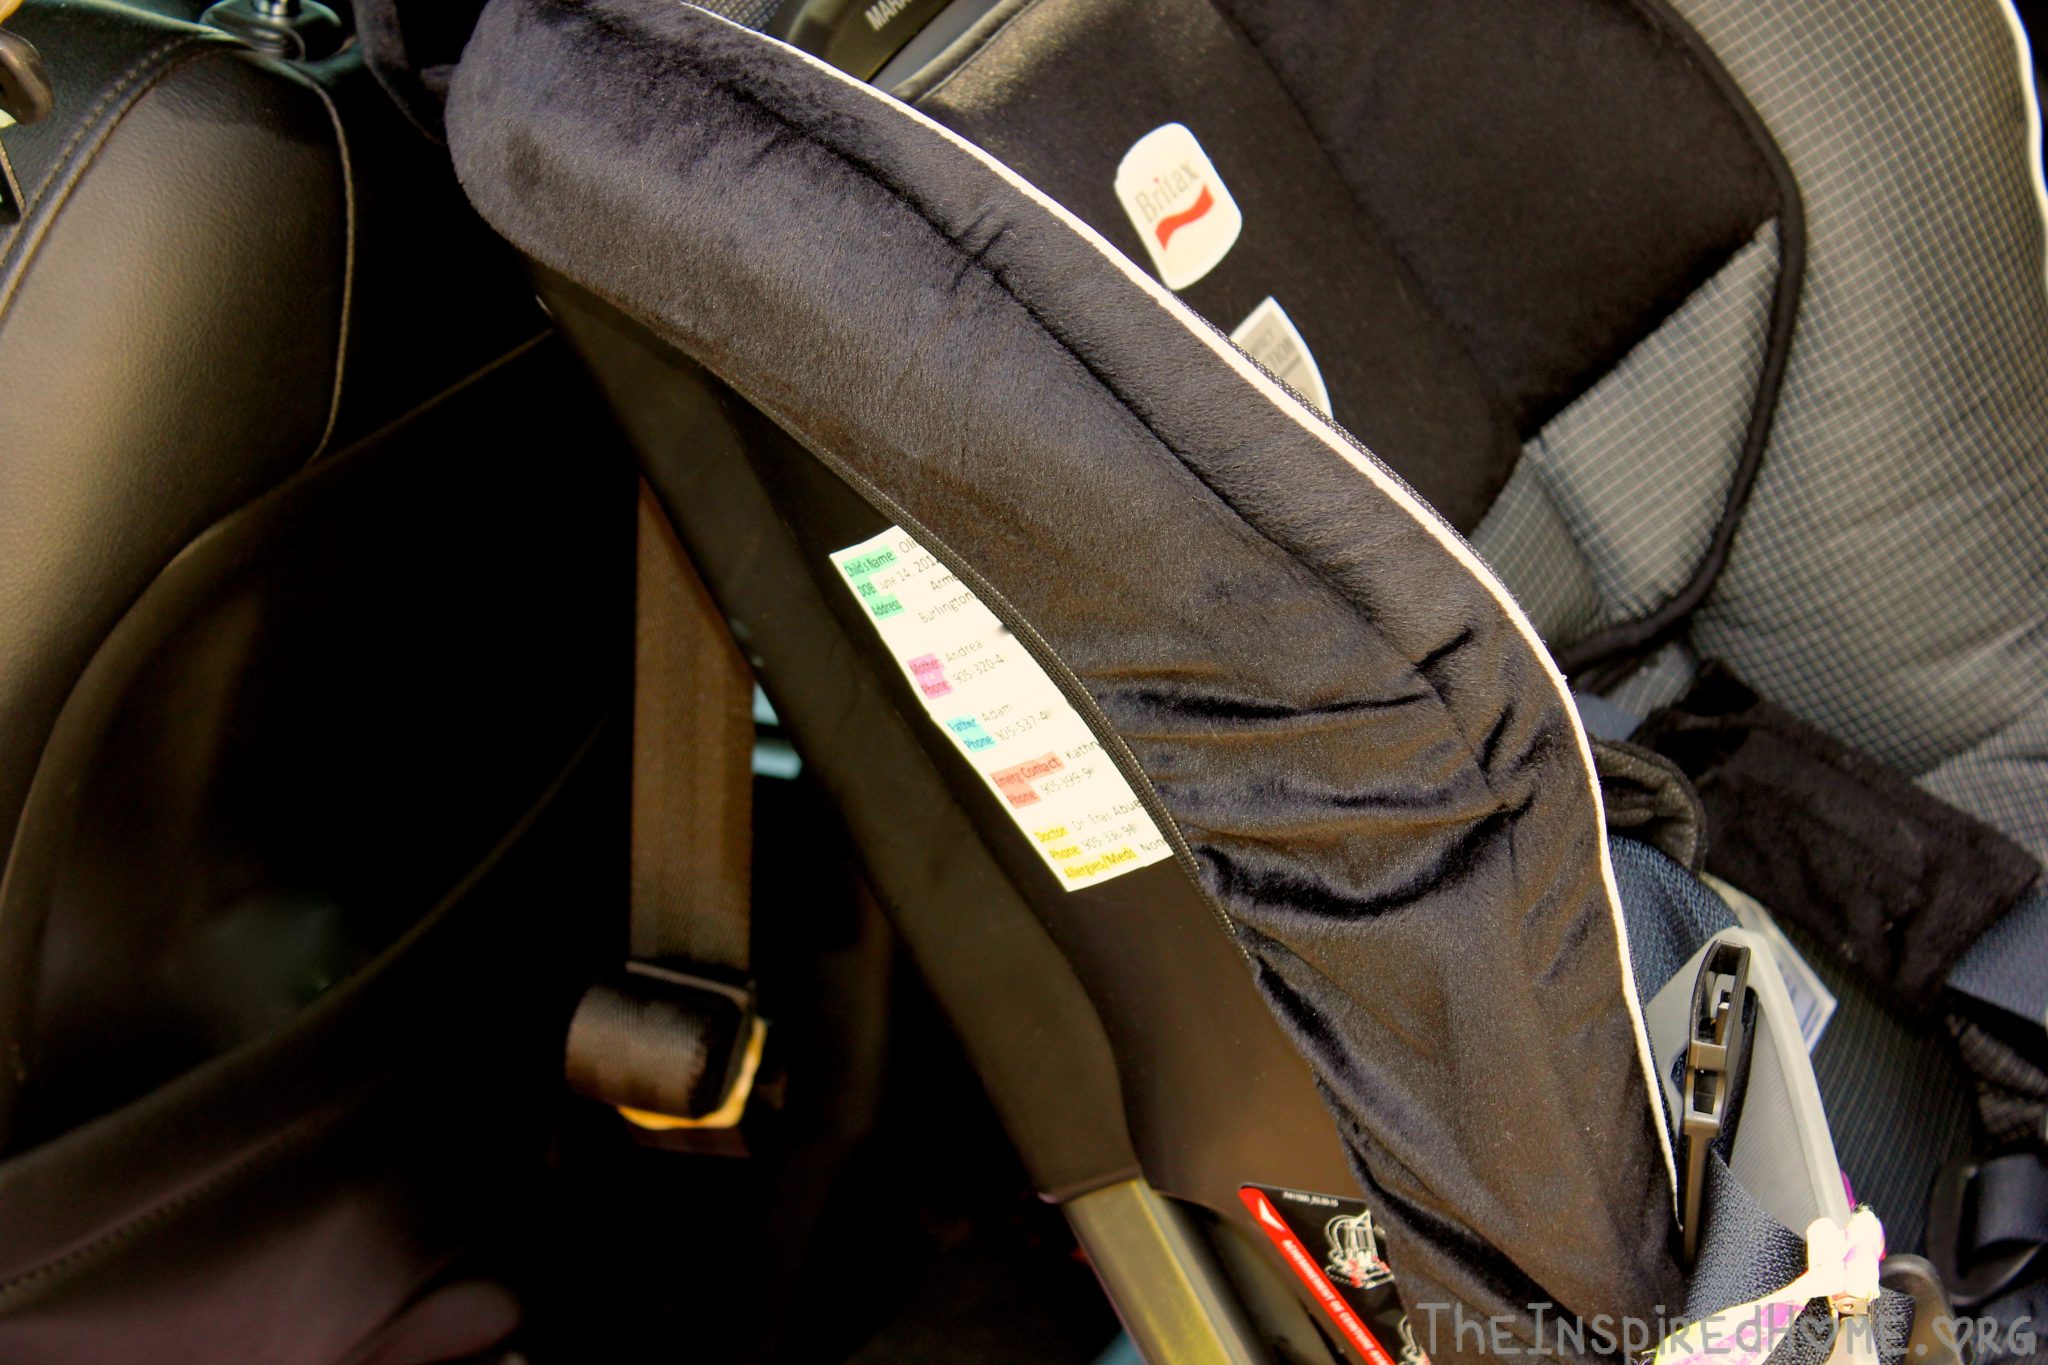
I slightly altered the sticker to fit my family’s needs. We only have one car seat so there is a chance that either myself or my husband will be driving the car. I wanted the sticker to have both of our contact information as well as an emergency contact in case both my husband and I were in the car. The photo below shows the placement of the sticker on Miss O’s carseat. There is one on each side of the seat.
I’m not sure why this lovely bag (or something similar) did not get applied to Christmas. There was always a large gift for myself or one of our siblings that inevitably would be impossible to wrap. Typically these large gifts would get hidden behind or under the couch.
I hear that in other cultures around the world, instead of wrapping gifts in coloured paper like we do in Canada, they put them in a Santa Sack. I have to say, this makes a lot of sense to this busy parent who has had to put together many large toys. I realize the simplicity, easy of use and eco-friendly nature of the Christmas gift bag.
The price tag of a personalized Santa Sack at $34-49 plus shipping to Canada from Pottery Barn really wasn’t in my budget. So I set forward to make my own Santa Sacks and I want to share the two different ways I came up with. If you’re not a sewer, don’t despair, you can still make your very own Santa Sack with little effort. If you are a sewing maven, congratulations, this a really simple pattern that even a child could handle with a little supervision. Maybe making these together will be your newest holiday tradition!
No Sew Santa Sack
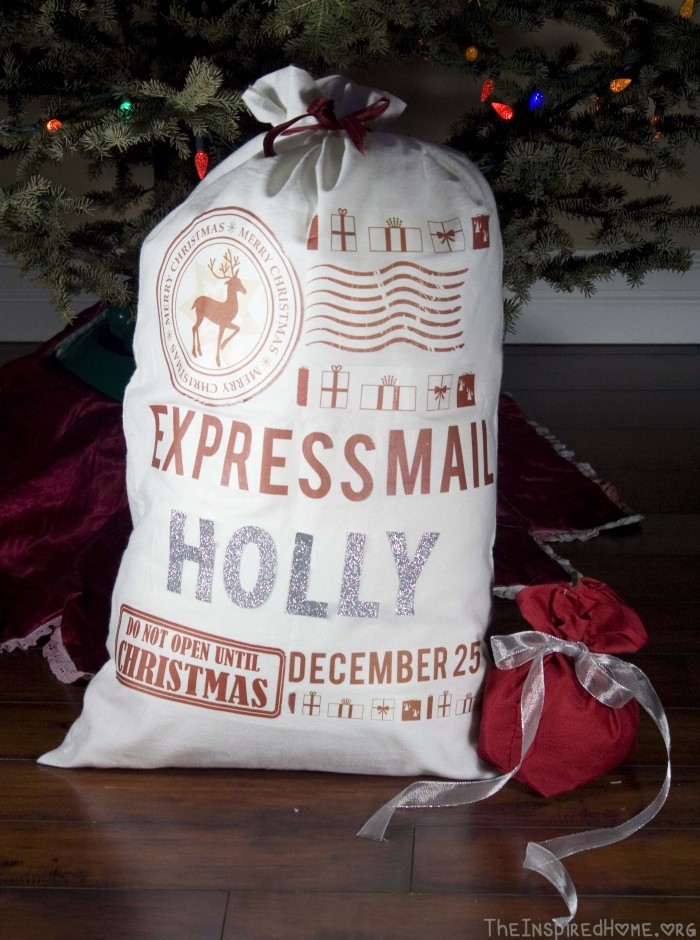
Items Needed
- A Fleece Pillowcase – 29×20″ (I got mine at the local dollar store – 2/$2)
- Iron-On Transfer Paper (Light)
- Printable Holiday Decals from the Inspired Home – Page 1, Page 2, Page 3
- 36-40″ of 1″-wide Ribbon
- Iron
- Printer
- Optional: 1 fat quarter of fabric & Heat N’Bond for personalization
Instructions
- Iron your fleece pillowcase so it is flat and does not have any creases in it.
- Print out the Holiday Decals (by The Inspired Home – see Items Needed above) on your Iron-On Transfer paper, using the printer set on MIRROR IMAGE (Note there are 3 different pages to create the look you see).
- Read iron-on transfer instructions, follow them & iron your decals onto the fabric.
- If you wish to personalize your sack, I recommend using 1 fat quarter of fabric, tracing your letters on to it after you print them from the computer, then applying Heat N’Bond. I know it sounds a little daunting but it’s just as easy as Iron-On Transferring. Check out this video for a great step-by-step lesson on how to do it.
- Stuff the presents in your Santa Sack and tie your ribbon to the top.
Sew Easy Fabric Santa Sack
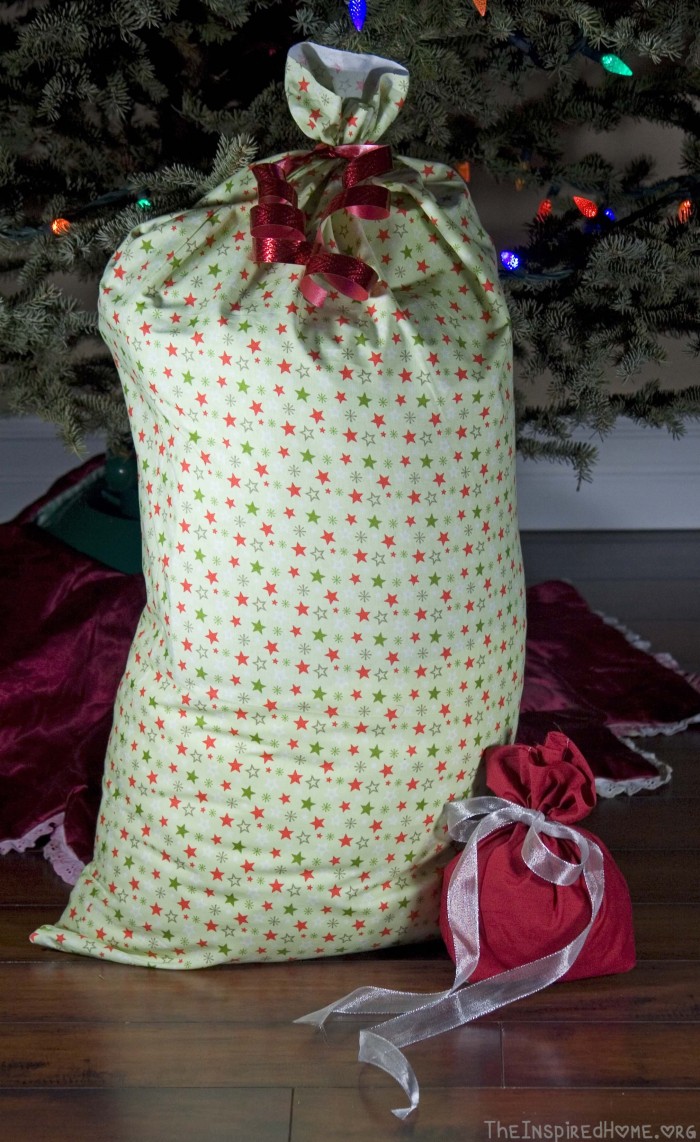
Items Needed
- 1 yard of decorative Christmas fabric
- Sewing Machine, Thread
- 36-40″ of 0.5-1″ Ribbon
- Iron
- optional: 1 fat quarter & Heat N’Bond for personalisation
Instructions
- Fold your fabric in half, bad sides (aka not the pretty fabric side) facing out.
- Cut your fabric to the size wanted (mine pictured is 35.5×19″ finished. Most fabric yards are usually 36″, seam allowance was 0.25″). I chose to use the best edge (the one I did not cut) at the top for ease!
- Zig-zag stitch the bottom & sides shut, then cut a 45 degree angle on the corners (careful, don’t get the stitches) then turn right side out.
- You can stitch a 1″ stitch on the back of your bag to hold the ribbon on if you desire (mostly so it doesn’t get lost in the Christmas festivities!)
- If you wish to personalize your sack, I recommend using 1 fat quarter of fabric, tracing your letters onto it after you print them from the computer, then applying Heat N’Bond. I know it sounds a little daunting, but it’s just as easy as sewing the bag. Check out this video for a great step by step lesson on how to do it.
- Stuff the presents in your Santa Sack and tie a pretty bow at the top!
*Note: All designs to be used for personal use only. Please contact us if you would like a license to use this design for reproduction.
]]>