senang303
sukses303
horus303
sboku99
spesial4d
amarta99
suryajp
monggojp
Xabi Alonso vs Edin Terzic: Adu Taktik di Laga Real Madrid Kontra Borussia Dortmund
Jangan Lewatkan! Prediksi dan Analisis Mendalam Laga Real Madrid vs Borussia Dortmund di Perempat Final
Head-to-Head yang Penuh Sejarah: Real Madrid vs Borussia Dortmund, Kini di Panggung Piala Dunia Antarklub!
Big Match Pagi Ini! Real Madrid vs Borussia Dortmund, Siapa yang Akan Melaju ke Semifinal Piala Dunia Antarklub?
Perempat Final Neraka! Real Madrid dan Borussia Dortmund Siap Adu Kekuatan di Panggung Dunia
Panas Sejak Awal! Palmeiras vs Chelsea, Siapa yang Akan Membuktikan Diri sebagai Juara Sejati di Piala Dunia Antarklub 2025?
Momen Balas Dendam Palmeiras? Akankah Chelsea Kembali Dihadang Tim Brasil di Piala Dunia Antarklub 2025?
Kekuatan Amerika Selatan Melawan Dominasi Eropa: Palmeiras vs Chelsea, Duel Epik di Piala Dunia Antarklub 2025!
Menuju Puncak Dunia: Perjalanan Chelsea dan Palmeiras Bertemu di Laga yang Paling Ditunggu di Piala Dunia Antarklub 2025
Jangan Berkedip! Ini Dia Detik-Detik Krusial yang Wajib Kamu Tahu Jelang Palmeiras vs Chelsea di Piala Dunia Antarklub FIFA 2025
Pertarungan Para Raja! PSG dan Bayern Siap Adu Gengsi di Panggung Piala Dunia Antarklub FIFA 2025
Siapa Lebih Unggul? Bayern Bidik Balas Dendam, PSG Ingin Tunjukkan Dominasi di Piala Dunia Antarklub!
Kutukan Final Terulang? PSG dan Bayern Bertemu Lagi di Piala Dunia Antarklub 2025, Kali Ini Siapa Juara?
Piala Dunia Antarklub FIFA 2025: Mampukah Bayern Hentikan Langkah Paris Saint-Germain yang Kian Gemilang?
Dari Liga Champions ke Panggung Dunia: PSG vs Bayern, Pertarungan Gengsi untuk Gelar Piala Dunia Antarklub
Comeback Dramatis! Fluminense Hajar Al-Hilal 2-1, Lolos ke Semifinal Piala Dunia Antarklub 2025!
Kejutan di Panggung Dunia: Fluminense Taklukkan Al-Hilal 2-1, Sang Juara Bertahan Angkat Kaki!
Fluminense Bangkit! Kalahkan Al-Hilal 2-1, Buktikan Kekuatan Amerika Selatan di Piala Dunia Antarklub FIFA 2025
Drama 90 Menit! Ini Kunci Kemenangan Fluminense Atas Al-Hilal 2-1 di Piala Dunia Antarklub 2025
Gol Telat Penentu! Fluminense Sukses Balikkan Keadaan, Benamkan Al-Hilal 2-1 di Laga Sengit
situs resmi
rupiah kembali melemah ke level 16221 per dolar as analisis
serbu cuci gudang smartphone jakarta fair 2025
promo hokben hari bank indonesia 46 juli irodori bento ocha
harga lpg terbaru juli 2025 daftar lengkap dari
honda cuve diskon fantastis yang bikin harga turun drastis
jadi pusat perhatian honda stylo 160 bikin jatuh hati
bisa sampai 5 tahun begini cara ajukan pinjaman kur bni
bansos tahap 3 juli 2025 resmi cair begini cara cek status
5 iphone murah juli 2025 yang wajib kamu tahu sebelum
6 laptop oled murah dibawah 10 juta 2025 pilihan
honor 400 series resmi dipasarkan di indonesia harga mulai
al hilal vs fluminense duel epik pembunuh raksasa eropa
polresta banyuwangi gelar turnamen biliar 2025
wujudkan dream car mazda 2 gtat dengan cicilan 5 jutaan
resmi dimulai bsu 2025 siap disalurkan untuk 87 juta pekerja
simulasi kredit toyota rush 2025 terlengkap khusus
5 pilihan mobil bekas terbaik dengan kredit cicilan ringan
7 rekomendasi ponsel 4 jutaan dengan kamera terbaik
restart hp rutin rahasia performa maksimal dan keamanan terjamin
kisruh internal juventus 10 pemain minta diganti saat
yamaha gear ultima hybrid simulasi kredit terjangkau untuk
buy 1 get 1 promo makanan hingga cashback ini promo
revolusi ekspor umkm kirim produk satuan ke luar negeri
rahasia doa pagi yang bikin hari jadi lancar sobat mahjong
catat ini jadwal turnamen biliar bergengsi dari predator pbc indonesia
daftar 5 rekomendasi motor 15 jutaan irit stylish dan perfect untuk
belanja banyak makin hemat jangan sampai ketinggalan promo
promo alfamart juli khusus sobat mahjong borong aneka susu
bsu tahap 2 masih berjalan begini cara cek dan tahapan
geger honda scoopy terbaru curi perhatian sobat mahjong
klaim saldo dana gratis hingga 100 ribu setiap hari rahasia main game
udah tanggal tua nih catat promo spesial akhir juni 2025 ini biar
indomaret lagi ada promo liburan hingga tanggal 2 juli 2025
ini 7 cara cerdas menghasilkan uang lewat meta ai whatsapp untuk para
gaji pas pasan tapi pengen hp baru ini cara kredit yang bikin kantong aman
pengen punya yamaha aerox turbo keluaran terbaru simak cicilan
wujudkan impian motor premium honda pcx 160 dengan kredit mudah oto finance
punya hp android lemot 7 trik ampuh bikin ponsel kamu kenceng lagi
akhirnya apple ikutan trend iphone fold punya empat kamera dan
hingga 300 ribuan ini 5 cara kamu bisa dapatkan saldo dana dengan mudah
toyota avanza 2025 si raja jalan yang tak terbendung lagi
ingin membeli yamaha nmax turbo jangan buru buru begini peforma
bsu 2025 sudah lolos verifikasi tapi dana belum masuk ternyata ini 7 alasan
pemerintah siapkan pajak baru untuk penjual e commerce umkm dengan
mengenal yamaha nmax turbo matic 30 jutaan dari yamaha dengan fitur sekelas moge
wujudkan impian miliki honda stylo 160 dengan kredit motor bca finance
iphone 17 siap guncang dunia layar lebih besar dan tanggal rilis
Scatter E-sports Ubah Cara Kita Bermain di Indonesia
Sensasi Scatter: Inovasi Gaming yang Mengubah Industri E-sports Indonesia
Rahasia Jackpot Mahjong Ways 1 Pakai Gemini CLI!
MONGGOJP: Black Scatter Ubah Gameplay Mahjong di Jakarta!
Rahasia Menang Mahjong Wins 3 Pakai BlackBerry!
Scatter Vidio.com Hadirkan Pengalaman Gaming Emosional di Jakarta
Rahasia Draft NBA 2025 ala Mahjong Ways 1!
MONGGOJP Ubah Cara Main Mahjong dengan Scatter Emas Squid Game 3
MONGGOJP Ciptakan Sensasi Scatter di Believe, Ubah Dunia E-sports
Fitur Scatter TikTok: Cara Baru Main Esports yang Bikin Adrenalin Meledak
Barcelona Vs Real Madrid: El Clásico Terpanas Musim Ini Dipadu Dengan Scatter Hitam Mahjong Ways 2 MONGGOJP
Kisah Jackpot Scatter Hitam Mahjong Ways 2 di MonggoJP: Fakta Menarik
Main Santai Ala Johan Berhasil Raup Keuntungan Rp114.000.000 Berkat Scatter Hitam Mahjong Ways 2
Cara Seru Dapat Scatter Hitam di Mahjong Ways 2 MONGGOJP Tanpa Nunggu Hoki
Azis Calim Menang Jackpot! Rahasia Menang Besar di Mahjong Ways 2 MONGGOJP
Rahasia Pemain Pontianak JP 5000x di Mahjong Ways 2 dengan Scatter Hitam MONGGOJP
Satpam Perusahaan Terbuka Manfaatkan Scatter Hitam Mahjong Wins 3 untuk Kebutuhan Sehari-Hari
Awali Harimu dengan Senyuman Dari Jackpot Scatter Hitam Mahjong Ways 2 MONGGOJP
Mekanik Wifi Ini Temukan Trik Scatter Hitam Muncul di Mahjong Ways 2
Modal Nekat Bikin Full Senyum Seorang Pekerja Serabutan Menang Sensasional Berkat 3 Scatter Hitam Mahjong Ways 2 di MONGGOJP
Scatter Hitam Mahjong Wins 3 Tembus Rp115.000.000 di MONGGOJP💵💰
Trik Terbaru Dari Mas Maman Cara Dapat Scatter Hitam Mahjong Ways 2 di MONGGOJP
Wawan Warga Tangerang Berhasil Manfaatkan Scatter Hitam Mahjong Ways 2, Raup Ratusan Juta💵💰
Zodiak yang Bakal Maxwin Scatter Hitam Mahjong Ways 2 di MONGGOJP Hari Ini
Mahjong Ways 3: Rahasia Menang dengan BLACKBOX.AI!
Mahjong Ways 2 & Emas: Cuan Ganda di Juni 2025 Mahjong Wins 3: Rahasia Strategi MotoGP Hari Ini 2025 Cara AI Pelajari Pola Menang di Mahjong Ways 2 Main Mahjong Ways 1, Dapat Saldo DANA Gratis Cair 2025 Mahjong Ways 2 di PRJ 2025: Tips Seru Auto JP
Rahasia Mahjong Ways 2: Sensasi Hiburan Hoki Maksimal! Mahjong Ways 2 Bikin BlackBerry Hidup Lagi di 2025? Bagaimana Gempa 21 Juni dan Mahjong Wins 3 Berhubungan? Mahjong Ways 2 di PRJ 2025: Tips Seru Auto JP! Mahjong Wins 3: Tips Aman Main Tanpa Dompet Jebol!
Petani Panen Duit Puluhan Juta dari Mahjong Ways 2 Mahjong Wins 3: Tips Jitu & Pantau Live SGP Terkini 2025 Rahasia Mahjong Ways 1: Hobi Jadi Cuan Berlimpah! Trik Sopir Truk Jago Mahjong Ways 3 dalam Waktu Singkat!
7 Motor Matic Murah Terbaik, Bisa Dibeli Cash Modal JP dari Mahjong Ways 2 Petani Sawit Raih Rp50 Juta dari Mahjong Ways 2 Mahjong Ways 2: Teknik Pola Naga
Mahjong Ways 2: Raih Motor Impian Tanpa Modal Ini Cara Gampang Menang di Mahjong Ways 2 Mahjong Ways 2 Melesat dengan Trik Bitcoin Ini Cara Gampang Menang di Mahjong Ways 2 Kuli Bangunan Ini Raup Puluhan Juta Petani Aceh Raup Gaji Bulanan dalam 1 Hari
Destinasi Bali Murah Jelajahi Surga Tersembunyi dengan Strategi Mahjong Ways 2 PGSOFT
Dari Antam Hingga Wild Bandito PG SOFT Kisah Pencarian Keberuntungan dalam Ekspedisi Harta Karun
Resep Sukses Warung Makan Racik Profit Sehebat Kombinasi Game Penghasil Uang Scatter Hitam
Jejak Petualang Hemat di Bali Temukan Keberuntungan di Setiap Sudut Terinspirasi Mahjong Ways 2 PGSOFT
Tambang Emas Antam Membongkar Potensi Kekayaan Mirip Kombinasi Unggulan Wild Bandito PG SOFT
Modal Kecil Cuan Maksimal Bangun Warung Makan ala Game Penghasil Uang Scatter Hitam
Panduan Wisata Bali Irit Dapatkan Pengalaman Terbaik Bak Bonus Mahjong Ways 2 PGSOFT
Dari Dapur Warung ke Saldo Rekening Kiat Jitu Mirip Game Penghasil Uang Scatter Hitam
Kisah Budi Tukang Parkir Handal Bagaimana Permainan Mahjong Ways 2 PG SOFT Menemani Rehat Sorenya
Kisah Anya Staf Shopee Produktivitas Kantor dan Rahasia Kemenangan di Permainan Wild Bandito PG SOFT
Pengalaman Bima Dari Mengantar Paket Hingga Kemenangan Sensasional di Mahjong Ways 2 PGSOFT
Rezeki Tak Terduga Pak Sugi Nasi Kuningnya Laris Manis Berkat Rahasia Scatter Hitam PGSOFT
Sukses Usaha Viral Rudi Bermula dari Hobi Game Penghasil Uang Scatter Hitam
Strategi Cerdas Rina Investasi Emas ANTAM Dimulai dari Kemenangan Gates of Olympus Pragmatic Play
Kisah Bu Ani Rezeki BSU BPJS Ketenagakerjaan Datang Disambut Petir Permainan Gates of Olympus
Kisah Sukses Pak Tino Sarang Walet Melesat Berkat Modal dari Sweet Bonanza Pragmatic Play
Rahasianya Makmur Punya Kebun Sawit Luas Berkat Game Penghasil Uang Sweet Bonanza
Bikin Penasaran Investor Emas Antam di Makassar Santai Main Mahjong Ways 2
Fenomena Bandung Emas Antam Naik Mahjong Ways 2 Pun Ramai Dimainkan
Eksklusif Medan Mengungkap Dampak Scatter Hitam pada Strategi Bertahan Tim Sepak Bola Lokal
Bos Nasi Padang Maya Ungkap Cara Dapatkan HP Murah Plus Efek Scatter Hitam yang Bikin Iri
Bayu Si Ojol Dari Motor Bekas Kinyis-kinyis Cuan Mahjong Ways 2 Mulus
Pak Karyawan Adi Dari Lelahnya Proyek Sawit Nikmati Serunya Keberuntungan Scatter Hitam
Bos Nasi Kuning Dian Ungkap Rahasia Sarang Walet dan Kemenangan Mahjong Ways 2
Bos Ayam Geprek Pak Jaya Motor Murah Jadi Andalan Senggangnya Fokus Kumpulin Simbol Mahjong Ways 2
Petani Sawit Pak Budi Kisah Inspiratif Rawat Kebun Sukses Bonusnya Asyik Main Scatter Hitam
Pengusaha Sukses Dian Ungkap Sarang Walet Rahasia Vitalitas dan Strategi Mahjong Ways 2
Karyawan Kantor Erick Pusing Cari HP Murah Scatter Hitam Jadi Solusi Hemat Akhir Bulan
Kisah Rina Berburu Motor Bekas Hemat Bensin Sorenya Seru-seruan di Mahjong Ways 2
Bayu Sang Penjaga Kebun Sawit Jaga Panen Tetap Cuan, Malamnya Santai Nikmati Sensasi Scatter Hitam
Dokter Anton Bongkar Manfaat Sarang Walet dan Cara Asyik Main Mahjong Ways 2 di Waktu Senggang
Dari Lapangan Hijau Jakarta Hingga Scatter Hitam Kisah Unik Pemain Muda Ibu Kota
Tangsel Siap-Siap Ojol dan Mahjong Ways 2 Scatter Hitam Apa Hubungannya dengan Keuntungan Mendadak
Semarang Siaga Laga PSIS dan Getaran Scatter Hitam yang Menyertai Setiap Tendangan Penalti
Yuk Intip Strategi Cerdas Pecinta Mahjong Ways 2 Jogja dalam Berinvestasi Emas Antam
Ojol Depok Berbagi Cerita Titik Balik Finansial Berkat Mahjong Ways 2 Scatter Hitam
Misteri di Balik Kemenangan Persib Bandung Apakah Formasi Tim Berkaitan dengan Rahasia Scatter Hitam
Driver Ojol Jakarta Bongkar Rahasia Mahjong Ways 2 Scatter Hitam Kisah di Balik Setoran Harian
Tren Jakarta Gen Z Borong Emas Antam Sorenya Main Mahjong Ways 2
Surabaya Bergairah Ketika Derby Sepak Bola Membuka Aura Scatter Hitam di Lapangan Hijau
Ketika Ojol Bandung dan Mahjong Ways 2 Scatter Hitam Bersatu Fenomena Unik di Kota Kembang
Warga Medan Kaya Mendadak Ini Hubungan Emas Antam dan Mahjong Ways 2
Arema FC dan Fenomena Scatter Hitam Analisis Statistik Gol yang Mengejutkan di Malang
Petualangan Ojol Surabaya Menembus Misteri Mahjong Ways 2 Scatter Hitam Mampukah Berkah Datang
Fenomena Scatter Hitam Bikin Heboh Benarkah Ada Pola Tersembunyi di Balik Naik Turunnya Emas Antam
Emas Antam & Misteri Scatter Hitam Waktu Tepat Beli di Tengah Gejolak Pasar
Lebih Panas dari Mahjong Ways 2 Ini Alasan Emas Antam Jadi Buruan Utama Investor Saat Ini
Dari Scatter Hitam Game hingga Kilauan Emas Antam Investasi Terbaru yang Bikin Penasaran
Lebih Hoki dari Mahjong Ways 2 Ini Strategi Driver Ojol Kejar Bonus Seperti Jackpot PG Soft
Bukan Sekadar Ngojek Mengapa Scatter Hitam Kini Melekat di Dunia Ojek Online
Terungkap Strategi Jitu Ojek Online Kuasai Jam Sibuk Mirip Pola Scatter Hitam Game PG Soft
Dari Gawai PG Soft ke Jalanan Kisah Driver Ojol Temukan Mahjong Ways 2 dalam Setiap Perjalanan
Bukan Sekadar Bisnis Begini Cara Pengusaha Walet Temukan Scatter Hitam Untung di Kebun Sawitnya
Lebih Cuan dari Mahjong Ways 2 Strategi Unik Pengusaha Sawit Ini Sukses Berkat Sarang Walet
Terungkap Rahasia Pengusaha Walet Mendulang Rupiah Mirip Fitur Scatter Hitam di Game PG Soft Favorit
Dari Kebun Sawit hingga Sarang Walet Filosofi Mahjong Ways 2 yang Bikin Bisnis Makin Cuan
Fenomena Scatter Hitam di Lapangan Hijau Apakah Pemain Sepak Bola Ini Bawa Keberuntungan Tak Terduga Mirip Jackpot PG Soft
Lebih Seru dari Mahjong Ways 2 Ini Cara Tim Sepak Bola Bangkit dari Keterpurukan Mirip Pola Kemenangan PG Soft
Terungkap Strategi Pelatih Bola Jitu Mirip Scatter Hitam Cara Ciptakan Peluang Emas ala Game PG Soft
Dari Konsol PG Soft ke Stadion Kisah Pemain Bola Muda yang Terapkan Filosofi Mahjong Ways 2
Gaji UMR Bisa Bikin Bahagia Ini Cara Bijak Nikmati Hidup Sambil Main Mahjong Ways 2 PG SOFT
Mau Tambahan Penghasilan Ini Daftar Kerja Sampingan Menarik Terinspirasi dari Scatter Hitam PGSoft
Dari Hobi Main Mahjong Ways 2 ke Ladang Cuan Sukses Jadi Pengusaha Sarang Walet dari Nol
Rekomendasi Club Malam Jakarta Terbaik Nikmati Suasana dan Santai Bareng Mahjong Ways 2 PG SOFT
Proyek Jalan Sumut Dikorupsi Demi Scatter Hitam PGSoft Polisi Tetapkan Tersangka KPK Bergerak
kujangbet 168
pacutoto 99 pacutoto 99 login pacutoto99 link alternatif pacutoto99 login sabung ayam pacutoto99 pacutoto99 slot pacutoto99 gacor pacutoto99 togel pacutoto99 slot anchorfly sportsepreneur visitomahafamilydental daladestroirecords africarenewableenergyawards sandsandpalms computerplanets njmetalroofing shanailmonick jun-deegan-mold-remediation superiorwastedisposal egyptotravel egyptotravel uthara serdiconi cliniquealbassar alfouzantransport kabatravel catoleemfoco uticafoods srisharadavedalayam sparelaxia feja feja shaheedeazamnews raus-global localenergyaudits unitedinstituteofbusiness maalichfarm keyviewadv sterlingfinancepartners raethgroup glhuntfoundationrepairofhondo dedicatedstaffingservices dedicatedstaffingservices skedaddlewildlife maeeempreendedora tamingautism esfamunifoundation risingabovethestorms dikomba rauthla denherdergroup abhilegal advankitsahu advocatepraveenmishradivorcelawyer akcentassociates radiantreve crazykidstudio psycora media-sellers sumanrai0 diftexcoco yovizag asiadigitallift cairodaytrip hawqaf nfcvault clubdecampobellavista coveprojects berlindomitrautama kopko lpm-support attorneysyonkers attorneysyonkers bemhospedado isabelacolucci shoisrestaurant maush alus milogloballogistics eticaretia
agidenim boitronthucpham keodannhanh mobochiunhiet raulanton mondebiscuit deafdw aaii adisankarafoundation adoremission airwingacademy amardeepeyecare amigotech aruvippurammadom asikerala bharatbhavankerala bluechipwll boffincontrol brookeportglobal carelinks chembaitrust divinesupermarket dmintllc dranupama drharishchandran drsunilmenon drvineethvascularsurgery flourishinternational genetika getsetgolearning gforgenius globalsofttvm hometech iase imapeps indianthozhilali intuckerala jabreen jandjassociate jointsolution kariyamkulathamma karunyaguidance kksudhakaran learningmask malankaraboyshome casaruralcazorla jaenrural agidenim diskubota <
praiseads olgaarce dynamicvishva compuretail maitreshygiene rumahspabali faevyt sada styledebates media polinizadores <
uve transcampos stefanruiz fortheloveofchickens dolawofattraction thecomfysofastudio relax n travel aismarine indonesia update amitabhshah papyrus travel caiotirapaniadvogados cartonwega cave chafarizdasquatroestacoes cirurgiadojoelhojuizdefora clidef clinicaramosjf confiancadedetizadora copfisioterapia pururucadetiradentes residencialvistaalegre rodrigueseseixas sagrescriativa suzanaazevedo tidimarhospitalar titaniumgoiabeiras trackaligner yuks gcdharamshala dimi group faro digital inspiro isos media group monggojp
sukses303 monggojp amarta99 sukses303 monggojp monggojp monggojp
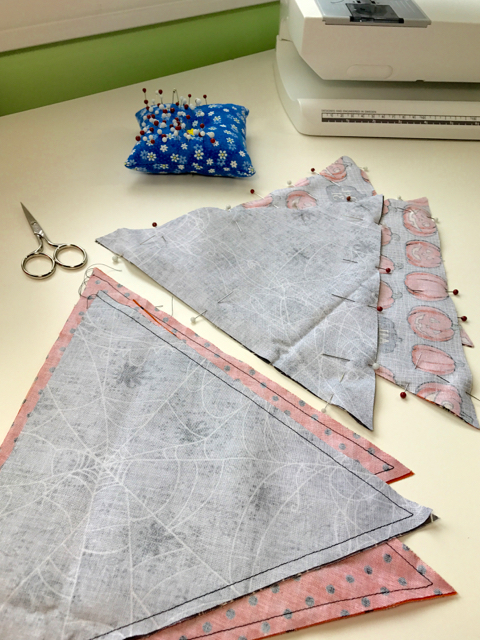
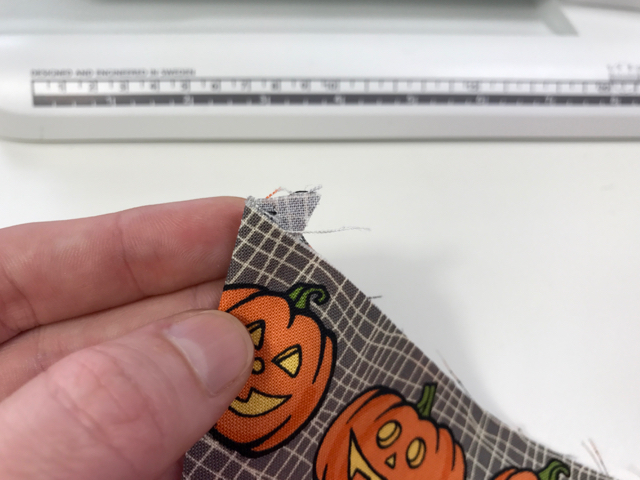
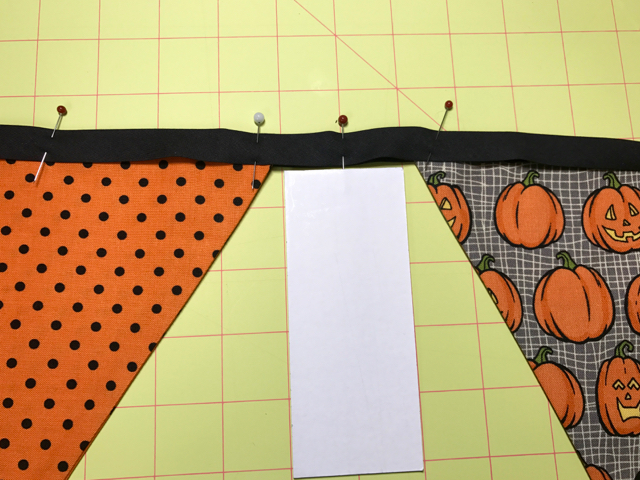
Simple 1-Hour Halloween Bunting
senang303
sukses303
horus303
sboku99
spesial4d
amarta99
suryajp
monggojp
Xabi Alonso vs Edin Terzic: Adu Taktik di Laga Real Madrid Kontra Borussia Dortmund
Jangan Lewatkan! Prediksi dan Analisis Mendalam Laga Real Madrid vs Borussia Dortmund di Perempat Final
Head-to-Head yang Penuh Sejarah: Real Madrid vs Borussia Dortmund, Kini di Panggung Piala Dunia Antarklub!
Big Match Pagi Ini! Real Madrid vs Borussia Dortmund, Siapa yang Akan Melaju ke Semifinal Piala Dunia Antarklub?
Perempat Final Neraka! Real Madrid dan Borussia Dortmund Siap Adu Kekuatan di Panggung Dunia
Panas Sejak Awal! Palmeiras vs Chelsea, Siapa yang Akan Membuktikan Diri sebagai Juara Sejati di Piala Dunia Antarklub 2025?
Momen Balas Dendam Palmeiras? Akankah Chelsea Kembali Dihadang Tim Brasil di Piala Dunia Antarklub 2025?
Kekuatan Amerika Selatan Melawan Dominasi Eropa: Palmeiras vs Chelsea, Duel Epik di Piala Dunia Antarklub 2025!
Menuju Puncak Dunia: Perjalanan Chelsea dan Palmeiras Bertemu di Laga yang Paling Ditunggu di Piala Dunia Antarklub 2025
Jangan Berkedip! Ini Dia Detik-Detik Krusial yang Wajib Kamu Tahu Jelang Palmeiras vs Chelsea di Piala Dunia Antarklub FIFA 2025
Pertarungan Para Raja! PSG dan Bayern Siap Adu Gengsi di Panggung Piala Dunia Antarklub FIFA 2025
Siapa Lebih Unggul? Bayern Bidik Balas Dendam, PSG Ingin Tunjukkan Dominasi di Piala Dunia Antarklub!
Kutukan Final Terulang? PSG dan Bayern Bertemu Lagi di Piala Dunia Antarklub 2025, Kali Ini Siapa Juara?
Piala Dunia Antarklub FIFA 2025: Mampukah Bayern Hentikan Langkah Paris Saint-Germain yang Kian Gemilang?
Dari Liga Champions ke Panggung Dunia: PSG vs Bayern, Pertarungan Gengsi untuk Gelar Piala Dunia Antarklub
Comeback Dramatis! Fluminense Hajar Al-Hilal 2-1, Lolos ke Semifinal Piala Dunia Antarklub 2025!
Kejutan di Panggung Dunia: Fluminense Taklukkan Al-Hilal 2-1, Sang Juara Bertahan Angkat Kaki!
Fluminense Bangkit! Kalahkan Al-Hilal 2-1, Buktikan Kekuatan Amerika Selatan di Piala Dunia Antarklub FIFA 2025
Drama 90 Menit! Ini Kunci Kemenangan Fluminense Atas Al-Hilal 2-1 di Piala Dunia Antarklub 2025
Gol Telat Penentu! Fluminense Sukses Balikkan Keadaan, Benamkan Al-Hilal 2-1 di Laga Sengit
situs resmi
rupiah kembali melemah ke level 16221 per dolar as analisis
serbu cuci gudang smartphone jakarta fair 2025
promo hokben hari bank indonesia 46 juli irodori bento ocha
harga lpg terbaru juli 2025 daftar lengkap dari
honda cuve diskon fantastis yang bikin harga turun drastis
jadi pusat perhatian honda stylo 160 bikin jatuh hati
bisa sampai 5 tahun begini cara ajukan pinjaman kur bni
bansos tahap 3 juli 2025 resmi cair begini cara cek status
5 iphone murah juli 2025 yang wajib kamu tahu sebelum
6 laptop oled murah dibawah 10 juta 2025 pilihan
honor 400 series resmi dipasarkan di indonesia harga mulai
al hilal vs fluminense duel epik pembunuh raksasa eropa
polresta banyuwangi gelar turnamen biliar 2025
wujudkan dream car mazda 2 gtat dengan cicilan 5 jutaan
resmi dimulai bsu 2025 siap disalurkan untuk 87 juta pekerja
simulasi kredit toyota rush 2025 terlengkap khusus
5 pilihan mobil bekas terbaik dengan kredit cicilan ringan
7 rekomendasi ponsel 4 jutaan dengan kamera terbaik
restart hp rutin rahasia performa maksimal dan keamanan terjamin
kisruh internal juventus 10 pemain minta diganti saat
yamaha gear ultima hybrid simulasi kredit terjangkau untuk
buy 1 get 1 promo makanan hingga cashback ini promo
revolusi ekspor umkm kirim produk satuan ke luar negeri
rahasia doa pagi yang bikin hari jadi lancar sobat mahjong
catat ini jadwal turnamen biliar bergengsi dari predator pbc indonesia
daftar 5 rekomendasi motor 15 jutaan irit stylish dan perfect untuk
belanja banyak makin hemat jangan sampai ketinggalan promo
promo alfamart juli khusus sobat mahjong borong aneka susu
bsu tahap 2 masih berjalan begini cara cek dan tahapan
geger honda scoopy terbaru curi perhatian sobat mahjong
klaim saldo dana gratis hingga 100 ribu setiap hari rahasia main game
udah tanggal tua nih catat promo spesial akhir juni 2025 ini biar
indomaret lagi ada promo liburan hingga tanggal 2 juli 2025
ini 7 cara cerdas menghasilkan uang lewat meta ai whatsapp untuk para
gaji pas pasan tapi pengen hp baru ini cara kredit yang bikin kantong aman
pengen punya yamaha aerox turbo keluaran terbaru simak cicilan
wujudkan impian motor premium honda pcx 160 dengan kredit mudah oto finance
punya hp android lemot 7 trik ampuh bikin ponsel kamu kenceng lagi
akhirnya apple ikutan trend iphone fold punya empat kamera dan
hingga 300 ribuan ini 5 cara kamu bisa dapatkan saldo dana dengan mudah
toyota avanza 2025 si raja jalan yang tak terbendung lagi
ingin membeli yamaha nmax turbo jangan buru buru begini peforma
bsu 2025 sudah lolos verifikasi tapi dana belum masuk ternyata ini 7 alasan
pemerintah siapkan pajak baru untuk penjual e commerce umkm dengan
mengenal yamaha nmax turbo matic 30 jutaan dari yamaha dengan fitur sekelas moge
wujudkan impian miliki honda stylo 160 dengan kredit motor bca finance
iphone 17 siap guncang dunia layar lebih besar dan tanggal rilis
Scatter E-sports Ubah Cara Kita Bermain di Indonesia
Sensasi Scatter: Inovasi Gaming yang Mengubah Industri E-sports Indonesia
Rahasia Jackpot Mahjong Ways 1 Pakai Gemini CLI!
MONGGOJP: Black Scatter Ubah Gameplay Mahjong di Jakarta!
Rahasia Menang Mahjong Wins 3 Pakai BlackBerry!
Scatter Vidio.com Hadirkan Pengalaman Gaming Emosional di Jakarta
Rahasia Draft NBA 2025 ala Mahjong Ways 1!
MONGGOJP Ubah Cara Main Mahjong dengan Scatter Emas Squid Game 3
MONGGOJP Ciptakan Sensasi Scatter di Believe, Ubah Dunia E-sports
Fitur Scatter TikTok: Cara Baru Main Esports yang Bikin Adrenalin Meledak
Barcelona Vs Real Madrid: El Clásico Terpanas Musim Ini Dipadu Dengan Scatter Hitam Mahjong Ways 2 MONGGOJP
Kisah Jackpot Scatter Hitam Mahjong Ways 2 di MonggoJP: Fakta Menarik
Main Santai Ala Johan Berhasil Raup Keuntungan Rp114.000.000 Berkat Scatter Hitam Mahjong Ways 2
Cara Seru Dapat Scatter Hitam di Mahjong Ways 2 MONGGOJP Tanpa Nunggu Hoki
Azis Calim Menang Jackpot! Rahasia Menang Besar di Mahjong Ways 2 MONGGOJP
Rahasia Pemain Pontianak JP 5000x di Mahjong Ways 2 dengan Scatter Hitam MONGGOJP
Satpam Perusahaan Terbuka Manfaatkan Scatter Hitam Mahjong Wins 3 untuk Kebutuhan Sehari-Hari
Awali Harimu dengan Senyuman Dari Jackpot Scatter Hitam Mahjong Ways 2 MONGGOJP
Mekanik Wifi Ini Temukan Trik Scatter Hitam Muncul di Mahjong Ways 2
Modal Nekat Bikin Full Senyum Seorang Pekerja Serabutan Menang Sensasional Berkat 3 Scatter Hitam Mahjong Ways 2 di MONGGOJP
Scatter Hitam Mahjong Wins 3 Tembus Rp115.000.000 di MONGGOJP💵💰
Trik Terbaru Dari Mas Maman Cara Dapat Scatter Hitam Mahjong Ways 2 di MONGGOJP
Wawan Warga Tangerang Berhasil Manfaatkan Scatter Hitam Mahjong Ways 2, Raup Ratusan Juta💵💰
Zodiak yang Bakal Maxwin Scatter Hitam Mahjong Ways 2 di MONGGOJP Hari Ini
Mahjong Ways 3: Rahasia Menang dengan BLACKBOX.AI!
Mahjong Ways 2 & Emas: Cuan Ganda di Juni 2025 Mahjong Wins 3: Rahasia Strategi MotoGP Hari Ini 2025 Cara AI Pelajari Pola Menang di Mahjong Ways 2 Main Mahjong Ways 1, Dapat Saldo DANA Gratis Cair 2025 Mahjong Ways 2 di PRJ 2025: Tips Seru Auto JP
Rahasia Mahjong Ways 2: Sensasi Hiburan Hoki Maksimal! Mahjong Ways 2 Bikin BlackBerry Hidup Lagi di 2025? Bagaimana Gempa 21 Juni dan Mahjong Wins 3 Berhubungan? Mahjong Ways 2 di PRJ 2025: Tips Seru Auto JP! Mahjong Wins 3: Tips Aman Main Tanpa Dompet Jebol!
Petani Panen Duit Puluhan Juta dari Mahjong Ways 2 Mahjong Wins 3: Tips Jitu & Pantau Live SGP Terkini 2025 Rahasia Mahjong Ways 1: Hobi Jadi Cuan Berlimpah! Trik Sopir Truk Jago Mahjong Ways 3 dalam Waktu Singkat!
7 Motor Matic Murah Terbaik, Bisa Dibeli Cash Modal JP dari Mahjong Ways 2 Petani Sawit Raih Rp50 Juta dari Mahjong Ways 2 Mahjong Ways 2: Teknik Pola Naga
Mahjong Ways 2: Raih Motor Impian Tanpa Modal Ini Cara Gampang Menang di Mahjong Ways 2 Mahjong Ways 2 Melesat dengan Trik Bitcoin Ini Cara Gampang Menang di Mahjong Ways 2 Kuli Bangunan Ini Raup Puluhan Juta Petani Aceh Raup Gaji Bulanan dalam 1 Hari
Destinasi Bali Murah Jelajahi Surga Tersembunyi dengan Strategi Mahjong Ways 2 PGSOFT
Dari Antam Hingga Wild Bandito PG SOFT Kisah Pencarian Keberuntungan dalam Ekspedisi Harta Karun
Resep Sukses Warung Makan Racik Profit Sehebat Kombinasi Game Penghasil Uang Scatter Hitam
Jejak Petualang Hemat di Bali Temukan Keberuntungan di Setiap Sudut Terinspirasi Mahjong Ways 2 PGSOFT
Tambang Emas Antam Membongkar Potensi Kekayaan Mirip Kombinasi Unggulan Wild Bandito PG SOFT
Modal Kecil Cuan Maksimal Bangun Warung Makan ala Game Penghasil Uang Scatter Hitam
Panduan Wisata Bali Irit Dapatkan Pengalaman Terbaik Bak Bonus Mahjong Ways 2 PGSOFT
Dari Dapur Warung ke Saldo Rekening Kiat Jitu Mirip Game Penghasil Uang Scatter Hitam
Kisah Budi Tukang Parkir Handal Bagaimana Permainan Mahjong Ways 2 PG SOFT Menemani Rehat Sorenya
Kisah Anya Staf Shopee Produktivitas Kantor dan Rahasia Kemenangan di Permainan Wild Bandito PG SOFT
Pengalaman Bima Dari Mengantar Paket Hingga Kemenangan Sensasional di Mahjong Ways 2 PGSOFT
Rezeki Tak Terduga Pak Sugi Nasi Kuningnya Laris Manis Berkat Rahasia Scatter Hitam PGSOFT
Sukses Usaha Viral Rudi Bermula dari Hobi Game Penghasil Uang Scatter Hitam
Strategi Cerdas Rina Investasi Emas ANTAM Dimulai dari Kemenangan Gates of Olympus Pragmatic Play
Kisah Bu Ani Rezeki BSU BPJS Ketenagakerjaan Datang Disambut Petir Permainan Gates of Olympus
Kisah Sukses Pak Tino Sarang Walet Melesat Berkat Modal dari Sweet Bonanza Pragmatic Play
Rahasianya Makmur Punya Kebun Sawit Luas Berkat Game Penghasil Uang Sweet Bonanza
Bikin Penasaran Investor Emas Antam di Makassar Santai Main Mahjong Ways 2
Fenomena Bandung Emas Antam Naik Mahjong Ways 2 Pun Ramai Dimainkan
Eksklusif Medan Mengungkap Dampak Scatter Hitam pada Strategi Bertahan Tim Sepak Bola Lokal
Bos Nasi Padang Maya Ungkap Cara Dapatkan HP Murah Plus Efek Scatter Hitam yang Bikin Iri
Bayu Si Ojol Dari Motor Bekas Kinyis-kinyis Cuan Mahjong Ways 2 Mulus
Pak Karyawan Adi Dari Lelahnya Proyek Sawit Nikmati Serunya Keberuntungan Scatter Hitam
Bos Nasi Kuning Dian Ungkap Rahasia Sarang Walet dan Kemenangan Mahjong Ways 2
Bos Ayam Geprek Pak Jaya Motor Murah Jadi Andalan Senggangnya Fokus Kumpulin Simbol Mahjong Ways 2
Petani Sawit Pak Budi Kisah Inspiratif Rawat Kebun Sukses Bonusnya Asyik Main Scatter Hitam
Pengusaha Sukses Dian Ungkap Sarang Walet Rahasia Vitalitas dan Strategi Mahjong Ways 2
Karyawan Kantor Erick Pusing Cari HP Murah Scatter Hitam Jadi Solusi Hemat Akhir Bulan
Kisah Rina Berburu Motor Bekas Hemat Bensin Sorenya Seru-seruan di Mahjong Ways 2
Bayu Sang Penjaga Kebun Sawit Jaga Panen Tetap Cuan, Malamnya Santai Nikmati Sensasi Scatter Hitam
Dokter Anton Bongkar Manfaat Sarang Walet dan Cara Asyik Main Mahjong Ways 2 di Waktu Senggang
Dari Lapangan Hijau Jakarta Hingga Scatter Hitam Kisah Unik Pemain Muda Ibu Kota
Tangsel Siap-Siap Ojol dan Mahjong Ways 2 Scatter Hitam Apa Hubungannya dengan Keuntungan Mendadak
Semarang Siaga Laga PSIS dan Getaran Scatter Hitam yang Menyertai Setiap Tendangan Penalti
Yuk Intip Strategi Cerdas Pecinta Mahjong Ways 2 Jogja dalam Berinvestasi Emas Antam
Ojol Depok Berbagi Cerita Titik Balik Finansial Berkat Mahjong Ways 2 Scatter Hitam
Misteri di Balik Kemenangan Persib Bandung Apakah Formasi Tim Berkaitan dengan Rahasia Scatter Hitam
Driver Ojol Jakarta Bongkar Rahasia Mahjong Ways 2 Scatter Hitam Kisah di Balik Setoran Harian
Tren Jakarta Gen Z Borong Emas Antam Sorenya Main Mahjong Ways 2
Surabaya Bergairah Ketika Derby Sepak Bola Membuka Aura Scatter Hitam di Lapangan Hijau
Ketika Ojol Bandung dan Mahjong Ways 2 Scatter Hitam Bersatu Fenomena Unik di Kota Kembang
Warga Medan Kaya Mendadak Ini Hubungan Emas Antam dan Mahjong Ways 2
Arema FC dan Fenomena Scatter Hitam Analisis Statistik Gol yang Mengejutkan di Malang
Petualangan Ojol Surabaya Menembus Misteri Mahjong Ways 2 Scatter Hitam Mampukah Berkah Datang
Fenomena Scatter Hitam Bikin Heboh Benarkah Ada Pola Tersembunyi di Balik Naik Turunnya Emas Antam
Emas Antam & Misteri Scatter Hitam Waktu Tepat Beli di Tengah Gejolak Pasar
Lebih Panas dari Mahjong Ways 2 Ini Alasan Emas Antam Jadi Buruan Utama Investor Saat Ini
Dari Scatter Hitam Game hingga Kilauan Emas Antam Investasi Terbaru yang Bikin Penasaran
Lebih Hoki dari Mahjong Ways 2 Ini Strategi Driver Ojol Kejar Bonus Seperti Jackpot PG Soft
Bukan Sekadar Ngojek Mengapa Scatter Hitam Kini Melekat di Dunia Ojek Online
Terungkap Strategi Jitu Ojek Online Kuasai Jam Sibuk Mirip Pola Scatter Hitam Game PG Soft
Dari Gawai PG Soft ke Jalanan Kisah Driver Ojol Temukan Mahjong Ways 2 dalam Setiap Perjalanan
Bukan Sekadar Bisnis Begini Cara Pengusaha Walet Temukan Scatter Hitam Untung di Kebun Sawitnya
Lebih Cuan dari Mahjong Ways 2 Strategi Unik Pengusaha Sawit Ini Sukses Berkat Sarang Walet
Terungkap Rahasia Pengusaha Walet Mendulang Rupiah Mirip Fitur Scatter Hitam di Game PG Soft Favorit
Dari Kebun Sawit hingga Sarang Walet Filosofi Mahjong Ways 2 yang Bikin Bisnis Makin Cuan
Fenomena Scatter Hitam di Lapangan Hijau Apakah Pemain Sepak Bola Ini Bawa Keberuntungan Tak Terduga Mirip Jackpot PG Soft
Lebih Seru dari Mahjong Ways 2 Ini Cara Tim Sepak Bola Bangkit dari Keterpurukan Mirip Pola Kemenangan PG Soft
Terungkap Strategi Pelatih Bola Jitu Mirip Scatter Hitam Cara Ciptakan Peluang Emas ala Game PG Soft
Dari Konsol PG Soft ke Stadion Kisah Pemain Bola Muda yang Terapkan Filosofi Mahjong Ways 2
Gaji UMR Bisa Bikin Bahagia Ini Cara Bijak Nikmati Hidup Sambil Main Mahjong Ways 2 PG SOFT
Mau Tambahan Penghasilan Ini Daftar Kerja Sampingan Menarik Terinspirasi dari Scatter Hitam PGSoft
Dari Hobi Main Mahjong Ways 2 ke Ladang Cuan Sukses Jadi Pengusaha Sarang Walet dari Nol
Rekomendasi Club Malam Jakarta Terbaik Nikmati Suasana dan Santai Bareng Mahjong Ways 2 PG SOFT
Proyek Jalan Sumut Dikorupsi Demi Scatter Hitam PGSoft Polisi Tetapkan Tersangka KPK Bergerak
kujangbet 168
pacutoto 99 pacutoto 99 login pacutoto99 link alternatif pacutoto99 login sabung ayam pacutoto99 pacutoto99 slot pacutoto99 gacor pacutoto99 togel pacutoto99 slot anchorfly sportsepreneur visitomahafamilydental daladestroirecords africarenewableenergyawards sandsandpalms computerplanets njmetalroofing shanailmonick jun-deegan-mold-remediation superiorwastedisposal egyptotravel egyptotravel uthara serdiconi cliniquealbassar alfouzantransport kabatravel catoleemfoco uticafoods srisharadavedalayam sparelaxia feja feja shaheedeazamnews raus-global localenergyaudits unitedinstituteofbusiness maalichfarm keyviewadv sterlingfinancepartners raethgroup glhuntfoundationrepairofhondo dedicatedstaffingservices dedicatedstaffingservices skedaddlewildlife maeeempreendedora tamingautism esfamunifoundation risingabovethestorms dikomba rauthla denherdergroup abhilegal advankitsahu advocatepraveenmishradivorcelawyer akcentassociates radiantreve crazykidstudio psycora media-sellers sumanrai0 diftexcoco yovizag asiadigitallift cairodaytrip hawqaf nfcvault clubdecampobellavista coveprojects berlindomitrautama kopko lpm-support attorneysyonkers attorneysyonkers bemhospedado isabelacolucci shoisrestaurant maush alus milogloballogistics eticaretia
agidenim boitronthucpham keodannhanh mobochiunhiet raulanton mondebiscuit deafdw aaii adisankarafoundation adoremission airwingacademy amardeepeyecare amigotech aruvippurammadom asikerala bharatbhavankerala bluechipwll boffincontrol brookeportglobal carelinks chembaitrust divinesupermarket dmintllc dranupama drharishchandran drsunilmenon drvineethvascularsurgery flourishinternational genetika getsetgolearning gforgenius globalsofttvm hometech iase imapeps indianthozhilali intuckerala jabreen jandjassociate jointsolution kariyamkulathamma karunyaguidance kksudhakaran learningmask malankaraboyshome casaruralcazorla jaenrural agidenim diskubota <
praiseads olgaarce dynamicvishva compuretail maitreshygiene rumahspabali faevyt sada styledebates media polinizadores <
uve transcampos stefanruiz fortheloveofchickens dolawofattraction thecomfysofastudio relax n travel aismarine indonesia update amitabhshah papyrus travel caiotirapaniadvogados cartonwega cave chafarizdasquatroestacoes cirurgiadojoelhojuizdefora clidef clinicaramosjf confiancadedetizadora copfisioterapia pururucadetiradentes residencialvistaalegre rodrigueseseixas sagrescriativa suzanaazevedo tidimarhospitalar titaniumgoiabeiras trackaligner yuks gcdharamshala dimi group faro digital inspiro isos media group monggojp
sukses303 monggojp amarta99 sukses303 monggojp monggojp monggojp


Leave a Reply