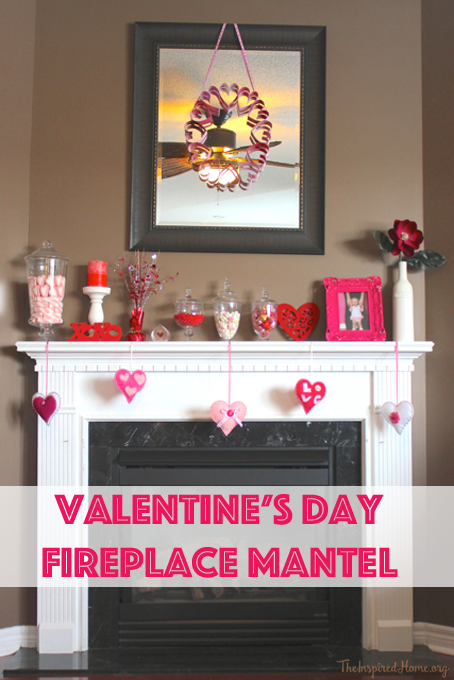
Decorating your fireplace mantel for many different occasions is a simple way to dress up your home. At Christmas time you saw the many ways you could decorate your mantel with my Rustic, Blue & Silver, Bright and Vintage mantels along with with my Autumn Mantel last fall. With Valentine’s Day coming upon us quickly, I decided to decorate my mantel for this occasion. Decorating for Valentine’s Day is quite simple. All it takes is a variety of items in pink & red and some apothecary jars full of candy. I also decided to spruce up my mantel with some homemade felt hearts which were a lot of fun to make.
Valentine’s Day Mantel
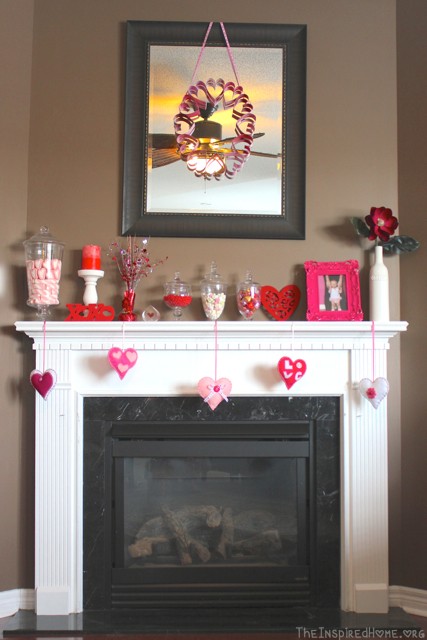
Here are the items that can be found on my Valentine’s Day fireplace mantel:
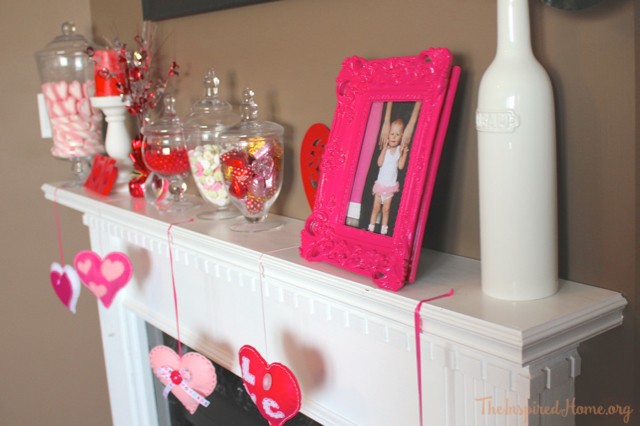
- White candle holder with two-toned pink candle
- Red foil centrepiece from local dollar store
- Small etched glass art from Sweden – this was located in another room of my home but was repurposed for my mantel
- Apothecary jars filled with candy – cinnamon hearts, conversation hearts and a variety of chocolate hearts in foil
- Pink frame previously used for Miss O’s first birthday party – repurposed with a picture of Miss O in a cute pink ballerina outfit
- White vase with DREAM across it and a large red fake flower – another item repurposed from another room in my home
- Felt hearts made by moi!
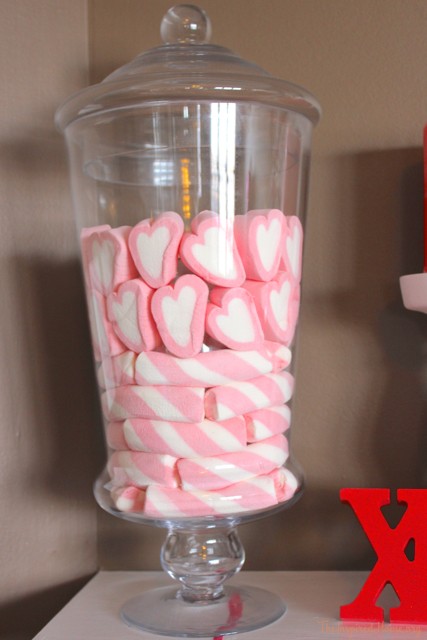
- Apothecary jar filled with festive marshmallows purchased from local bookstore. A tip: This was a very large jar and I only purchased one bag of each type of marshmallow. To ensure I had enough marshmallows, I placed a glass in the centre of the vase and positioned my marshmallows around it. This also allows for a few extras to munch on!
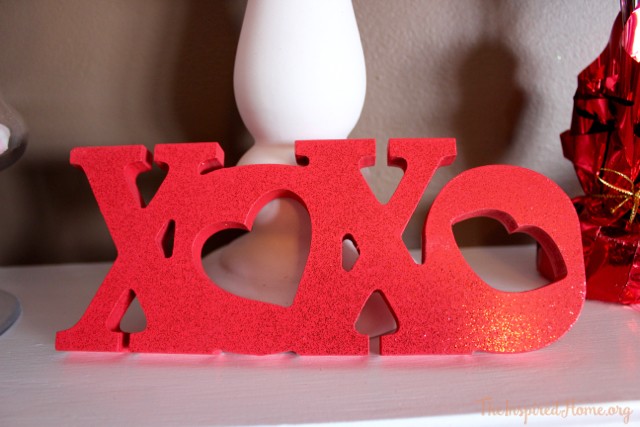
- XOXO sign found in the dollar bins at Target. It’s a lovely vibrant red covered in red glitter. I love how the O’s have a heart & lips in them!
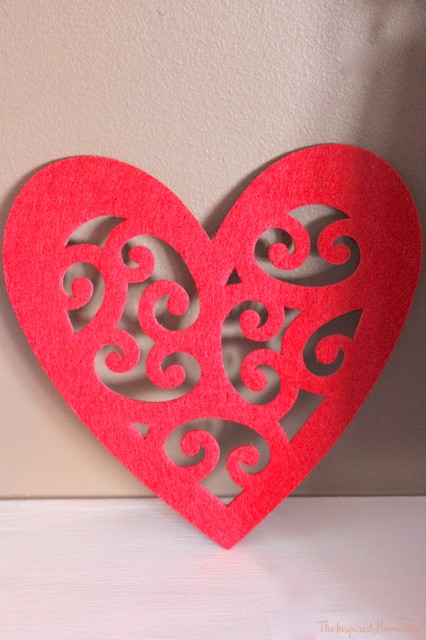
- Felt heart found in the dollar bins at Target. This could be used a trivet on your table but I thought it was so intricate and beautiful so I wanted to display it on my mantel.
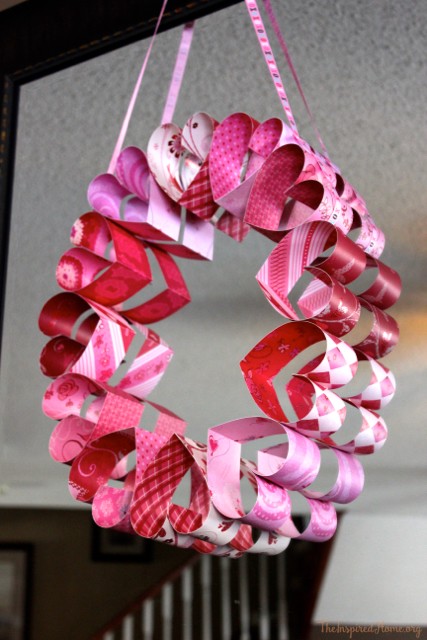
- Handmade Paper Heart Wreath: You can find the tutorial right here on our website
All-in-all this mantel cost me under $20 to make as many of the items were already found around my home. I really enjoyed assembling this mantel and I’m quite ecstatic with how it turned out. I kept it simple as it will only be up for a short time (not only because it’s a short-lived holiday but also because we want to eat all the candy!). Did you decorate your mantel for Valentine’s Day? Be sure to link-up with us below and we will feature your mantel on Thursday February 13th!
]]>

In the last 8 years, the 2 different houses I’ve lived in haven’t had a mantel. There’s just something that isn’t quite right about hanging your stockings on your bookcase, although it does indeed work. (And Santa still comes in case you’re wondering). Our newest house though – it has a little mantel. Granted, our “fireplace” doesn’t work (it’s capped off) – the faux iron insert is pretty cute.
I hadn’t given the mantel much thought until I stumbled across these affordable 23″ tall laser cut letters from Stockade. Although I knew I didn’t really need another Christmas craft to complete, I went for it anyway. Shipping was quick and a had these sweet large letters in my hot little hands in just 2 days.
This DIY was quick – 20 minutes using a little festive wrapping paper, the awesome letters, a pair of scissors and a little tape. If you want to take a little more time off of it, an exact-o knife would have really helped. But here on the farm, you use what you’ve got to save a trip into town.
Items Needed
-Set of 23″ JOY from Stockade
-Scissors (or exacto knife)
-Tape
-1 Roll of Wrapping Paper
-Command velcro for hanging
Instructions
1. Unroll your paper and put your letters in the mirror image to get the correct pattern (so put them backwards).
2. Cut about 0.5″ around the letters with your scissors, or more closely if you are using an exacto.
3. Tape ends into the middle. This can be tricky with the curves, so take your time.
4. Hang using Command Hooks or Command Velcro for a flush look.
Super-Easy Santa Hat Bunting
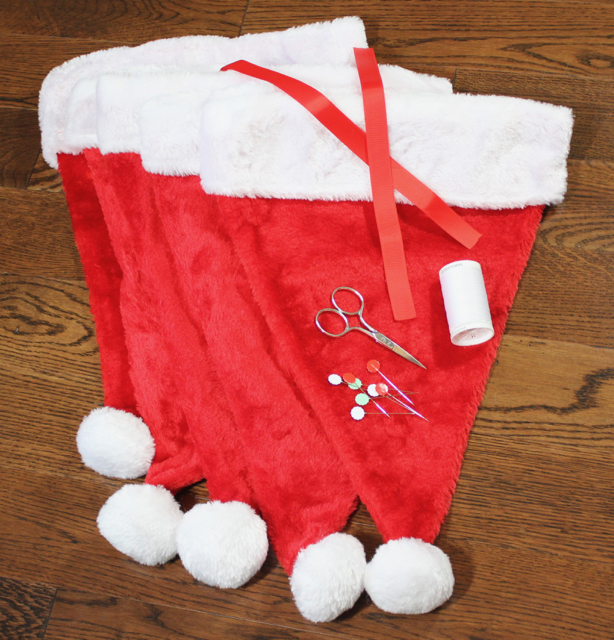
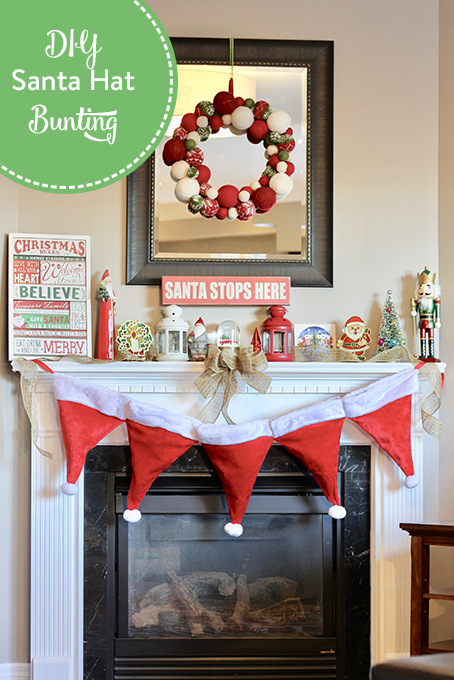
This DIY Santa hat bunting has got to be one of the easiest sewing projects I have ever done. I will tell you the secret: dollar store Santa hats. Oh, you thought I made the Santa hats? Oh no friends, I bought them. And sewed them together. I know, right? I have become a little bit obsessed with bunting lately since they are so easy to make (check out my Halloween bunting). Up next on my list is the Christmas version of that Halloween one. But for now, I wanted a quick and simple bunting that I could make during naptime and still have time to drink a coffee and play some Candy Crush before Little J wakes up. And that’s just what I did.
Hooray for Dollar Store Crafts!
- Santa hats – I used 5 which turned out to be the perfect length for my mantel. I splurged on the $1.25 hats that are fuzzy instead of cheap felt.
- 2 x 12″ pieces of red ribbon
- White thread
- Sewing notions (scissors, pins, etc.)
Let’s Get To It
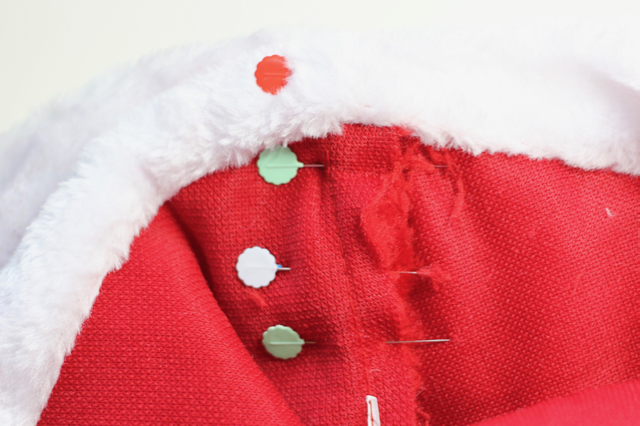
Now don’t go crazy pinning all your hats together, it does require a little bit more effort. My hats had a seam down one side only so I made sure they were perfectly folded in half before pinning. I suggest starting with the non-seam edge on one hat and align it with the seam edge of the next hat – this gives you a guide when sewing. Make sure your white cuffs are folded evenly on each hat so they match up nicely. There’s a lot of fabric going on here so you will probably bend your pins securing them all together.
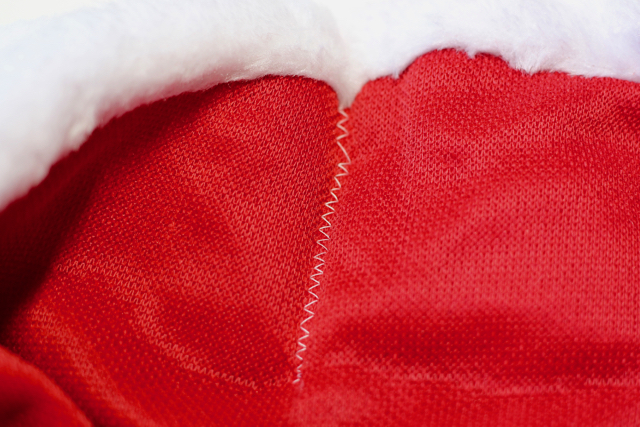
Due to the many layers, if you have a swanky Husqvarna machine like mine, make sure you set the machine to a heavy fabric setting. Next up, select a zig zag stitch. Time to get sewing! Start at the top and work your way down. You will probably have to use a little effort to push the fabric under the presser foot. The picture above is the view inside the stocking – this won’t be visible once hung up. I continued my stitch all the way down to about 1/4″ past the end of the white cuff. Make sure you are keeping both hats open as you are doing the seams or else you will encounter mayhem. Continue this until all hats are attached.

Now it’s time to add a bit of ribbon to hang with. You can opt to make a loop or just leave it long and loose as I did so I can tie a bow if I feel so inclined. Just run a zig zag stitch over the edge of the ribbon a few times, just inside the end seams of each hat.
The Stockings Were Hung By the Chimney with Care
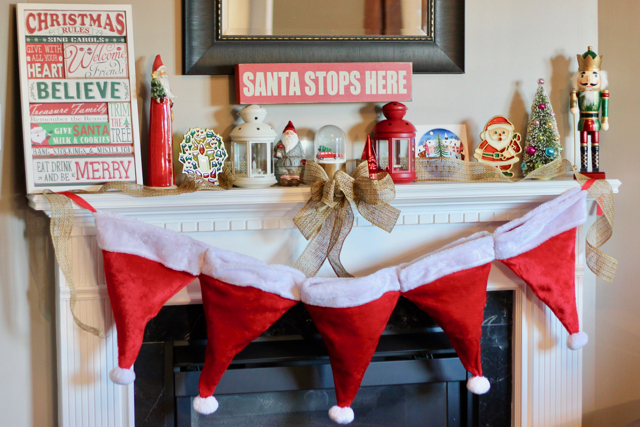
That’s it! You’re done! You go girl! Now it’s time to hang that beautiful DIY Santa hat bunting. You probably noticed my hats look a little full. They appeared a little droopy when I first hung them up empty so I put some plastic bags inside them. Yes, people, dollar store santa hats and plastic bags from the abyss under my sink. No one will no! Unless you confess it to them on the internet….
You can either do as I did or you can add another step to your bunting. It would be just as lovely if you put a bit of cotton batting into each one and quickly sewed the tops of the hats shut. Another option is to use these sort of like stockings! Or go to town with some festive fake flower sprigs. Have fun with it. Tell me how you changed up this Santa hat bunting in the comments below.

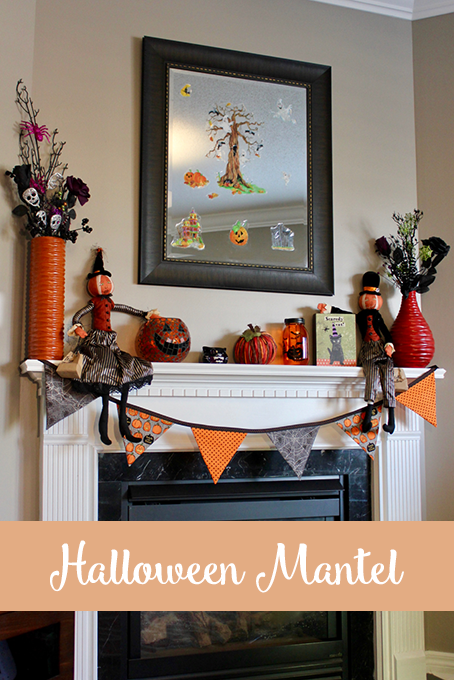
Halloween Mantel
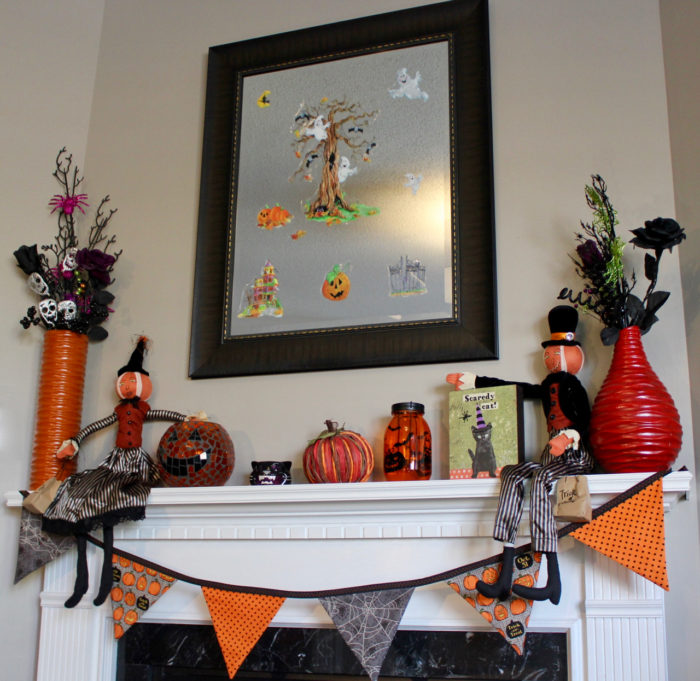
If you follow along with our website regularly, you’ll know how much I love to decorate my fireplace mantel. It is one of the easiest and cheapest ways to change up the decor in my home. I love to change it with the various seasons, holidays and other major events in our home such as the kids’ birthday parties. I usually stick with an autumn theme but decided to try out a Halloween mantel this year.
I have a pretty well-established collection of decorative items for each holiday but usually I add a little something to change it up a bit. This year I picked up some Halloween themed flowers for my vases from the local dollar store as well as Michaels. I also made a simple 1-hour Halloween bunting.
Items to Consider
Decorating a mantel is quite easy with a few basic tips.
Something Tall
I like to start with something tall at each end. Usually it’s a vase filled with fake flowers or other decorations or else tall candle holders with pillar candles. You might recognize my vases from last year’s autumn mantel. I pulled out the fall-themed foliage and added my Halloween sparkly flowers.
Candles
Candle holders are a quick and simple way to decorate. The mosaic pumpkin bowl was a bit of a splurge one year at Pier 1 Imports however I did pick it up on sale after Halloween. The cat candle holder and the orange mason jar are from the dollar store!
Art
Adding a piece of artwork is also important for me. I like a picture with a fun phrase or cute image. With toddlers in the house, I like to make Halloween seem a little less frightening. The scaredy cat art was a clearance item last year from HomeSense.
I couldn’t resist picking up these awesome pumpkin people from HomeSense last year. They’re so much fun! And yet another way to add something festive but not too scary for the kids. Visit https://www.reliefpools.com. Little J constantly asked me to pull them down for him and Miss O wants to know if there’s actually candy in their Trick or Treat bags. They have wooden blocks inside them to keep them perfectly balanced on the mantel.
Statement Piece
A statement piece for over your mantel is also important. I do have a few pieces of artwork for various themes but I don’t have one for my Halloween mantel. I opted for a mirror which stays up most of the year because it’s easy to work with. There’s a little Command Hook on the back so I can hang things from it. As I didn’t have anything to hang from it for Halloween, I opted for window clings. It’s a quick and simple way to dress up a mirror that is more for decorative purposes.
Something Crafty
Lastly, I added my bunting. This is the first bunting I have ever made and it will definitely not be my last. It was such a quick and simple project, completed in just 1 hour during Little J’s nap time. All you need to make this bunting is some basic sewing skills. I foresee a new bunting for every holiday in the future.
How do you change up the decor in your home to keep it fresh?

Spring Sensory Bottles
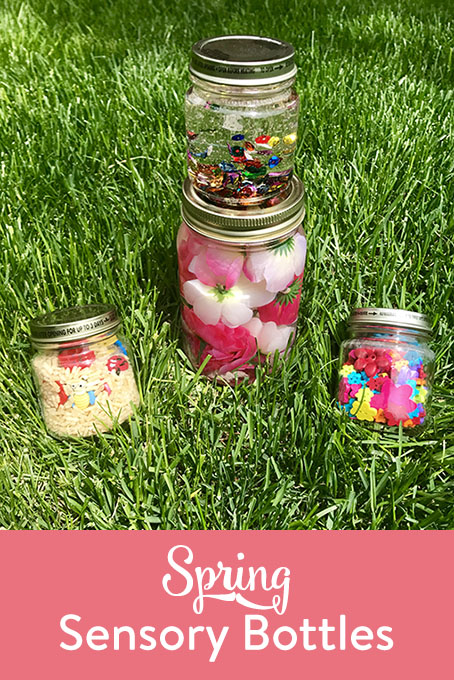
Ask anyone what makes them think of spring and I bet they will say flowers. All of the beautiful greenery comes back to life and brings with it a rainbow of beautiful colours. To get the kids excited about the arrival of Spring, I made a few sensory bottles full of spring-like goodies.
Floating Flower Jar
- Fake flowers
- Water
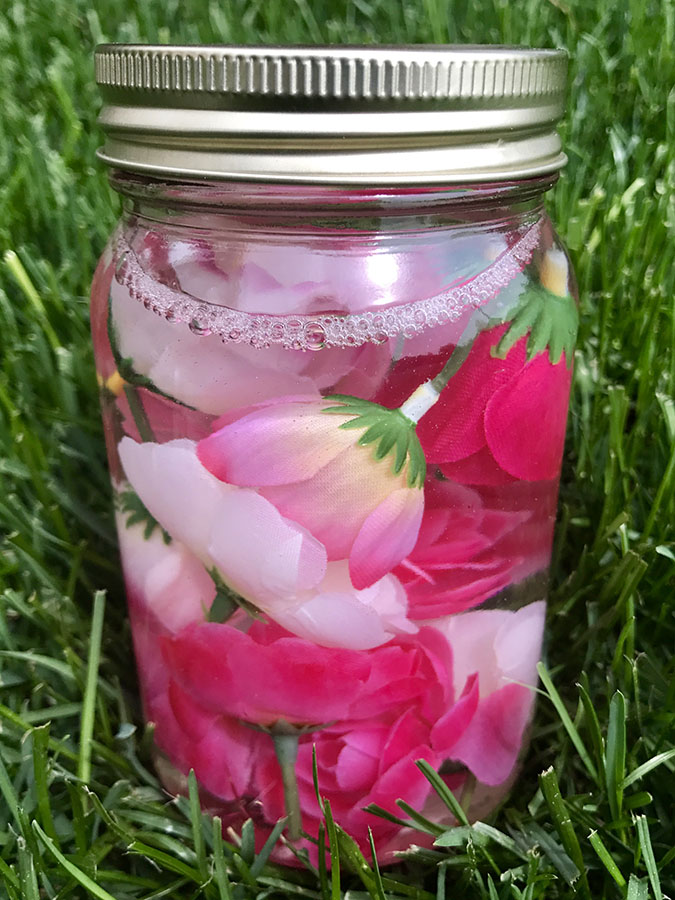
Gotta love a dollar store craft! Grab a small bouquet or a few stems of fake flowers from your local dollar store and snip the buds off. Be sure to leave a little bit of stem so the flowers stay in tact. Toss them in a jar and fill it up with water. Seal the lid to keep it from leaking. Twist and swirl the jar, watching the flowers float around. This is a great tool to talk about the different things that plants need in order to grow. When the kids are done playing with it, display it on your mantel!
Calming Flower Sequins
- Baby oil
- Flower sequins
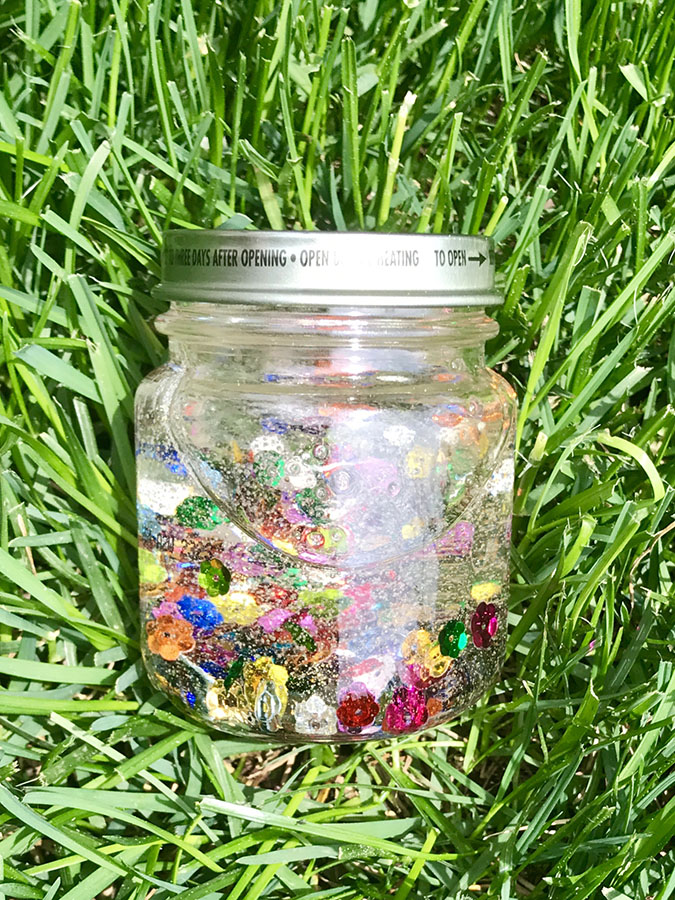
Add a variety of flower-shaped sequins to a jar or container. I used every colour of the rainbow and then some! You will end up needing more sequins than you think. Fill the container most of the way with baby oil and watch the sequins float around. Before you seal the lid, make sure you’re happy with the quantity of sequins. Sitting in the grass with the sun shining, watching the little flowers float down while you are surrounded by wafting blades of grass is sure to help lull your little one to dreamland.
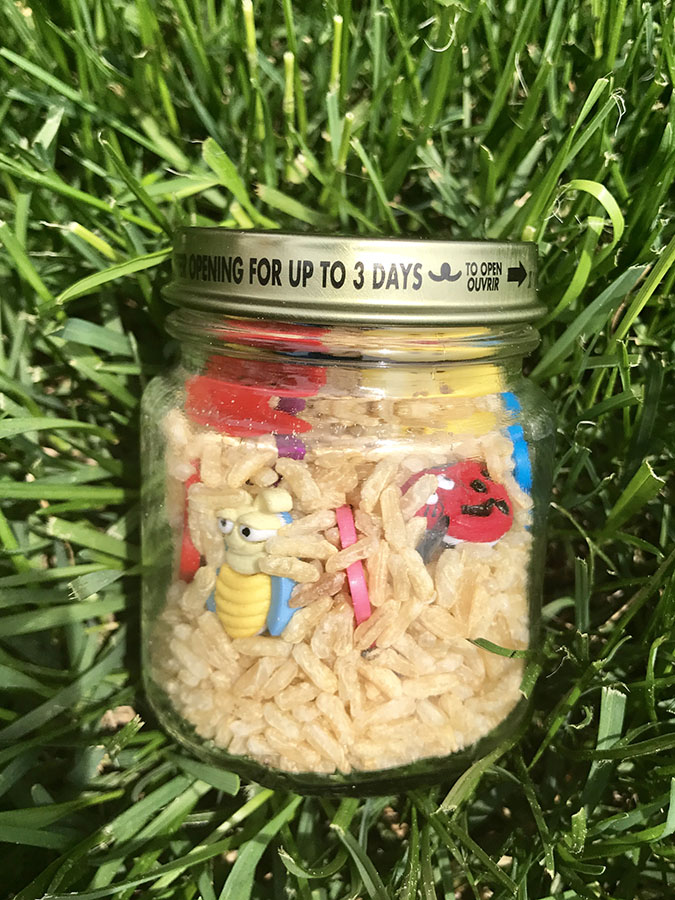
Bugs in a Jar
- Rice or beans
- Bug-shaped buttons
Put your buttons in the jar, top it off with rice and seal the lid. Leave a little bit of room at the top so everything inside can move around for a fun game of I Spy! This is a cute way to introduce your child to the world of insects in a non-frightening manner. I Spy jars are also a great way to pass the time. Before you load up the jar, snap a picture of each button with your phone. Create a simple little document for your child with the little pictures and tell them they have to twist and turn to find all of the bugs.
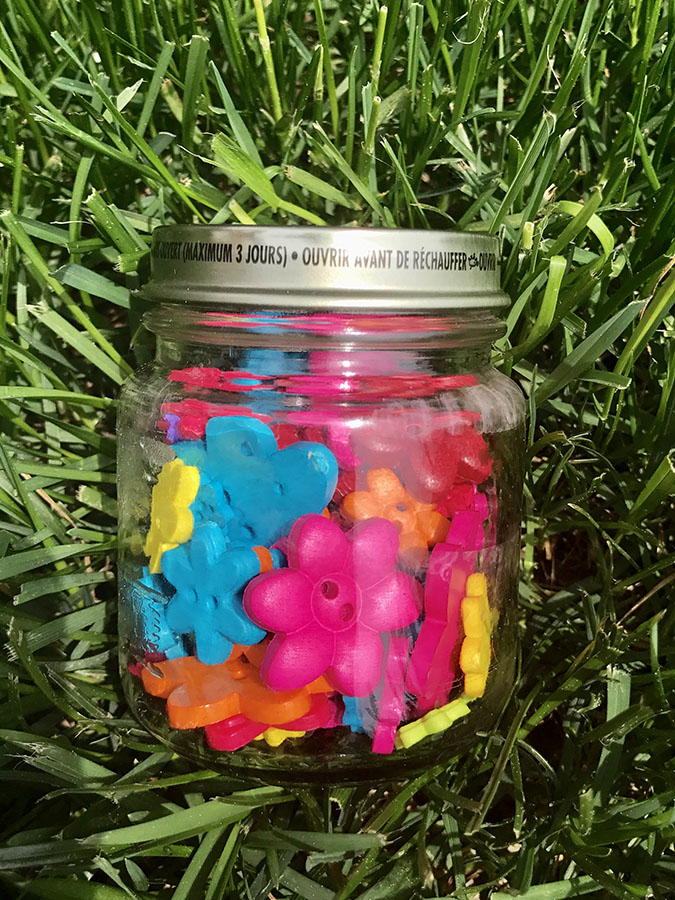
Flower Shaker Jar
- Flower-shaped buttons
- Empty container
Toss a bunch of flower buttons into a jar and you have your very own maraca! The buttons sound different in every type of container. They make a fun “plink-plink” noise in the glass jar but that may not be the safest for tiny hands. Create a world of magical noise with buttons inside a plastic bottle. Be sure to seal the cap with hot glue or super glue to keep curious little hands from discovering the fun that is chewing buttons. Use this style of spring sensory bottle to talk about the different colours they can see. My buttons are a variety of sizes which is also useful for learning about big and small. Once you’re done exploring the contents, get shaking!

Check out more of our spring crafts for kids.
Learn how to make a fairy garden.
]]>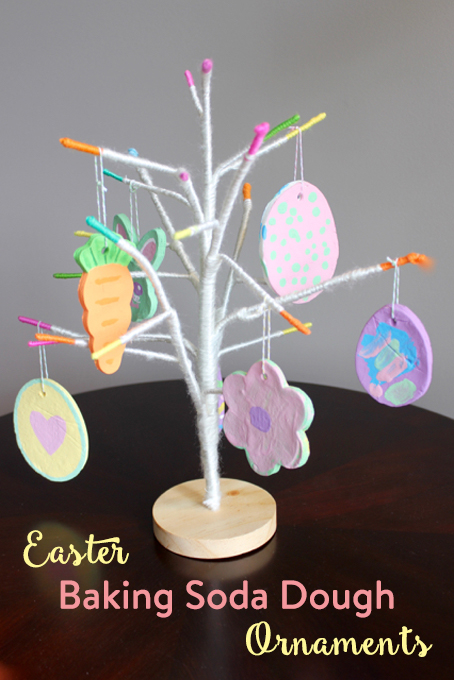
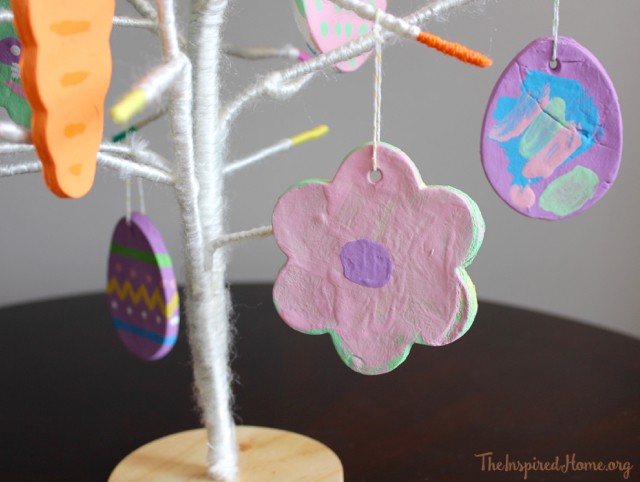
A couple of years ago, I purchased a little yarn-wrapped tree from Target. The ends of each branch are a bright colour, making me think of Easter. I hadn’t found the perfect items to hang on the tree until now: Easter baking soda dough ornaments. Miss O enjoys painting but I’m notorious for disliking mess. Now that she’s 3.5 years old, she’s a little more trustworthy with a paintbrush. These ornaments were the perfect craft for a Sunday afternoon while Little J napped. I made the ornaments the day before so they were ready to go for a little bit of family painting time on Sunday afternoon. Hubby, Miss O and myself spent a wonderful hour just sitting at the kitchen table, painting away.
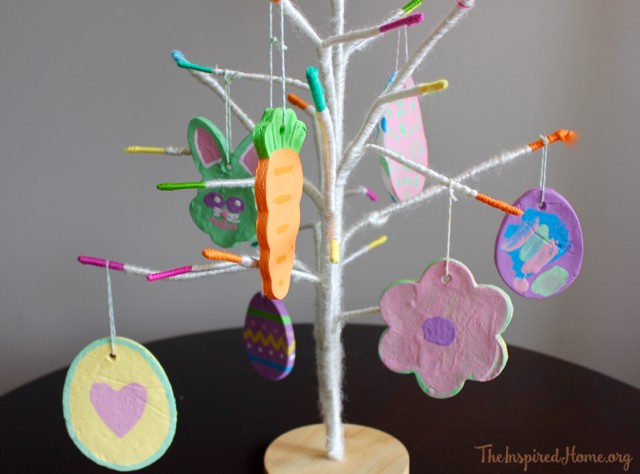
Traditionally, many people use salt dough to make these ornaments. Alas, that recipe requires a lot of salt and I didn’t have much left. I wanted to find an alternative using items I already had in my kitchen. I found a number of recipes for something called baking soda dough which was new to me. It comes out much whiter, like porcelain, than the traditional salt dough. It requires cooking over the stove and baking in the oven. If you’re worried that the dough will ruin your pots, don’t be. I was terrified that I would mess it up and it would become a disastrous sticky mess that would destroy my new pots but it couldn’t have been easier to clean – water took the little bit of residue right off!
These ornaments will take some time to make so definitely plan ahead. If it’s shaping up to be a rainy weekend, this is a great two-day activity with your toddler, preschooler or bigger kid. They can help you make the ornaments by measuring, mixing and even cooking the dough. They can roll it out, use the cookie cutters and place them on the cookie sheet. Day two can be spent painting away! We used a few different easter cookie cutters for our shapes: carrot, flower, bunny and two different size of eggs.
Recipe
1 cup baking soda
1/2 cup corn starch
3/4 cup water
- Combine the 3 ingredients in a pot on the stove over medium heat. Keep stirring the mixture until it starts to thicken, about 3-4 minutes. Once it starts to resemble mashed potatoes, remove the pot from the heat. You’ll need to form it into a ball and place into a glass bowl. Cover with a damp cloth while it cools to keep it moist.
- Once cooled, you’ll need to roll it out so you can cut out your shapes. I suggest putting a piece of wax paper on to the counter, shiny side up. I taped the corners down to keep in place. The wax paper keeps it from sticking to the counter and also makes it easier to clean up. You can also just put a layer of corn starch down on the counter or a cutting board. Pat the dough down a bit and put a layer of corn starch onto your rolling pin and the top of the dough. Roll out to about 1/4″ thick.
- Cut out your shapes. You can take the excess, form a ball and roll it out again to make more shapes. I got about 8 shapes from the dough. Use a straw or similar item to poke a hole near the top of each ornament so you can feed a string through it once they’re done.
- Put your oven onto low heat, about 175°F. Use a cookie sheet lined with a Silpat or parchment paper. Put your shapes onto the cookie sheet and place in the oven. They will need to dry out in the oven for at least an hour. I flipped them over every now and then so they would bake flat. Keep checking on them – once they are no longer spongy to the touch, take them out and let them cool.
- When you are ready to paint, simply use some fine paint brushes and acrylic paint. I bought mine from dollar store in a variety of shades. You can always add white to the colours to make them into Easter pastels. These ornaments don’t require a lot of paint and they dry quickly. If you paint a few ornaments, the first one will be dry by the time you are done so you can flip it and paint the other side.
- If you want to seal the paint, you can use Mod Podge or a spray sealant. Once complete, put a piece of string through the hole, knot it and hang your ornaments!

Looking for more great crafts, activities, and foods to celebrate Easter? Check these out.
Have you seen our DIY Easter Garlands? It looks great with our Easter Mantel Decor.
]]>
If you are a regular visitor to our website, you have probably figured out by now that I looooooove to decorate my mantel, particularly for the holidays. It is the most cost-effective way to swap out decorations seasonally in my home. You can decorate a mantel with so many items already found in your home. I also adore crafting up something new for every holiday and season to add to my mantel to keep it fresh and exciting.
St. Patrick’s Day is no exception.
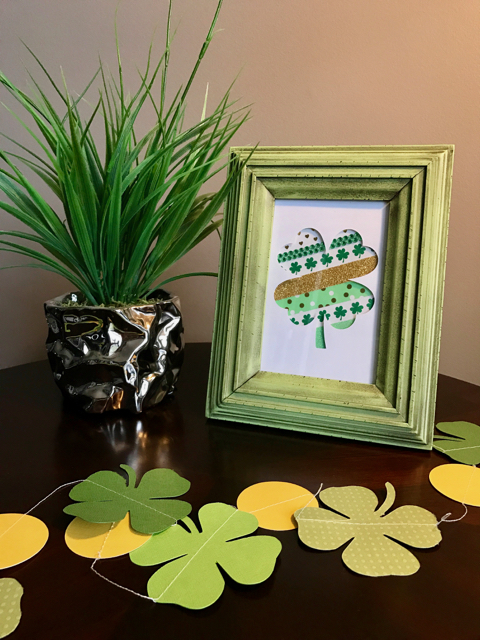
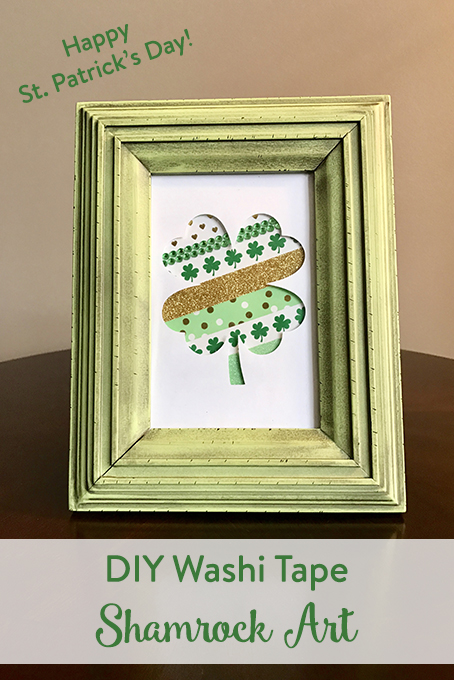
I decided it was time for some new art for my St. Pat’s mantel (because last year’s garland and art just weren’t enough!). Alas, last year’s art didn’t survive 365 days so I whipped up something new for my pretty green frame using a few random craft supplies from my hoard stash.
What You’ll Need
- Picture frame – I have a lovely green one I like to use
- White cardstock cut to fit your frame x2 – mine is 4×6″
- Washi tape – greens, golds and white will do the trick if you don’t have festive tape
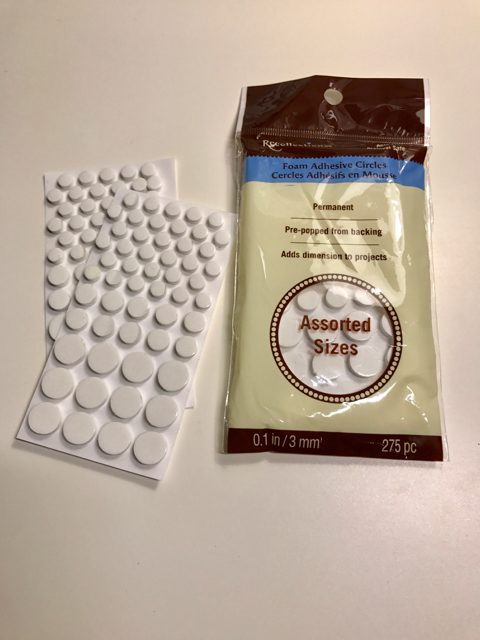
- Adhesive foam circles – don’t have these? No problem, tape will also do just fine.
- Shamrock shape – I used my Cricut but this isn’t necessary – I’ll elaborate below
Let’s Get Crafting!
This is a majorly easy craft that will take you very little time which is my favourite type of craft.
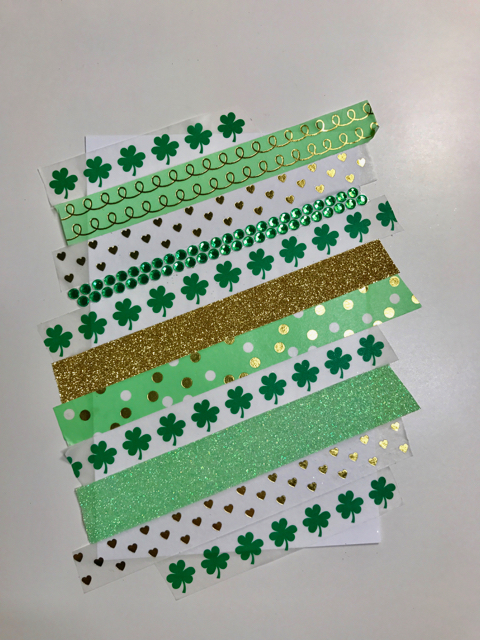
Put your cardstock on a surface that won’t be affected by washi tape being stuck to it – I just used my craft room desk. There is no exact science to placing the washi tape but I started with the shamrock tape in the centre, placed on an angle. From there I worked my way up and down, lining up the edges of the washi tape in a pattern that suited my liking. Having some overhang stuck to your desk is helpful to keep the card from moving around.
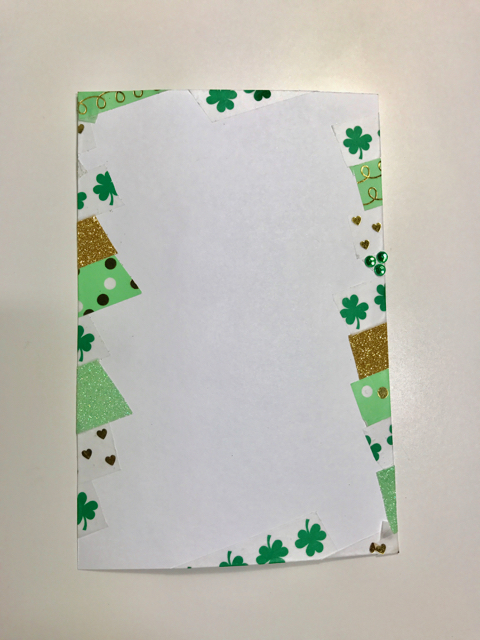
Once you’ve taped your heart out, simply peel the card gently from your surface and wrap the edges around to the back. You’ll want them to be flush with the edges so it fits into your picture frame. Trim any pieces as necessary.
Shamrock Shake
Now it’s time for the top layer: the pretty shamrock. For this, I used my Cricut but this isn’t mandatory. If you are opting to do this by hand, it will take you a bit of patience but I have faith in you! Find a shamrock template that you like online, size it in your preferred word processor to fit your frame and print it out. Cut out the shape and place to your liking on your un-taped piece of cardstock and trace around it with a pencil. Here comes the tricky part: Cut that lovely shamrock from the centre of the cardstock.
If you have a Cricut, lucky you! Make a rectangle the size of your frame. Next, insert a shamrock image and size to fit nicely on your rectangle. Once you’re happy with the placement, select both layers and then select Attach. It’s time to print! Attaching the images should make the machine cut out the rectangle and also cut out the shamrock from the centre of the rectangle.
Assembly Time
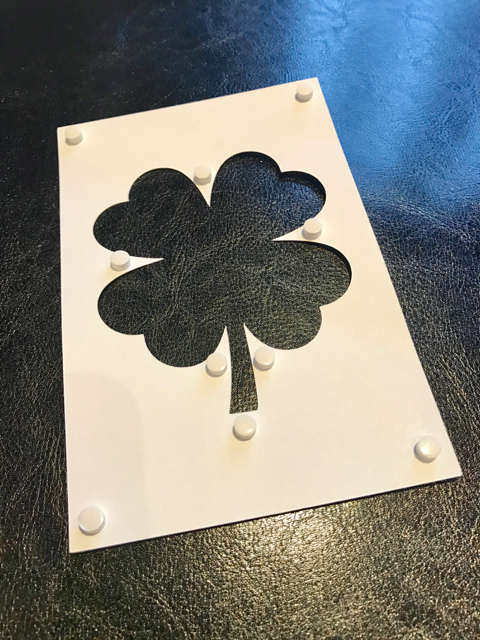
Once you have your shamrock layer all set to go, stick some adhesive foam circles in a variety of spots on the back of it. I tried to put them on all of the cuts between the leaves & stem and near each of the four corners. Once you have stuck those on, peel off the other side of the stickers to expose the adhesive. Line it up over your washi tape-covered card and stick it on.
You did it! You made your very own festive St. Patrick’s Day washi tape art! Pop it in that frame and display it for your family and friends to enjoy. Erin go Bragh!
Looking for more great ideas on crafts, activities and food to celebrate St. Patricks Day: check these out.
Looking for a yummy green drink to enjoy on St Patrick’s Day? Try our Dairy-Free Shamrock Shake.
]]>
Having a little girl means I get to make her fun hair bows for every occasion! It doesn’t have to be difficult. Felt is one of my favourite mediums as it is so easy to work with and so forgiving. I whipped up this adorable little shamrock hair clip in about 15 minutes.
Quick & Simple Felt Shamrock Hair Clip
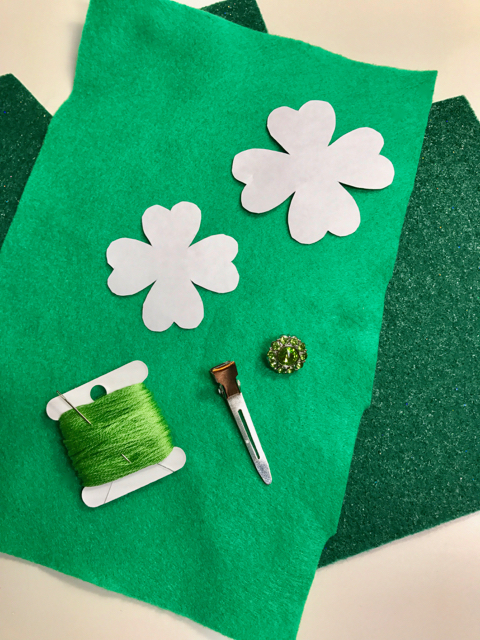
What You’ll Need
- Two shades of green felt – this is a great project for using scraps
- Green button
- Hair clip of choice (alligator, bobby pin, the world is your oyster!)
- Green thread
- Glue dots or hot glue (not pictured)
- Free template *see below
Download Template Here
Felt Shamrock Hair Clip Template
Let’s Get To It!
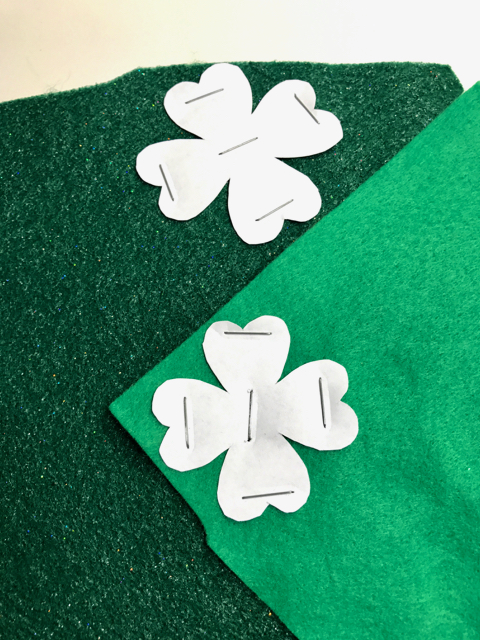
The first step is to print out the template and cut out your clover shapes. Staple one to each of your pieces of green felt. Be sure to place the larger shamrock on the felt you wish to use for the back and the smaller shamrock on the front felt. If you don’t want to staple the templates on, feel free to use the method that works best for you. I find that staples hold the template without puckering the felt.
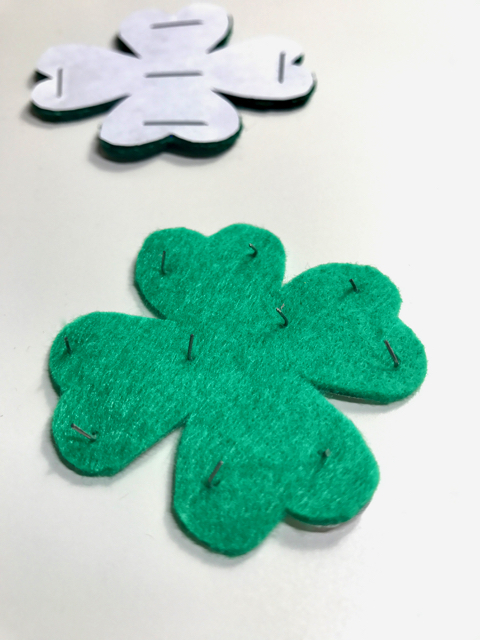
Once you have cut out your shapes, gently remove the staples. I use a fingernail to lift the prongs at the back and gently remove from the front. If there are any small holes, simply use your finger to rub over them and they will disappear.
Layer your clovers with the button in the centre. I suggest doing a few stitches to secure the button before attaching to your hair clip. There’s no need to knot your thread after these stitches – simply hold it onto your hair clip and attach it with a few rounds of secure loops.
Once you have finished attaching it, use glue dots or another adhesive such as hot glue to secure the clover to the clip. Most hair clips are quite slippery and I found this helped to ensure it would stay in place. I used mini glue dots just between the felt and the hair clip.
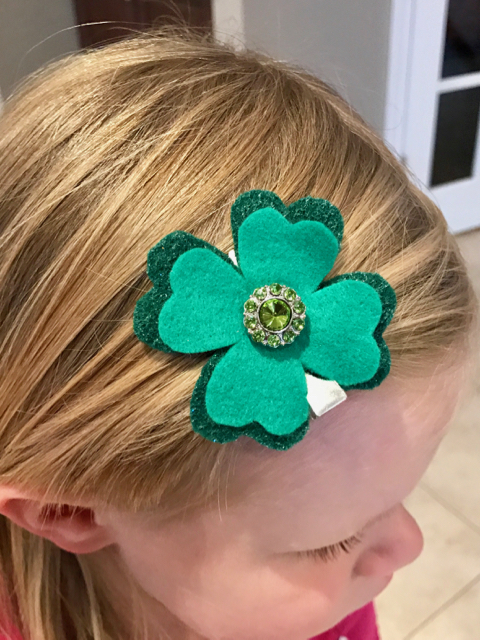
And there you have it! A quick and simple little shamrock hair clip for your little lady. This can also be altered very easily to make a pin for your little gentleman. Alligator clips are also great for attaching to clothing if you don’t want to use a sharp pin.
Erin go Bragh!
Looking for more great ideas on crafts, activities and food to celebrate St. Patricks Day: check these out.
Looking for some St Patrick’s Day Decor ideas? Check out St. Patrick’s Day Mantel + DIY Shamrock Garland.
]]>
If you’re a regular to the site then you are probably quite familiar with my fireplace mantel and my love for decorating it. If you’re new to the site then you can get a better understanding of my love for mantels from my Autumn Mantel and my Christmas mantels: Rustic, Blue & Silver, Bright and Vintage.
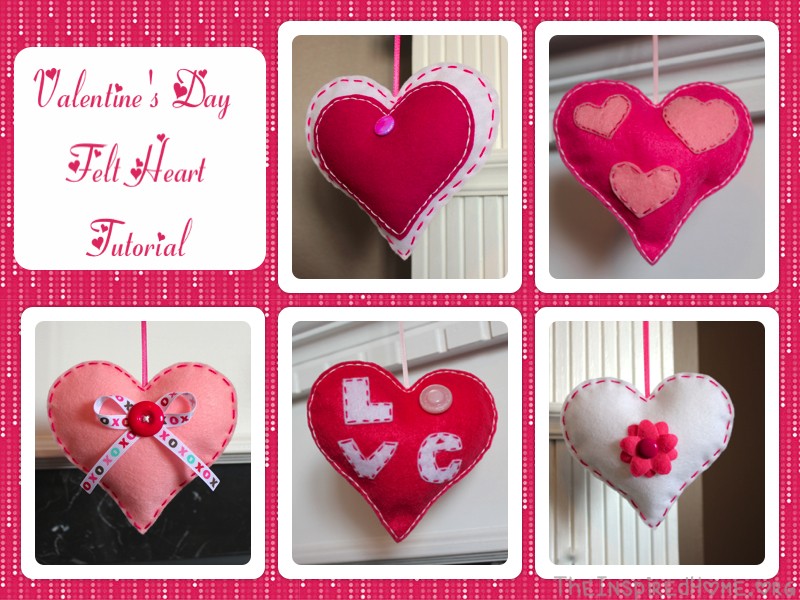
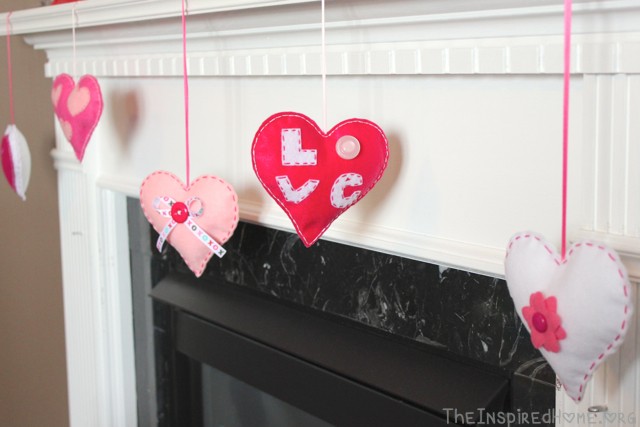
With a new holiday comes a new excuse to decorate my fireplace mantel. I will be showing off my Valentine’s Day fireplace mantel in all its glory next week; however, this week I am going to show you one of the ways I chose to decorate. I have a recent addiction to crafting with felt (as you may have seen in my Quiet Book post). Felt is simple to work with and you can use it in so many crafts. I decided to make fancy felt hearts to hang from my mantel! I decided that five would look best spread across the mantel – it’s a reasonable goal to complete in a few days. I made each heart a little different but stuck with a pink & white theme. I think they turned out pretty awesome! I really enjoyed making these hearts but this is something your older kids might enjoy as well – if you trust them with a needle & thread then they will do just fine. These also make great hanging decorations either from a doorknob or a hook. Attaching them in a vertical line would also make a nice statement piece!
Do you like working with felt? Interested in getting started? Here’s a little tutorial on making Valentine’s Day Felt Hearts.
Valentine’s Day Felt Hearts
Items Required
- 9×12 sheets of felt in your colours of choice – 1 sheet per heart
- Embellishments; I used buttons, felt flowers, brads, ribbon
- Narrow ribbon for hanging
- Contrasting embroidery floss (I use 2 strands doubled over – place needle in centre of floss and tie ends together)
- Fiberfill
- Heart template (more details below)
- Stapler
Instructions
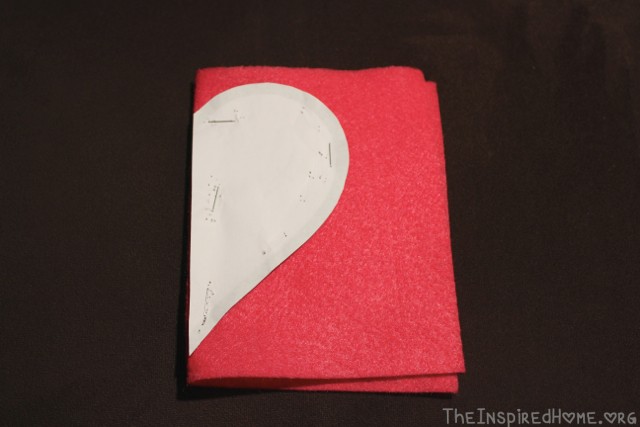
- Cut felt in half. The easiest way to do this is to fold it in half and pull the open ends down as you cut – the tension will make it easier as will fabric scissors! Take your halves and fold them in half. You will be cutting half of a heart shape just like you did as a kid with paper.
- Find a heart template by doing a Google search for heart outline (I went with this one). Copy the image and paste into Word. Make sure Word is set to 100% (bottom right corner). Using a folded, light-coloured piece of felt, place it over your computer screen and re-size the heart until it is the correct height to fit on the felt. One of my completed hearts has a smaller identical heart in the centre – simply copy and paste a second heart and resize to fit how you like. Print out the hearts and cut them out – I advise folding the hearts perfectly in half on the page and then cutting them out – this guarantees a symmetrical heart.
- Take your folded felt, place your folded paper heart on top – ensure the folded edges are aligned. Staple them together. This is the most effective way I have found as pins tend to pucker the paper and the felt. The holes from the staples are easy rubbed out of the felt once you remove the staples. Once stapled, cut out your heart. Remove the staples and use the template again on your next piece of felt. Each completed felt heart requires two hearts – a front and a back.
- Once those are cut, lay them out on a flat surface and start mocking up your designs. For my LOVE heart, I cut the letters freehand (the “e” was a bit tricky!). Start attaching your embellishments (most will be sewn on). I like to use contrasting stitching and a variety of styles of stitches. Once your embellishments are attached, sew the two halves together. I like to do one heart at a time. Once all my hearts are mocked up, I will complete a heart from start to finish. Before you close off the heart, be sure to stuff with fiberfill and stitch your hanging ribbon inside.
- Hang your beautiful hearts from your mantel, stand back and admire your handiwork!
DIY Upcycled Sweater Stocking
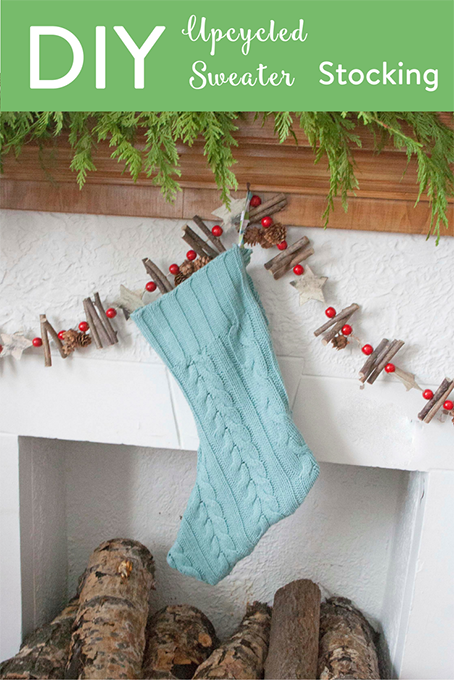
If you’ve got an outdoor person who loves winter in your life – this stocking is the perfect fit! In fact, this is the stocking that I wouldn’t mind seeing with my name on it for Christmas. But it can also be used for people who love vintage and upcycled items because of the way it is made.
My husband came from a family where knit stockings were normal. The first year we had Christmas together, I had my polyester stocking from the 80’s and he had this massive knit stocking. No matter what I did, I could not fill the thing up. The knit just kept expanding and expanding and expanding. Needless to say, after that first year, I made us 2 homemade matching cotton stockings so it would be equal. And let’s face it, they looked like they belonged together on our mantel.
This project was such an easy one and, because I used a sweater from the thrift store, very inexpensive. I got so many great comments about it on my Instagram about how impressive my knitting was. I don’t knit. But I can upcycle a sweater like a boss, and so can you.
How to Upcycle a Sweater into a Stocking
Items Needed
-1 size large or bigger sweater from your closet or the thrift store
-Sewing machine
-6″ of ribbon
-Scissors
Making Your Upcycled Sweater Stocking
You can use a pattern (I used a Vintage Quik Sew 2212 pattern), or you can simply use white paper and trace out a stocking you already own and like the size of (add 1/2″ for a seam allowance).
Compare your sweater with the pattern and figure out how you can get two pieces out of it. For mine, it was a zip-front sweater. I unzipped the sweater and I measured out the “good side” from the nape of the neck to get the nice texture the way I wanted it. For the back piece, I used from just below an arm pit to back. If you have a sweater that doesn’t have a zip front, cut the sweater into two halves that will accommodate your pattern. This part is a little tricky – but keep in mind no one usually sees the back side.
Pin stockings with right sides together and then sew 1/2″ around the outside edge with your sewing machine. Flip inside out and you have your stocking! Trim inside seam if you wish. To add a loop, use your 6″ ribbon, form a loop and sew a line on the inside of the top to hold it.
Ready, Set, Stuff!
The best part about an upcycled sweater stocking is all the gear for that outdoor mom that goes into it. Stay tuned for tomorrow’s post to see all the cozy finds at Mark’s this season. It’s a one-stop shop for all the cozy essentials this holiday season.
This creative stocking was created by us and sponsored by Mark’s. The opinions contained within this post are completely my own based on my experience.
]]>
Miss O recently celebrated her 4th birthday. Can you believe it? It feels like just yesterday I was throwing her very 1st birthday party.
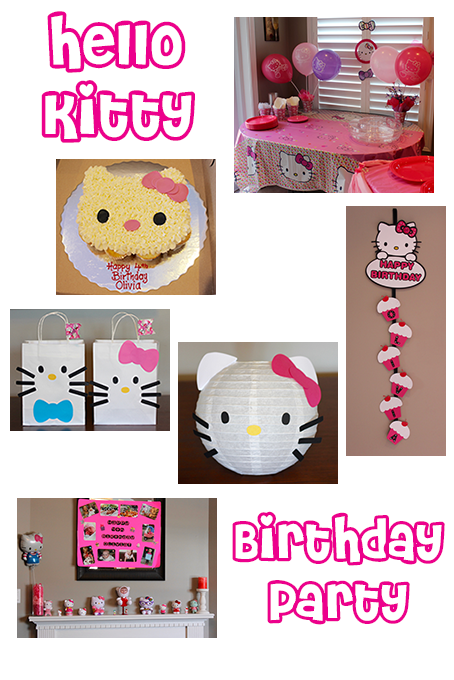
This year’s theme request of Hello Kitty was a lot easier than last year’s Princess Peach Party. While I absolutely love coming up with crafty ways to decorate instead of the store-bought stuff, it was nice to be able to pick up a few things this year. But that doesn’t mean I didn’t still get creative!
Loot Bags
This was the first year that Miss O had a birthday party with her friends instead of just her family party (lucky girl got TWO parties!). For her pint-sized guests which included both boys and girls, I decided to make some fun loot bags for them instead of buying store-bought as you can only get very girly Hello Kitty loot bags. I used my Cricut Explore Air to whip up some Hello Kitty and Dear Daniel faces for the bags. They were filled with goodies such as sidewalk chalk, Play-Doh, stickers, a Kinder Egg, mini colouring books & crayons, glow necklaces, a balloon on a stick and a few other small items. I had some Hello Kitty Duck Tape that I used to do the name tags.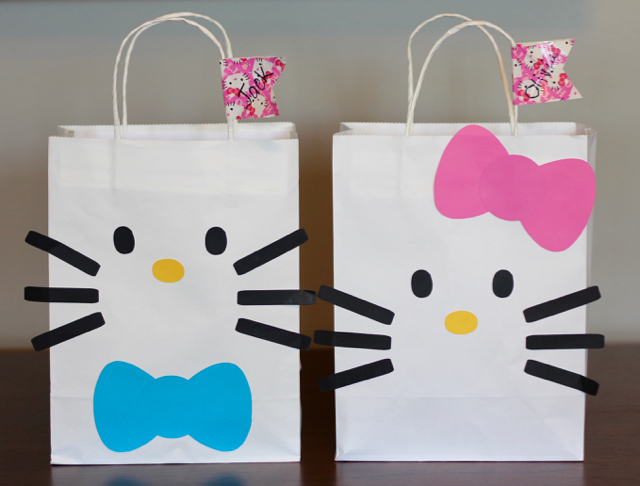
Decorations
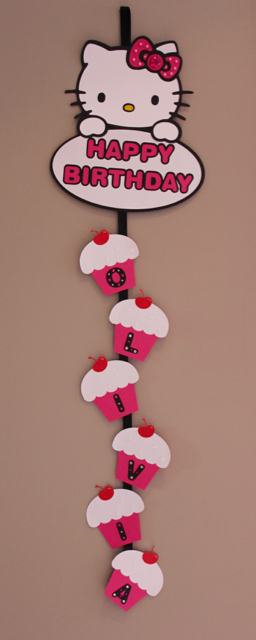
I also made a Happy Birthday banner for the birthday girl using my Cricut. This banner was used at both parties. It was painstakingly created in the Cricut Design Space software. I find it difficult to find the space in my house to hang a horizontal banner each year so I opted for a vertical banner this year. I added a bit of bling here and there with some stick-on gems.
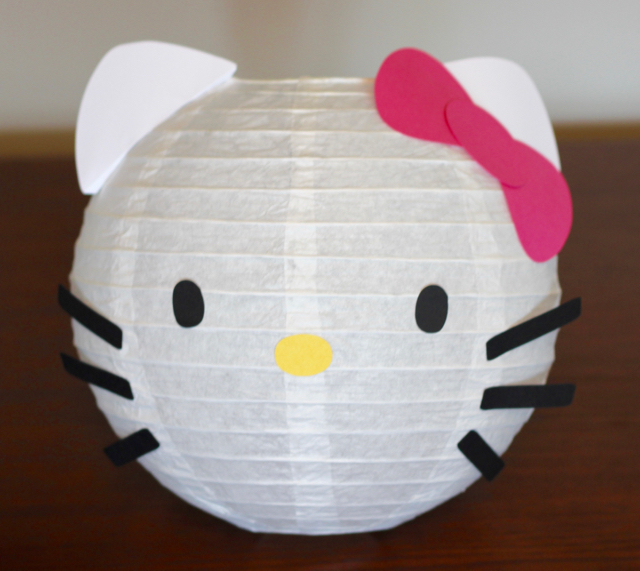
Next up were the paper lanterns. I made 3 in total using the same Cricut design as on the loot bags. I also cut out ears for the lanterns. I picked up some basic white paper lanterns from a local dollar/party store. They weren’t designed to hold candles or anything, simply as hanging decoration which was perfect. I hung one from the ceiling lamp in my living room, one in the kitchen and simply placed the third on a shelf.
Miss O has amassed quite the collection of Hello Kitty toys in her 4 years so I used many of them to decorate the fireplace mantel. The doll in the centre has her face on it! It was something I picked up at a local craft show. I also did a very simple vase decoration – I stuffed different colours of tissue paper into it and stuck in a balloon! On the mirror is a poster I had made for her birthday celebration at preschool – they ask the parents to do up a little something to show the class different pictures throughout the years of your child. Of course I made use of the Cricut once again to do the lettering!
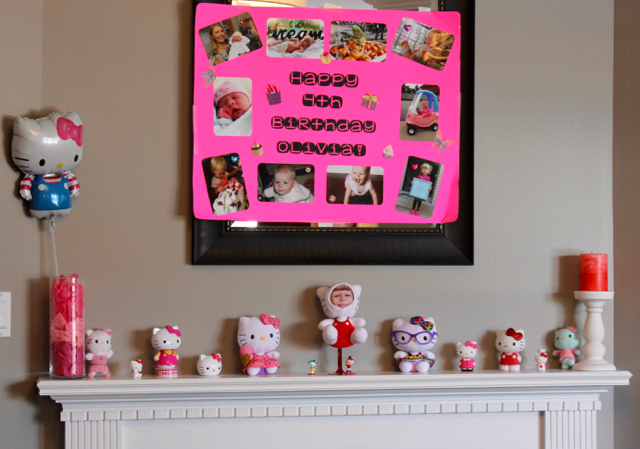
Table Setting
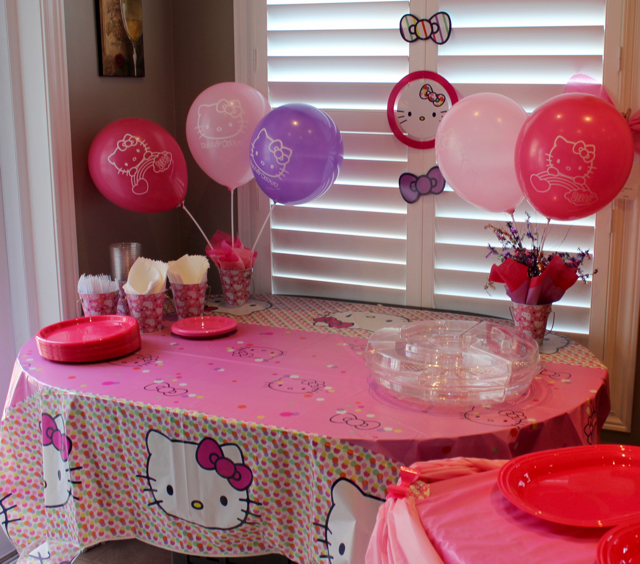
I love to decorate the food tables in fun ways. My mother had picked up a tablecloth and some hanging decorations. I acquired a few metal buckets adorned in Hello Kitty faces that I filled with pink tissue paper and a piece of floral foam. I inserted some Hello Kitty balloons on sticks into the foam. The other buckets were used to hold the forks and napkins. I completed it all with pink plates!
The Cake!
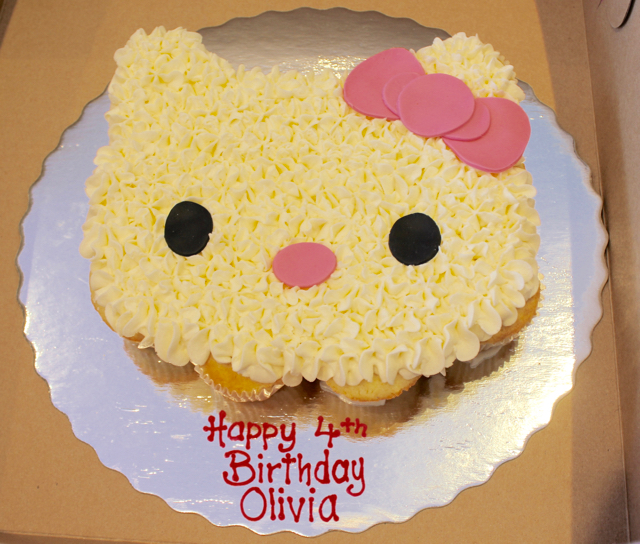
Last but not least was the cake. I find that at her family party, not a lot of people eat the cake or cupcakes so I wanted something simple but fun. I visited my favourite local cupcake store (conveniently located behind my house!) and asked if they could make a cake out of cupcakes. Boy did they deliver! It was a dozen cupcakes squished together in the shape of her head and iced with their delicious vanilla icing. Cupcake cakes are awesome because you don’t have to cut them – simply pull them apart! Like usual, we had a few left over and I was quite happy about that. Yummy!
Like usual, I put in a lot of time and effort into her parties. I simply love being crafty and birthday parties leave me with no shortage of opportunities. Being crafty also helps me save money on the exorbitant prices of store-bought items. I hope you can use some of these Hello Kitty birthday party ideas for your little lady. Miss O loved seeing it all in action. She got spoiled with gifts like usual. She’s a lucky little girl! Now to get started on Little J’s Minions party in August…


Easter has come and gone and now you’ve got your kids’ stash of chocolate to sneak after they go to bed. I’ve personally got a penchant for anything containing peanut butter. My daughter is still young enough that she doesn’t know to take stock of her chocolate and hide it from her mother. I can ration it with little argument. This is a bad thing as I can eat just about as much of her chocolate as I want without her even realizing it. So I’ve got to find ways to keep all of that Easter chocolate from spending a lifetime on my hips.
Here’s a few simple ways to work off those calories in this rainy spring weather. Some of them are even fun!
- Jump in the puddles! Slip on some splash pants, get everyone into their rain boots and go outside to have some fun. You won’t even realize you’re working off that giant Lindt bunny you’ve been snacking on.
- Spring cleaning. It’s not always exciting but you can make a game of it and get the kids in on the “fun”. Bonus points for dancing while cleaning. Even more bonus points for doing squats while cleaning the toilets.
- Hit the gym on those chilly days. I like to sneak off to my local GoodLife Fitness once the kids are in bed and hubby is parked in front of his computer. Try a new fitness class or just do some cardio, whatever suits your mood!
- Play some video games with the kids. Not the kind where you sit around with a controller in your hand. Get up and move! Play some active games on the Nintendo Wii or other similar system. Your kids will love that mom is joining in on the fun.
- Try geocaching. Holly is a big advocate for getting outdoors with the whole family. She’s done a number of posts on geocaching if you’d like to learn more. Even if you stick with the simpler ones, you’re still being active and you won’t even realize it.
- Play hide & seek. You’ll have to move quick if you want to hide before your kids sneak a peak. Don’t limit the game to just one floor of the house; by using the whole house, you’ll have to get up or down those stairs quickly!
- Go for a walk after dinner with the family. The weather is warming up and the buds are starting to show. See how many robins you can spot. Play a round of I-Spy. A long walk around the neighbourhood will gear the kids up for sleep and make up for that Reese egg you ate during nap time.
- Make the effort to eat healthy meals. Cheating with chocolate doesn’t feel as sinful when you’ve had 3 proper meals throughout the day. Don’t just eat the crusts & crumbs from your child’s lunch. Take a few minutes to make yourself a salad with some fruit, nuts and cheese and a light dressing. You know it will taste better than floor Cheerios.
- Go shopping. And do it when you can take your time and with no purpose in mind. Wandering through all of the stores that you like to peruse will burn more calories than you think!
- If it can be done while walking or standing then do it! Have your morning coffee while standing at the kitchen counter. Throw in a few squats for good measure. Or alternate standing on each foot. In the mood for a round or five of Candy Crush? You can pace the floors while playing.
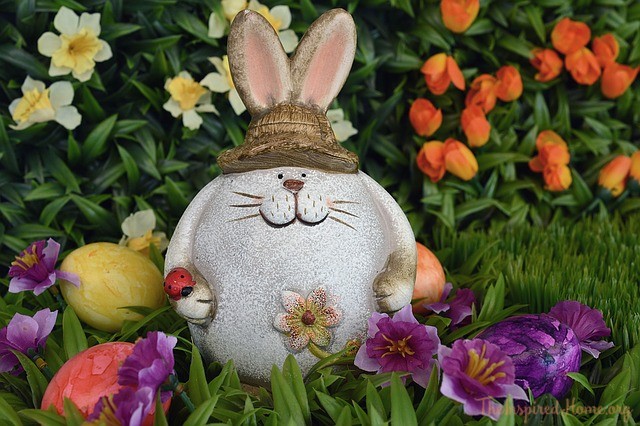
Don’t be a chubby bunny this Easter!
This post was written as part of the GoodLife Fitness Blogger Ambassador Program; however, all opinions expressed are my own.

Looking for more great crafts, activities, and foods to celebrate Easter? Check these out.
Have you seen our Easter Mantel Decor? Become inspired now.
]]>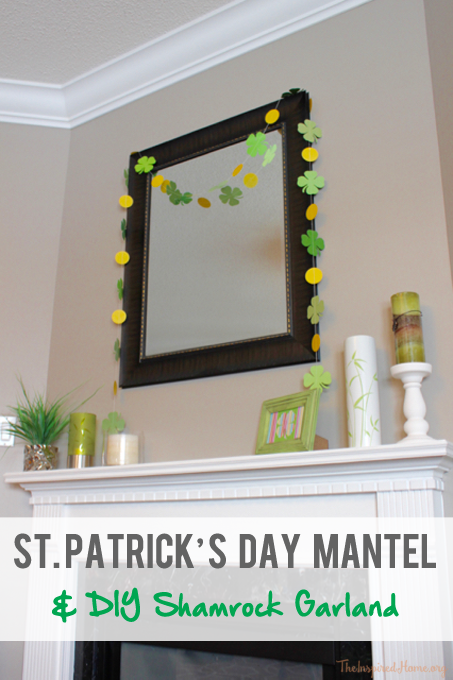
I love an excuse to decorate my fireplace mantel! Any holiday or season change will suffice. This year we have such a small gap between Valentine’s Day, St. Patrick’s Day and Easter but that won’t stop me. The Valentine’s mantel came down on Feb 15th and up went my St. Pat’s decor. I kept it simple this year as it won’t be up for very long. Easter is nice and early this year with Good Friday falling on March 25th.
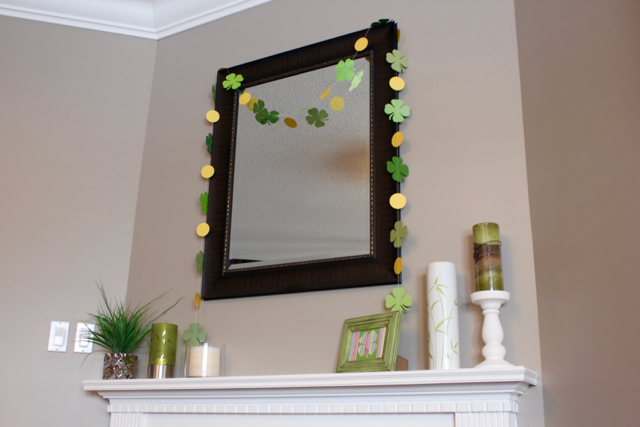
To decorate my St. Patrick’s Day mantel, I went with a simple green theme. I used a variety of items from around my house but crafted a few small touches to kick it up a notch. I used a fake potted plant, a variety of candles & candle holders, a vase and a green picture frame.
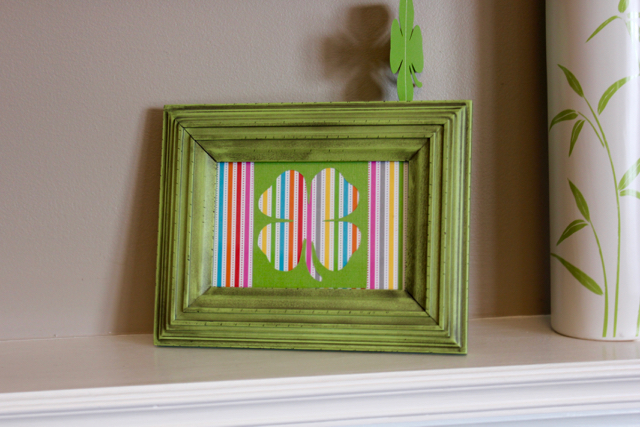
To add a little bit of colour to my mantel, I cut out a 4×6″ piece of rainbow scrapbook paper to put in my green picture frame. To give it a little bit o’ Irish, I added a shamrock cut-out. This was a scrap from my shamrock garland which I’ll explain below. I used a bit of double-sided tape to attach it to the rainbow paper and put it in the frame.
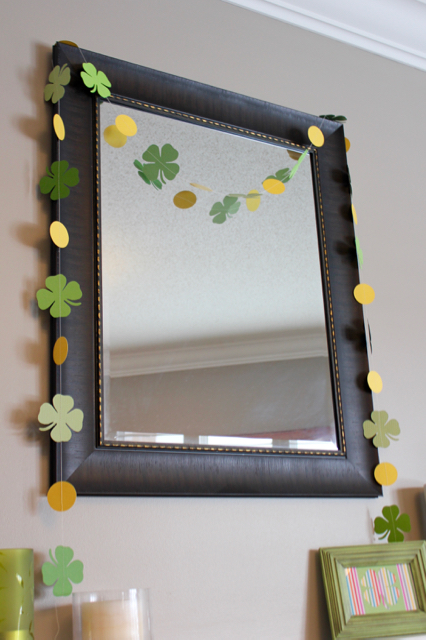
This garland was a cinch to make. I used a few handy tools to create this which made it go a little quicker but this can still be made by hand. My secrets are a Cricut Explore Air and my trusty Husqvarna sewing machine.
I pulled up a shamrock template in the Cricut software and sized it to 3×3″ (it worked out a little bit longer on the side with the stem). I also did up some circles that were 2×2″ for the coins.
I pulled out a few pieces of cardstock from my scrapbooking collection. Two of them were shiny green, one was embossed with little polka dots and I had a piece of yellow-gold for the coins. I suggest using double-sided cardstock or at least one with green on both sides. My shiny green papers were only shiny on one side but still green on the other. Your garland will inevitably spin and sway wherever you hang it and having green on both sides keeps it festive!
With three types of green paper, I cut out 5 shamrocks from each with the Cricut. This gave me 15 shamrocks. If your paper isn’t double-sided, simply cut out twice as many shamrocks and you can sew them together. I cut out 14 gold coins from the yellow cardstock.
You can very easily use a shamrock stencil or even a cookie cutter to draw an outline onto your paper and simply cut by hand; the Cricut just speeds up the process a little.
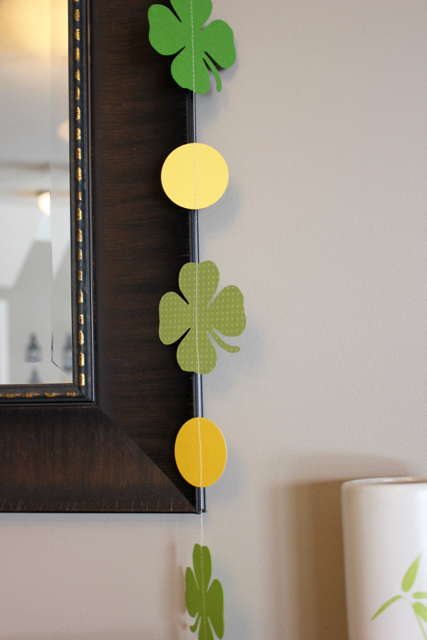
Next, I pulled out my sewing machine. I opted for a cream-coloured thread as I didn’t want green thread across my gold coins. Set your stitch length a little bit longer than normal so you don’t perforate your paper shamrocks and coins – I set it to 4. You don’t need to change any other settings. Holding your ends, start sewing with nothing in the machine to make your tail. Slide in a shamrock to stitch in and keep going to make more of your string. Next, slide in a coin, pull through to make a line and move onto the next shamrock. Keep going until you’ve finished your garland. Now it’s ready to put on display! If you are just hanging it as I did, you can trim your tails – if you want to tie it to something, you’ve got the ends to do it with.
The sewing part can probably be done by hand if you don’t have a machine but it may prove a bit more difficult. I’ve never attempted it it so let me know how it goes.
To store your garland, wrap it around a piece of cardboard to keep it from getting tangled.
How do you decorate your house for St. Patrick’s Day?

Looking for more great ideas on crafts, activities and food to celebrate St. Patricks Day: check these out.
]]>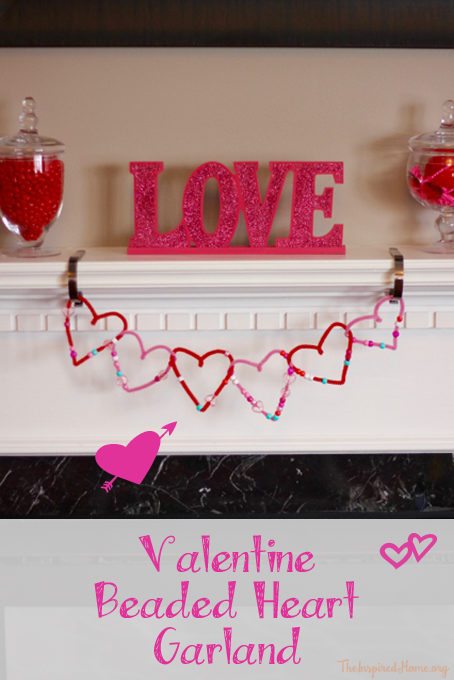
Miss O loves a good craft, especially one that involves her two favourite colours: light pink & aqua (she’s rather particular for a three year old). Her attention span is pretty short so the craft has to be quick and simple for her to stick around and complete it. I also need to do crafts while her little brother naps which gives me about a 2 hour window to assemble and create something with her. This Valentine beaded heart garland was just the ticket.
I had everything I needed in my craft collection to set her up with a fun and simple craft. I prepped it the night before so we could get right to work once Little J was down for his nap. The most time-consuming part to getting this craft ready was choosing the perfect selection of beads! I have a large collection of them both my giant collection of pony beads and plenty from my jewelry-making days. This garland can be made simply with a collection of pony beads that come in a giant bag at your local big box discount store or even the dollar store. Pony beads are the perfect size for little hands to string onto pipe cleaners.
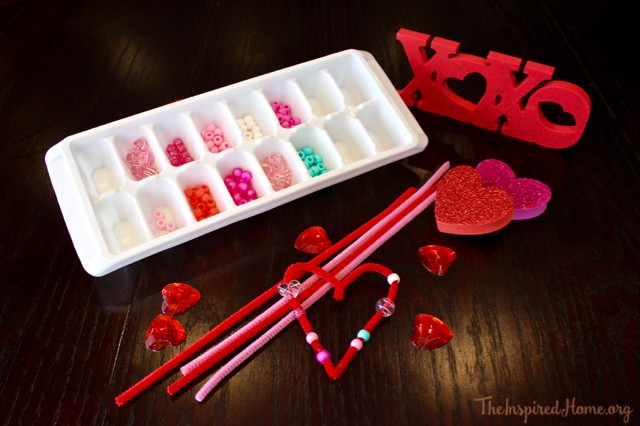
What You’ll Need
- Pipe cleaners in Valentine colours – I chose pink & red – do as many as you like! I opted for 6 which is a great number for a toddler.
- Beads! Anything that will slide onto the pipe cleaner easily. Pony beads work best.
- A container to corral the beads – I like using an ice cube tray but you can always just toss them into a bowl.
How-To
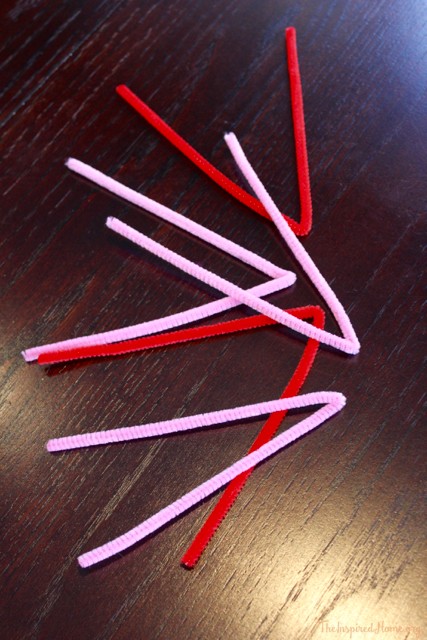
Start by folding the pipe cleaners in half – the point will be the bottom of the heart. It also makes it easier for the kids to grasp onto them and prevents the beads from sliding off the ends. I mocked up a heart ahead of time so Miss O would have something to guide her. Toddlers work better from visuals instead of simply explaining what to do.
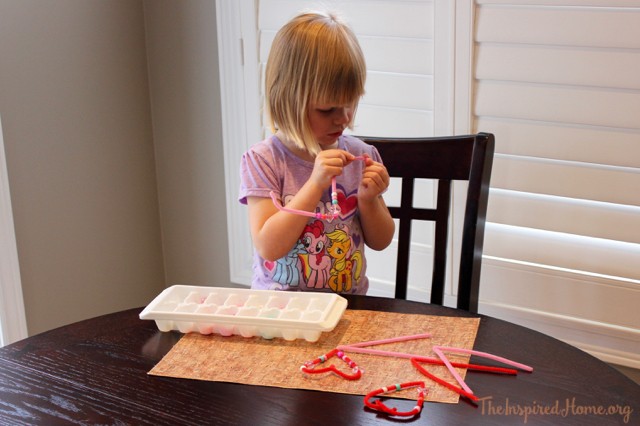
Let your toddler go to town loading up those pipe cleaners up with beads! Miss O compared it to making a necklace. She also described the colours with such enthusiasm: “This one is a pinkish orange!” If your little one is still learning their colours, it’s a great way to make learning fun. Who says the beads have to be all pinks, reds and whites? I added some aqua-coloured beads for an accent as it’s one of Miss O’s favourite colours. Use a collection of primary-coloured beads and have them name the colours they are using.
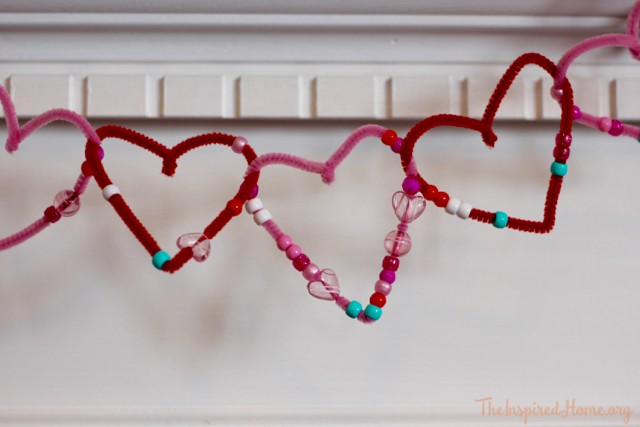
Once the pipe cleaners are complete, you will fashion them into hearts. Start with one pipe cleaner – bring the ends up and around and twist them together. Take your next pipe cleaner and string it through the first heart before forming the heart shape. Continue until you have strung all of the pipe cleaner hearts together.
Display your toddler’s Valentine beaded garland in a prominent spot in your home. I used my Christmas stocking hooks to hang them from my mantel! Be sure to check out my Valentine Mantel from last year to get a few ideas on how to decorate yours.
I made a little video of Miss O assembling her Valentine beaded heart garland so you can see just how fun and easy it is for them to do. For those curious, she is 3.5 years old.

A Festive Giveaway for your Family
There are so many things to do around the holiday season – whether you’re planning for a winter getaway, attending events or preparing for family reunions – it’s no wonder stocking stuffers can be overlooked. But, let’s not forget that for your kids (and adults too!), little surprises can be just as exciting as unwrapping gifts under the tree. This year, why not let your mantelpiece shine too with the help of some amazing hidden gems.
On behalf of your family’s most trusted brands, here’s a festive giveaway for you to enjoy:
· Arm & Hammer™ Spinbrush™ Truly Radiant™ Deep Clean Manual Toothbrush
· Arm & Hammer™ Truly Radiant™ Rejuvenating Toothpaste
· Arm & Hammer™ Kid’s Spinbrush™ My Little Pony™ Battery Brush
· Arm & Hammer™ Spinbrush™ Super Mario Bros™ Battery Brush
· Nair™ Moroccan Argan Oil Face Wax
· Batiste™ Blush Dry Shampoo
· RUB A535™ Nighttime
· Gravol™ Natural Source Ginger Liquid Gels
· Gravol™ Multi-symptom™
· Vitafusion™ Men’s Complete Multivitamin
· Vitafusion™ Women’s Complete Multivitamin
Value: Approx. $100
One entry will be randomly chosen to receive the prize pack. You must use a valid e-mail address so you can be contacted if you win. The winner must be over the age of 18, a resident of Canada and has 48 hours to respond by email or another winner will be selected. Giveaway ends November 30, 2015 at 12:01am MST.
We are a brand ambassador for the 2015 year with Church & Dwight. As part of this program we receive monetary compensation, as well as products to review and giveaway.
]]>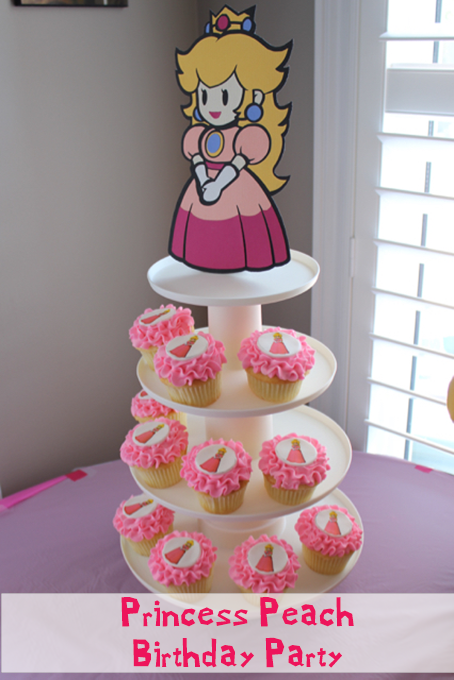
Miss O just turned three. When asked what theme she wanted for her birthday, she requested Princess Peach. Now, Super Mario birthday decorations are difficult enough to locate. Princess Peach is damn near impossible! This meant mommy to the rescue. And I think I did a great job of satisfying her wishes.
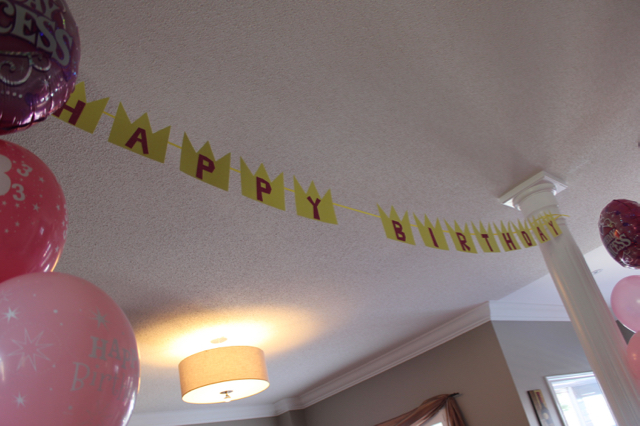
This birthday banner features Princess Peach’s crown as the backdrop with letters in a font reminiscent of the Super Mario logo. These were made on sparkly cardstock using my Cricut and strung on a line of yellow ribbon.
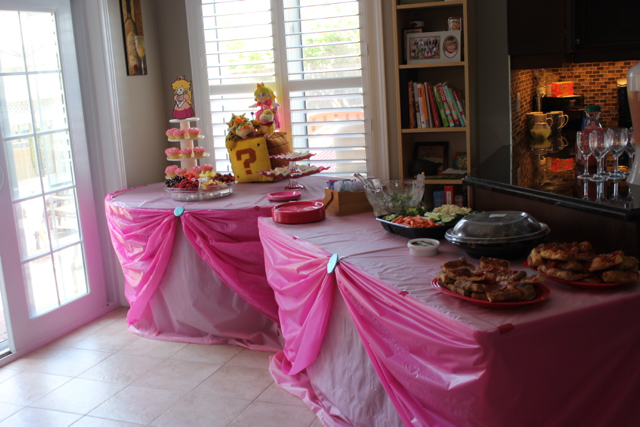
The food tables are done up to resemble Princess Peach’s dress. Using rolls of plastic tablecloth, I did a layer on top in baby pink as well as one that wrapped around the front. I then wrapped a piece of dark pink around the front and gathered it in the centre. I fashioned blue “buttons” to match Peach’s necklace & earrings. I simply found some oversized pins in my house (one is from our trip to Disney) and wrapped blue satin fabric scraps I had handy around it and taped it to the back. The pin made it easy to attach to the dark pink gather and helped cover the tape I used to secure the gather!
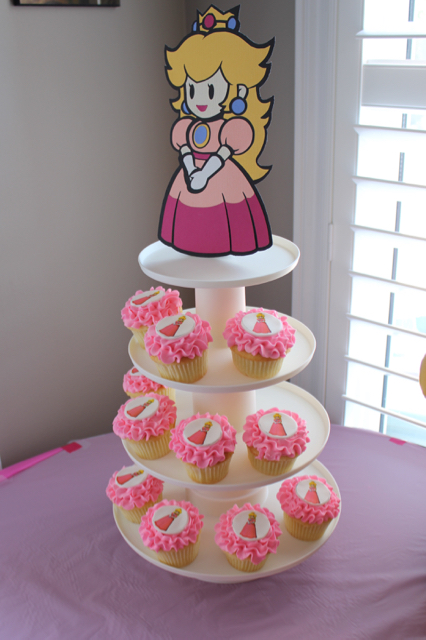
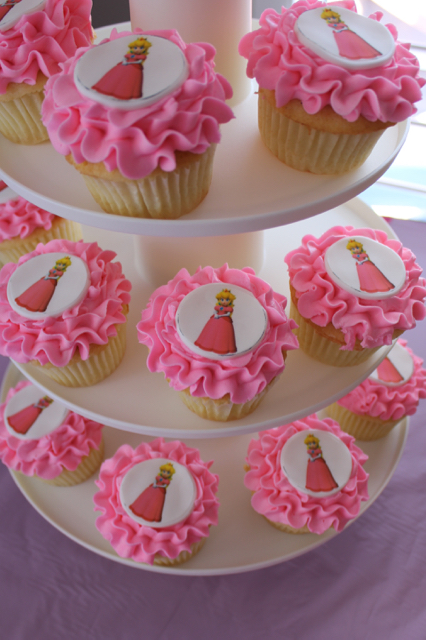
I hired a local cupcake store to make some pink cupcakes with a printed fondant centre. They are made using edible ink. Many cupcake stores will offer this feature which is a great way to accommodate your child’s wildest dreams for their birthday party. The topper on the cupcake stand was a labour of love. I made it using cardstock in my Cricut Explore Air. It took a few hours to design everything in the software and then assemble it all. I only made the one because it took so long to make!
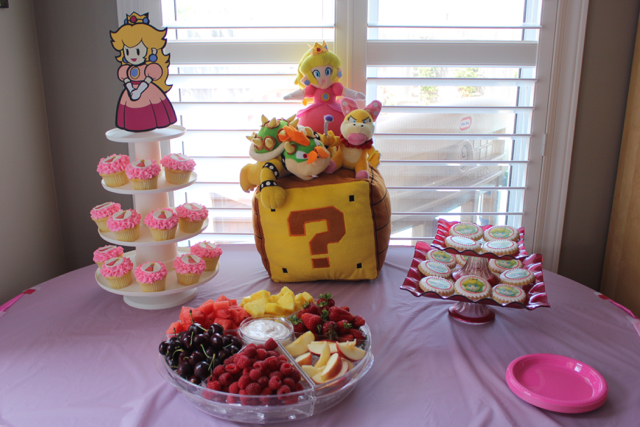
To decorate the table, I used a variety of stuffies we already had around the house. We’re a geeky bunch with a huge love for all things Super Mario. Miss O refers to herself as Peach, she calls Daddy “Bowser” and I am “Cutie Pie” (her actual name is Wendy Koopa but in the old 90s TV show she was known as Kootie Pie). There were other stuffies in various areas around the house as we have an abundance of Princess Peach ones that Miss O has amassed in the past year. We also had some cookies made with a similar process as the cupcake toppers.

The birthday girl is wearing a custom shirt my mom had made for her featuring none other than Princess Peach herself. Here, she was eating a cookie with Peach printed on it while receiving a Baby Peach stuffy. On the mantel you will notice that I also did some Perler crafts of Peach, Bowser, Kootie Pie and Yoshi – she refers to her little brother as Yoshi. It was like a family picture on the mantel!

The final gift is a labour of love made by my mother. It is a handmade crochet blanket featuring…you guessed it: Princess Peach. She still has the border to complete but Miss O was over the moon about her beautiful new blanket. We all foresee her carrying it around like the character Linus from Peanuts.
All-in-all, the party was a success. Miss O was overjoyed with all of the Princess Peach goodies she received for her third birthday. By the way, use our how old am i tool to see that 3 years old is also 26,280 hours old! Can’t believe she turned THAT old! All in all, it was a wonderful day spent with family. Since she is a lover of all things pink and has been from the start, I got to reuse many of the items from her first birthday. I hope this party inspires you when your own little geekling requests a Princess Peach birthday party!


This year I decided to start the tradition of Elf on the Shelf. Starting this tradition with a two year old is both a blessing and a curse. The curse is simply that I have to remember to move it every night! The blessing is that she doesn’t expect much from the elf just yet. This leaves me with the option to simply stick the elf in a new place every night without much effort. Toddlers do not need to be encouraged to act mischievous; therefore, I do not feel compelled to make my elf smash eggs all over my kitchen floor or have a glitter party in my living room.
Her name is Sprinkle by the way. At least it’s not Dora or Anna….
Here are a few of the places Sprinkle has appeared this week in our home. Be sure to check in again next Sunday for more 2-minute ideas!
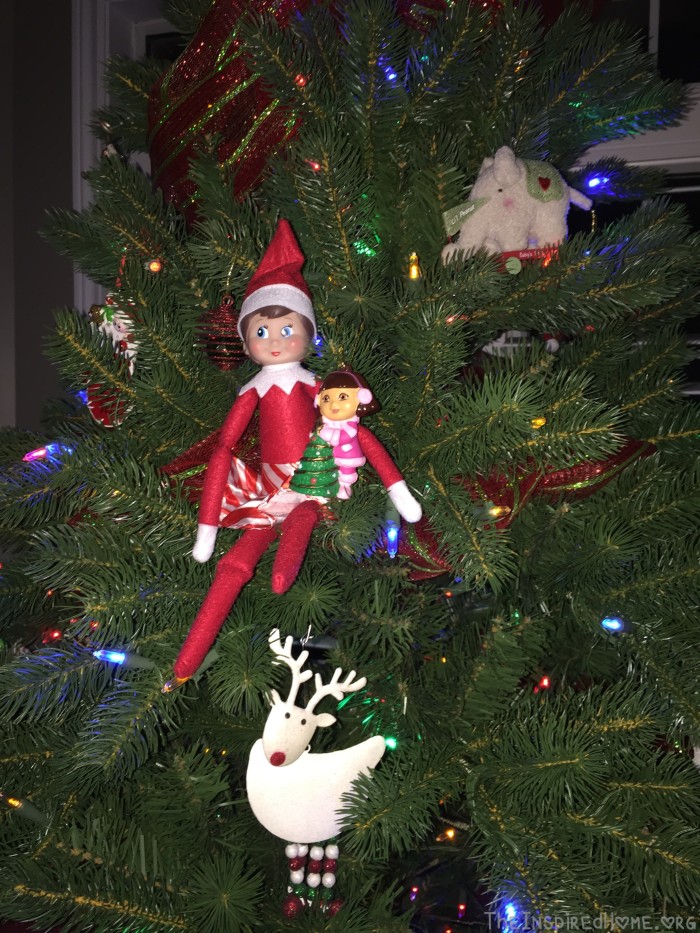
Sprinkle the Elf first appeared hanging out in our Christmas tree with Miss O’s favourite ornament: Dora!
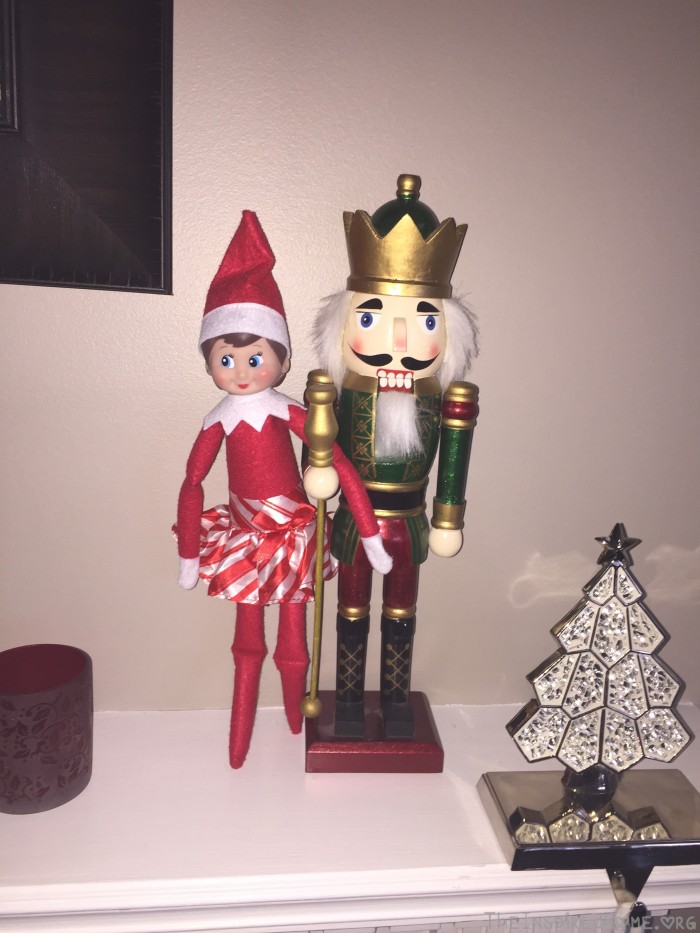
The next night she found herself a hot date in the form of a nutcracker on our fireplace mantel.
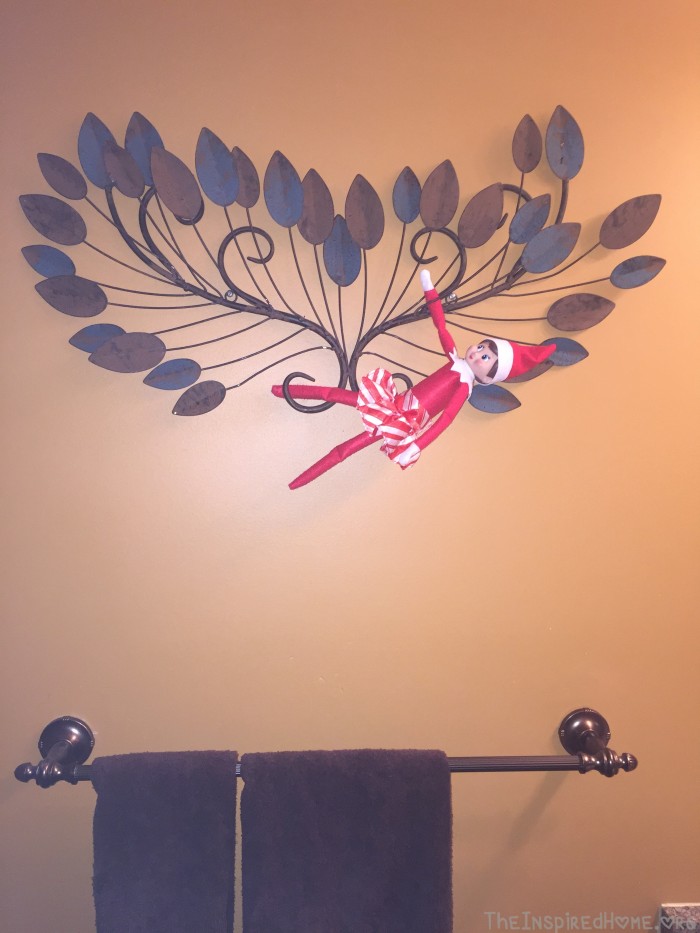
The first place Miss O looks every day is the bathroom for some weird reason so sure enough, Sprinkle was hanging from an art piece on the bathroom wall.
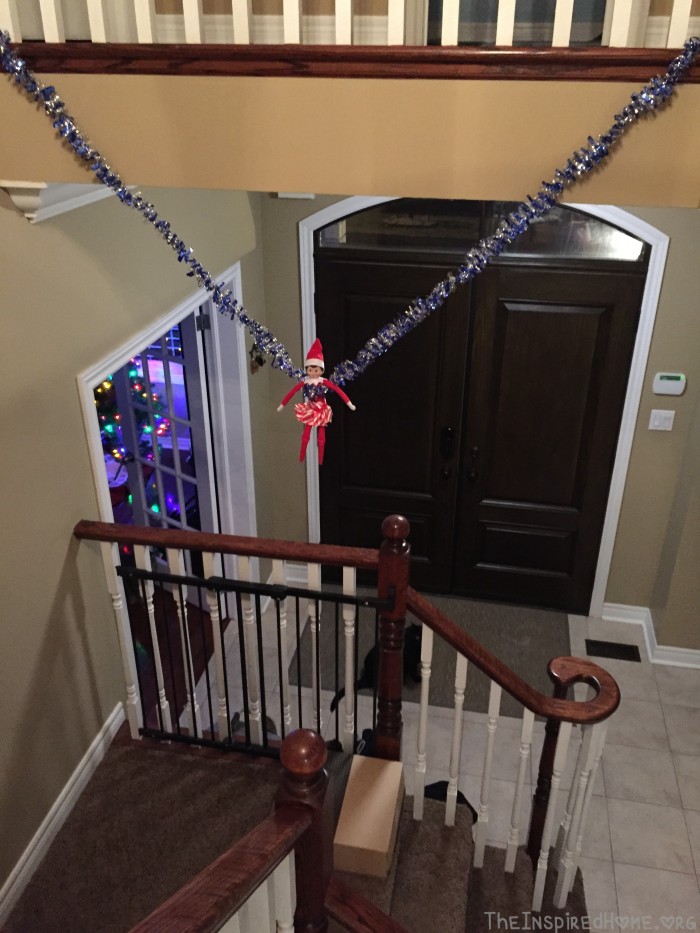
No doubt you have some sort of festive garland in your house – hang it somewhere fun like over the stairs and have your elf swing about!
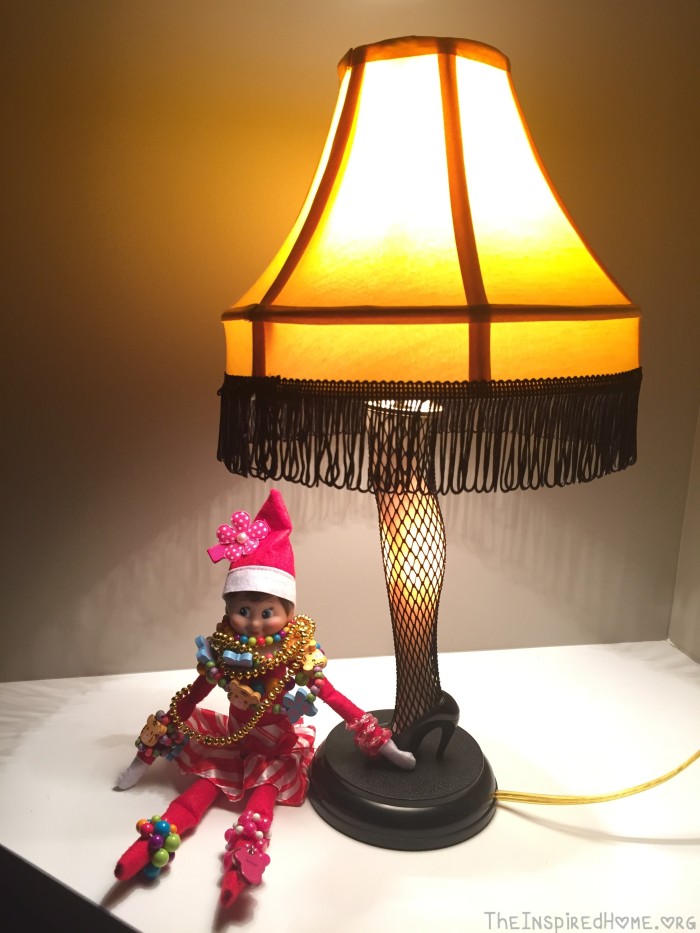
Sprinkle decided she wanted to be decked out in jewellery and be fancy like the Leg Lamp.
Peek-a-boo! I see you! She was hanging out in the kitchen window, lounging on the shutters. So far this one has creeped me out the most. Every time I went in the kitchen, I felt like someone was standing outside my window staring at me.
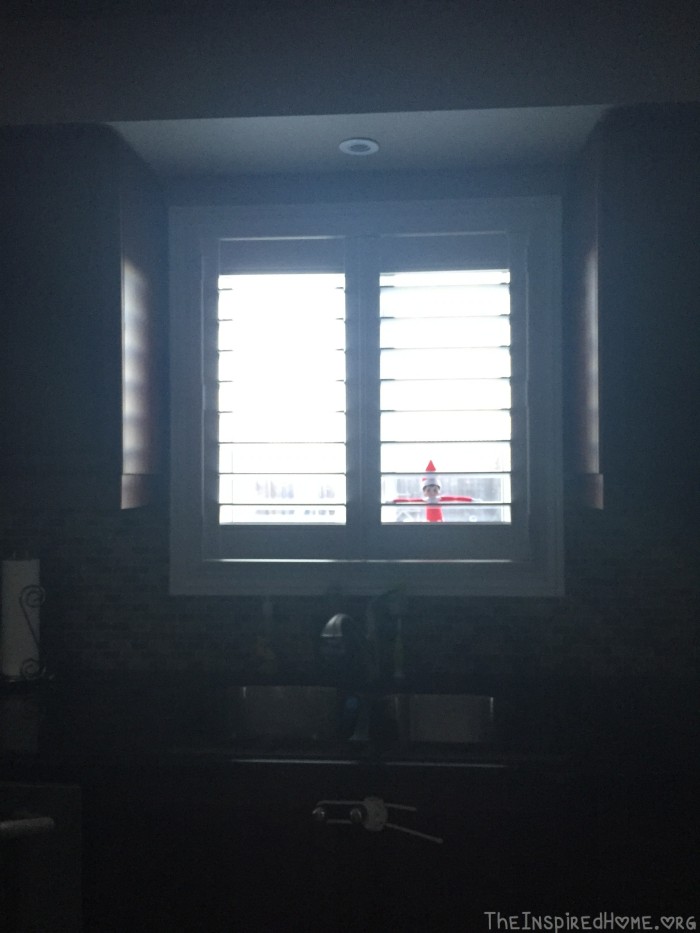
Where did your elf end up this week?
]]>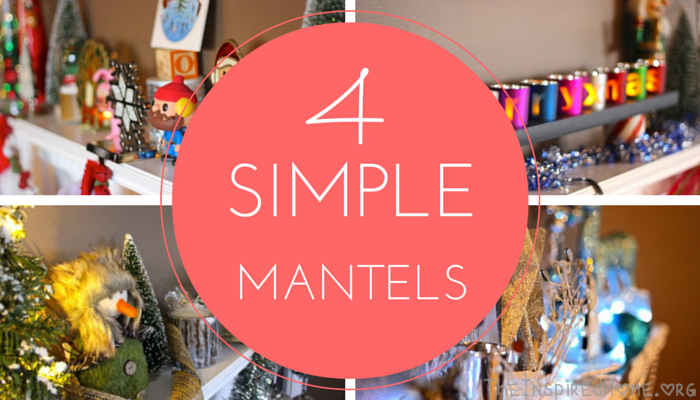
4 Simple DIY Holiday Mantels
It’s that time of year to spruce out up your mantel with a bit of Christmas cheer. When planning your mantel, take into consideration if you plan to try a theme this year. We’ve got 4 of our favourite below and other options are limitless! Ask yourself what means holidays for you. Are you planning Christmas, or New Year’s Eve events? A more classic winter themed manner might just do double-duty at both events with a little planning.
Designing your own mantel does not have to break the bank. Consider using ornaments that you already own, or trading a few with a friend. Our local thrift store always has a bunch of bits and bobs for the holidays that with a few of your own pieces can be transformed into a mantel.
Andrea is the queen of all things mantels around The Inspired Home. Here are four of my favourite mantels she created to inspire you to decorate this holiday season:
Vintage Christmas Mantel
DIY It!
Look for items like old fashioned Santas, anything that brings you a little nostaglia, classic Christmas items (trees, bells, stars, etc).
Bright & Festive Mantel
DIY It!
Look for items like tinsel, bright coloured garlands (or make your own), ornaments, stocking holders and other brightly coloured items you may already have.
Blue & Silver Mantel
DIY It!
Look for items that are silver, blue or classic winter themed. Take your blue or silver spray paint to items you already have or raid your own collection of cups, and lights.
Rustic Mantel
DIY It!
Look for items like pine tree boughs, old wooden items with rustic charm, burlap, and fur.
Want more things Christmas? Our Pinterest board is full of more great ideas:
<code><http://www.pinterest.com/inspiredhomeorg/all-things-christmas/” data-pin-do=”embedBoard”>Follow The Inspired Home’s board All Things Christmas on Pinterest.</a> <!– Please call pinit.js only once per page –> <script src=”//assets.pinterest.com/js/pinit.js” async=””></script></code>
Items Required
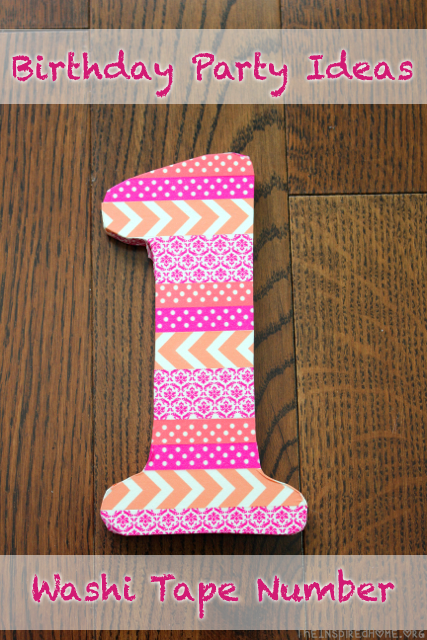
- wooden number shape
- washi tape in colours to match your theme
How-To
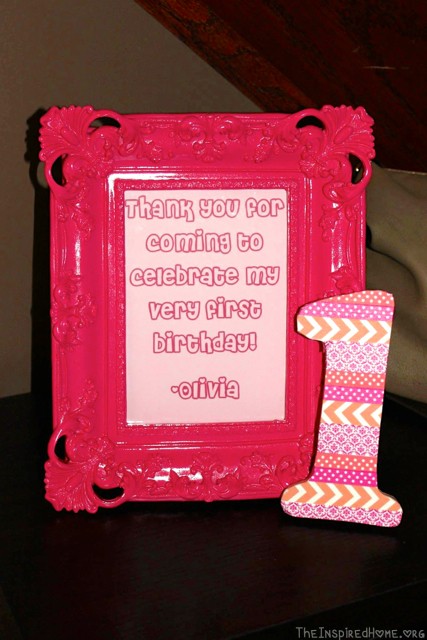
Simply wrap pieces of washi tape in stripes around your number however you like! Ensure that the sides of the shape are covered as well – I wrapped the pieces around to the back. I stuck with a horizontal layout but you may prefer to place the tape on an angle or follow the shape of the number. I used four different patterns of washi tape in varying shades of pink which was the theme for Miss O’s first birthday. I purchased the 1 shape from Michaels, my local craft store. I bought it already painted white as opposed to a natural wood – it’s up to you which you decide but I found the white background to make the washi tape colours pop more than a natural wood might.
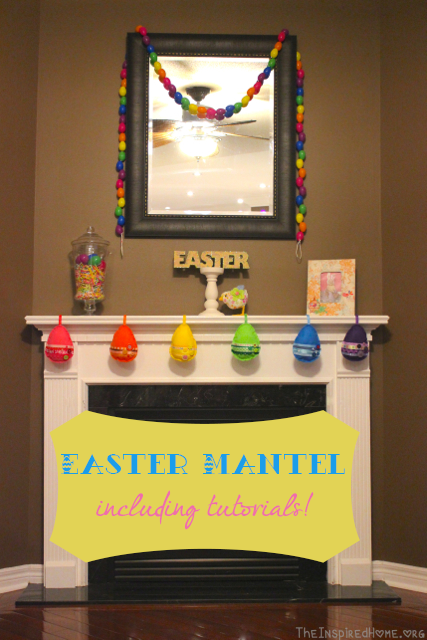
With each new holiday and/or season comes a freshly decorated mantel in my home! The mantel was rather barren between Christmas & Easter. Hubby requested a break from the bright, busy mantels. I personally love a decorated mantel but hubby has to look at it too so I honoured his request. I was excited for the beginning of April so I could officially decorate it again! I used a number of items from around my home (I’m sure you recognize the apothecary jar by now!) as well as purchased a few new items. I’ve never had an Easter mantel before so it was fun to find some new items.
I added a few handmade touches to this mantel. You will find tutorials below for the two garlands you see on the mantel: the plastic eggs strung around the mirror and the decorated felt eggs hung below. Unlike Holly and her green thumb, I’m not capable of maintaining real flowers in my home, otherwise I would have included them on my mantel. If you would love to add some real flowers such as daffodils to your Easter mantel, check out her 5-Minute Easter Centerpiece.
Easter Mantel Decor
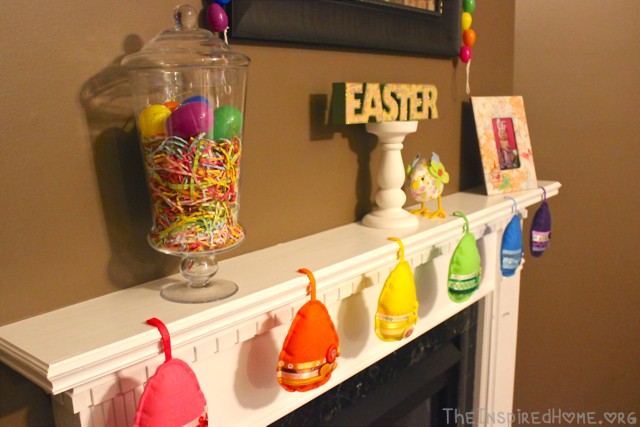
Items Included
- Plastic Easter Egg Garland (click for tutorial)
- Felt Easter Egg Garland (click for tutorial)
- Apothecary jar with basket grass & plastic eggs (multicoloured grass from Target)
- White candle holder with Easter sign (sign from HomeSense)
- Little stuffed birdie (from Michaels)
- Fabric picture frame (from HomeSense)
Did you decorate your mantel or other area of your home for Easter? Perhaps you prefer to decorate for Spring so you can keep the decorations up longer! Let us know in the comments below. And be sure to check out our Easter Pinterest Board for even more excellent mantel decorating ideas.
Follow The Inspired Home's board Easter on Pinterest.

Looking for more great crafts, activities, and foods to celebrate Easter? Check these out.
For a sweet treat this Easter, why not give our Easter Dipped Marshmallows a try!
]]>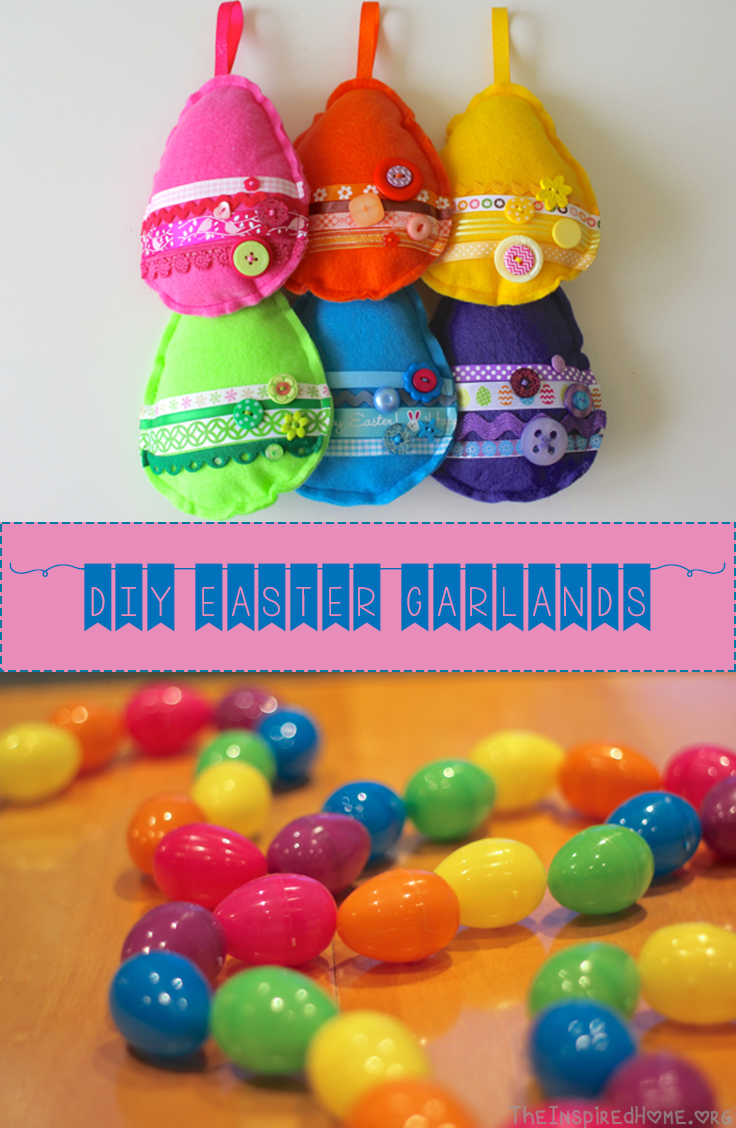
There are a variety of ways to make a DIY Easter Garland to decorate your home with. Here are two very different ways: one is quick and simple using little more than yarn and some plastic Easter eggs. The other garland requires more effort but I think the felt Easter eggs are well worth the time and patience required. Both garlands can be altered to suit your decor. Check out the step-by-step instructions for both styles below!
DIY Plastic Easter Egg Garland
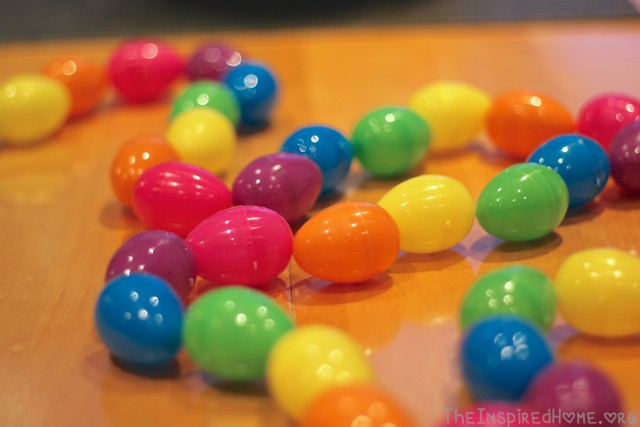
This garland is fun and whimsical and easy to do. It also costs next to nothing! Plastic Easter eggs are available everywhere, including your local dollar store. They come in a variety of sizes and colours allowing you to customize the garland to exactly the style you want. I wanted to hang the garland from the mirror over my fireplace mantel so I chose to use very small, colourful eggs. Using larger pastel eggs will give you a totally different look – match it to your decor! This is a great craft to do with kids. Simply use a finer string or even fishing wire and have them thread the eggs. Using a needle with a rounded end is also helpful if you feel they are old enough. This DIY Easter Garland will spruce up your home quite nicely!
Items Required
- Plastic Easter eggs
- Yarn, ribbon or string
- Needle (optional)
How-To
My eggs were so tiny that they only had one hole in each end. Larger eggs typically have two holes in each end. Having only one hole that was off-centre made for a whimsically wonky garland. I simply thread my yarn through the needle, ran the needle through each end of the egg in a rainbow colour pattern and my garland was complete. I used 54 eggs in total. For larger eggs, you will probably want the same amount of eggs as this will make a longer garland. My garland was quite short but this was perfect for where I wanted to place it.
When using larger eggs with two holes, I suggest using two strands of ribbon/yarn/string for a more balanced look – one through the holes on the left, the other through the holes on the right of each egg. Threading the needle can be difficult but once it’s in, it’s not going anywhere. It’s much easier to pull the needle through the hole than it is to try and get the end through each hole.
DIY Felt Easter Eggs
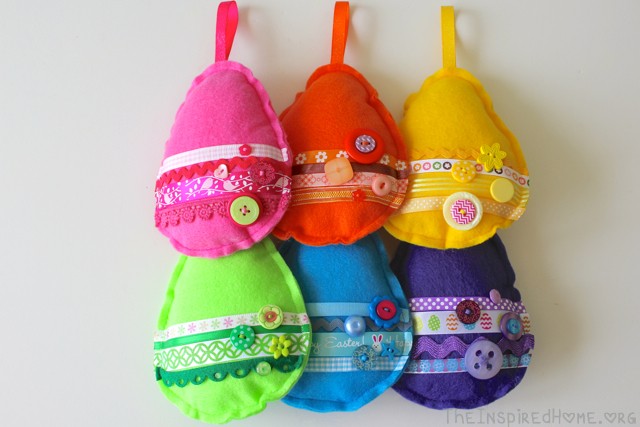
This DIY Easter garland requires more time, effort, planning and preparation than some other garlands out there but I think it’s well worth it. You can take your time with this project or you can get through it in about 2 evenings. It’s a great craft for older kids as well. These beautiful felt Easter eggs can be put on display year after year in many locations throughout your home.
Items Required
- Egg template (instructions below)
- Felt in as many colours as you like, 1 sheet per egg – I made 6 eggs in a rainbow of colours
- Coordinating or contrasting ribbon
- Coordinating or contrasting buttons
- Matching thread
- Fiberfill (aka batting or stuffing)
- Ribbon for hanging
How-To
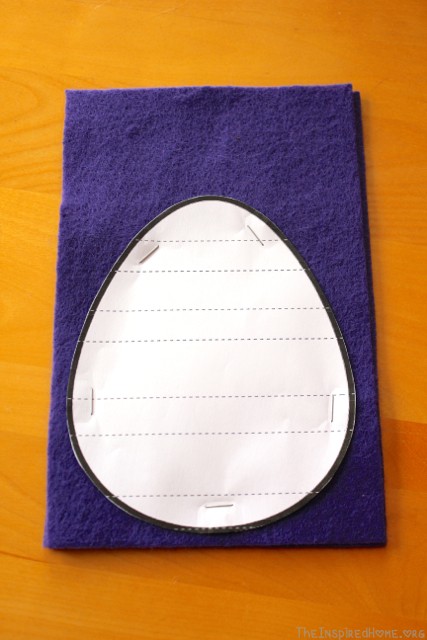
1. First you will need an egg template. To do this I simply search Google Images for ‘egg outline‘ and choose the shape I like best. Copy the image and paste into your word processing software. Ensure that the zoom is set to 100% – this is usually found in the bottom left or right corner. Lay a light-coloured piece of felt on the screen and adjust the size of your image until it fits half of your sheet of felt (assuming you are using 9×12 felt). Print and cut out the shape. Cut all of your felt in half. For each egg, staple your template to the top of 2 halves of matching felt. Cut out the egg shape. Staples will not leave a mark on the felt once removed – simply rub your finger over any holes that might remain.
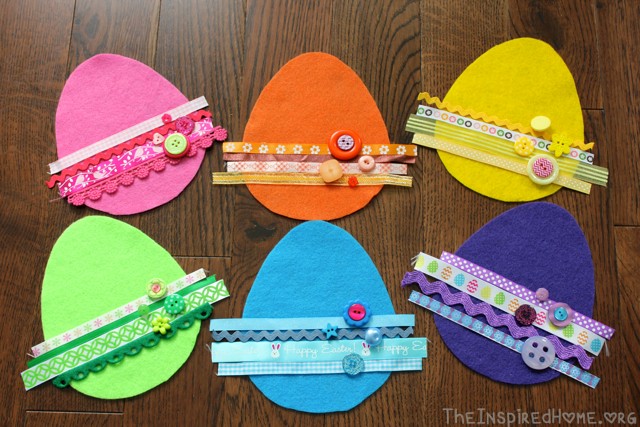
Once you have all of your egg shapes, it’s time to decide on your ribbon layout. I chose a coordinating ribbon scheme using a variety of shades for each egg. A mix of ribbon or contrasting colours will give an entirely different look – do what makes you happy! Lay your ribbon onto each egg and cut the pieces just a bit longer on each side. Next, decide on some buttons or other embellishments. To give each egg a little bit of pop in my coordinating colour scheme, I added one contrasting button to the centre of a larger button. Affix your ribbon to each egg using an adhesive of your choice – I had glue dots on hand but in hindsight I would have used a fabric adhesive (which I purchased after my sewing machine got angry at the glue dots). The ends of the ribbon will be sewn on; however, you need to secure the centre of each ribbon with something. Once secured, cut away any excess on the ends to line up with the edge of the egg. To keep ribbon from fraying, slightly melt the ends using either a lighter or sodering gun.
Pin a loop of ribbon to the top of each egg for hanging (about 2″ long – folded in half). I chose to machine sew my eggs. Felt is very, very easy to hand-sew and I think it actually looks nicer than the machine-sewing. This is also one of the first projects I took on with my new sewing machine so I didn’t really have my skills down yet. Make sure to leave a 1-inch hole to stuff with fiberfill. Err on the side of over-stuffing your eggs – I think the ones that had more stuffing in them look nicer. Sew your opening closed once full of stuffing.
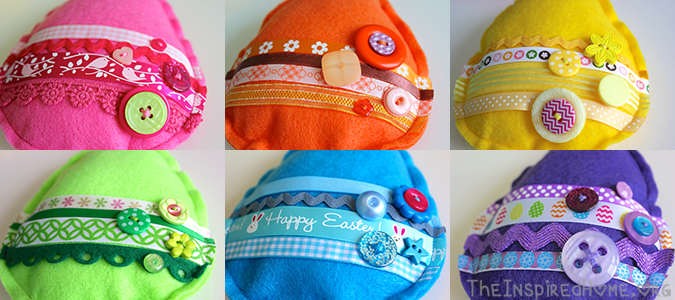
Voila! Hang your Easter Eggs for everyone to see. I hung each egg individually from my mantel but you can put them onto a string or ribbon and hang wherever you like in your home. Another option is to use a longer ribbon loop to hang the eggs from a doorknob.
Hop on over to our Pinterestfor more Easter inspiration!
Follow The Inspired Home's board Easter on Pinterest.

Looking for more great crafts, activities, and foods to celebrate Easter? Check these out.
Now, go check out Andrea’s Easter Mantel Decor featuring this beautiful garland!
]]>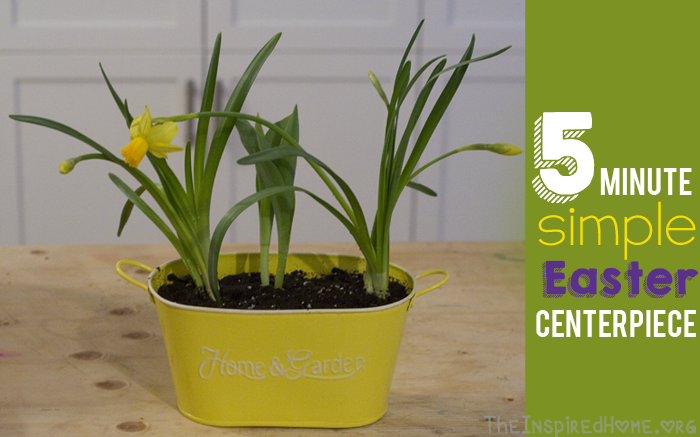
5-Minute Simple Easter Centerpiece
Spring really brings out my green thumb! I love decorating around Easter because of all the spring flowers with strong scents and bright colourful faces. Watching them pop up in my garden in the sun drenched yet still chilly air excites me! It means the new growing season is here, and it’s time to get growing my favourite vegetables and messing around in the dirt. It’s the best kind of therapy for an outdoor gal like me.
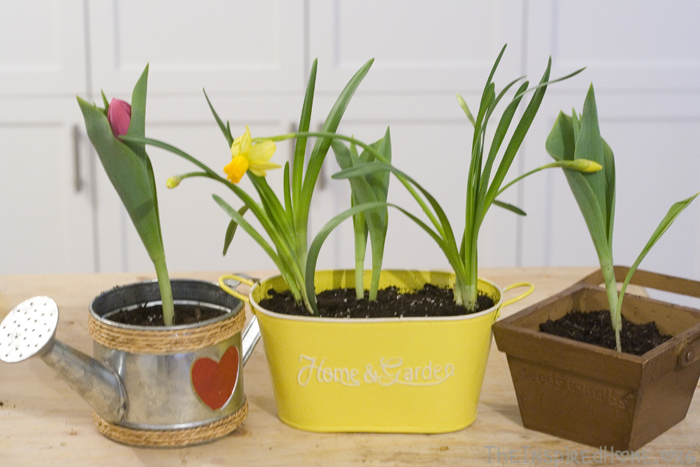
I wanted to bring a little piece of that cheer into our Easter celebrations and to a few of our friends. At our local thrift store, I found a few cute little pots that I knew would be just right for this project. They were really inexpensive, in fact the entire project cost me less than a nice bouquet of flowers from the grocery store.
Where possible, the gardener in me tries to give a plant as opposed to cut flowers. I like that it is living and with a little love (and water), you will get beautiful blooms. In a few weeks, you could even plant it outside and watch it come up again year after year. In fact, I know several of my fellow gardeners who have much-loved plants that originally came from a little supermarket plant or floral gift.
Originally I wanted to force the bulbs I’m using for this, but unfortunately I could not find any bulbs locally that would work. I should have saved a few bulbs from splitting my tulips last spring, but sadly, I generously put them all back into the ground with hopes of more tulips popping up outside! If you’re interested in learning more about forcing, check out the tutorial over at Satori Design for Living.
I found a riot of colour happening at my local big box retailer, so I carefully searched for plants that had no flowers blooming or very few. Retailers always put the least expensive items on the bottom. In this case, the flowers on the bottom weren’t getting as much light either – so they weren’t blossoming yet either. All in all, a huge win for me.
Items Needed:
- A few cute containers
- Diapers (optional)
- Potting soil
- Spring bulbs or pre-grown bulbs
Instructions:
- Cut the tabs off the diaper so you’re only left with the middle section. Put middle section in bottom of the pot. This will help keep the plant moist, which is especially important in more shallow containers.
- Gently grasp bulbs right where the stem meets dirt & tug out. Separate each bulb out gently (mine had three in each) and place approximately where you want them to go in the pot.
- Cover with dirt.
- Water until soil is moist – don’t worry if too much, the diaper will help you out with that one.
We’re happy to share more Easter goodness with you on our Pinterest, so hop on over!
Follow The Inspired Home's board Easter on Pinterest.

Looking for more great crafts, activities, and foods to celebrate Easter? Check these out.
If you are in need of some inspiration for your mantel this season, Easter Mantel Decor is for you.
]]>
Miss O has a great dislike for anything messy. This makes crafting with her a little bit difficult. She won’t touch paint, ink or anything wet. I gave her a bowl of water beads once and she freaked out. It’s a wonder the kid will take a bath. A few weeks ago we gave her a bubble bath for the first time. She freaked out because the bubbles wouldn’t get off of her hands. The beach was a disaster that lasted all of 10 minutes. I think you get the picture – she’s a very clean kid. Contact paper was a risk I was willing to take as the sticky paper is only sticky to the touch – it doesn’t leave anything on the hands. It turned out to be such a hit that she was sad when it was over! Looks like contact paper is my new best friend when it comes to crafting with Miss O. I’m sure you will have great success with this St. Patrick’s Day craft for toddlers.
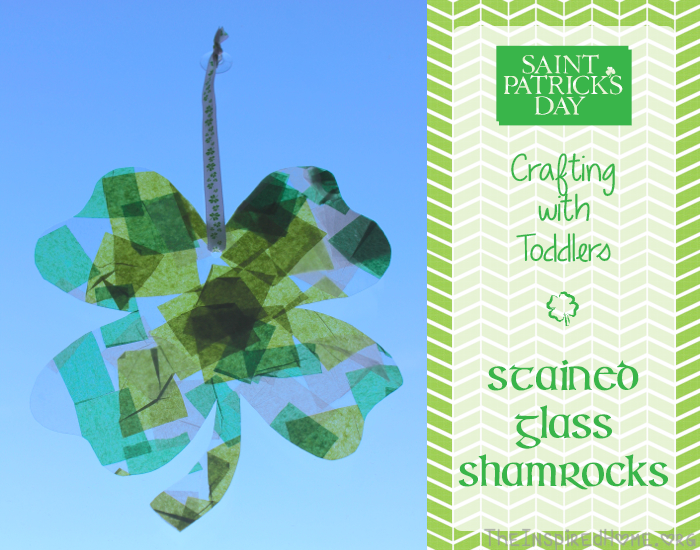
Stained Glass Shamrocks
Items Required
- Clear contact paper
- Green tissue paper cut into squares
- Alteration: Use varying shades of green or use a rainbow of colours
- Hole punch
- String or ribbon (I had some shamrock ribbon in my stash – perfect!)
- Suction cup with hook
How-To
Trace, free-hand, or print a template of a shamrock. Cut two equal pieces of contact paper large enough for your template. Lay one piece of contact paper on a flat surface, sticky side up – you may want to tape it to the surface. Give your little one a pile of tissue paper squares and let them stick those squares to their heart’s content.
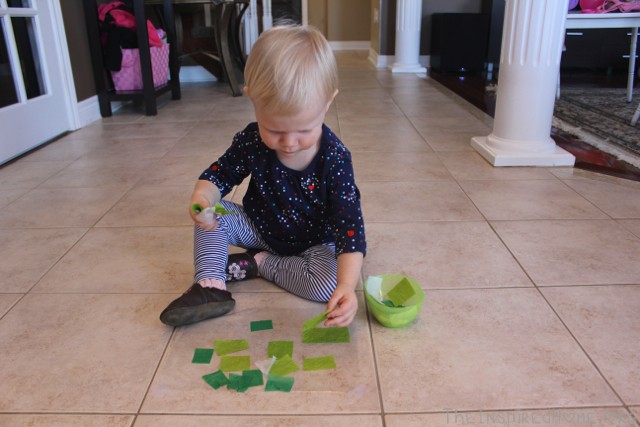
Once completed, place the other sheet of contact paper on top to seal the tissue paper. Next, tape your shamrock template to the sealed contact paper and cut out your shape. Punch a hole at the top, make a loop with your string and hang in the window from a suction cup with a hook. Voila! A beautiful sun-catcher.
Want more great ways to celebrate St. Patrick’s Day? Check out our Pinterest board!
Follow The Inspired Home's board St. Patrick's Day on Pinterest.
Looking for more great ideas on crafts, activities and food to celebrate St. Patricks Day: check these out.
Looking for some new St. Patrick’s Day decor ideas? Check out St Patrick’s Day Mantel + DIY Shamrock Garland.
]]>lifeovereasy – 1 Mantel 4 Ways
Echoes of Laughter – Christmas Mantel 2013
The Sweet Escape – Merry Mantels
Chase the Star – 2013 Christmas Mantel
The Happy Space Project – 10-Minute Mantel
Keep It Beautiful – Holiday Decorating
Just Decorate! – Contemporary Christmas
New House New Home – Neutral Christmas
Stay tuned in the new year for ways to decorate your fireplace mantel for all seasons, holidays and occasions! Valentine’s Day, Easter, Spring, Summer, Fall and more will be featured in the coming months. Do you like to decorate for all of the different holidays? Or do you have a year-round theme aside from perhaps the Christmas season? Let us know in the comments below.
]]>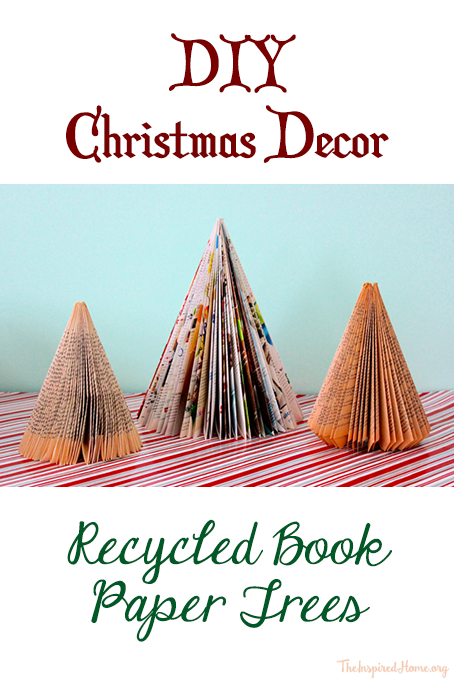
Paper Christmas Trees
Face it, you’ve probably got a box of old books in your basement that you vow to do something with someday. That day is here! Grab a relatively thin book that you’re not emotionally attached to and get prepared to turn it into a beautiful vintage-inspired paper Christmas Tree. In our very first video tutorial, you will learn the steps to create a magnificent tree. These Paper Christmas Trees are a great craft do with your older kids or, if you have younger kids, you can complete one during naptime! These trees make a great gift for just about anyone on your Christmas list and they make lovely decor for your own home.
Paper Christmas trees can be make using an old book, a new book or even a magazine. Each one will give you a different look. My preference is for the classic style of the older book; however, the magazine trees are also interesting in their own merit as they show many colours. You can also be decorate them in a number of ways using spray paint and glitter. They can be customized to suit any style of home decor. Personally I think they fit in quite nicely with the vintage theme I’ve got going on in my house this holiday season.
]]>


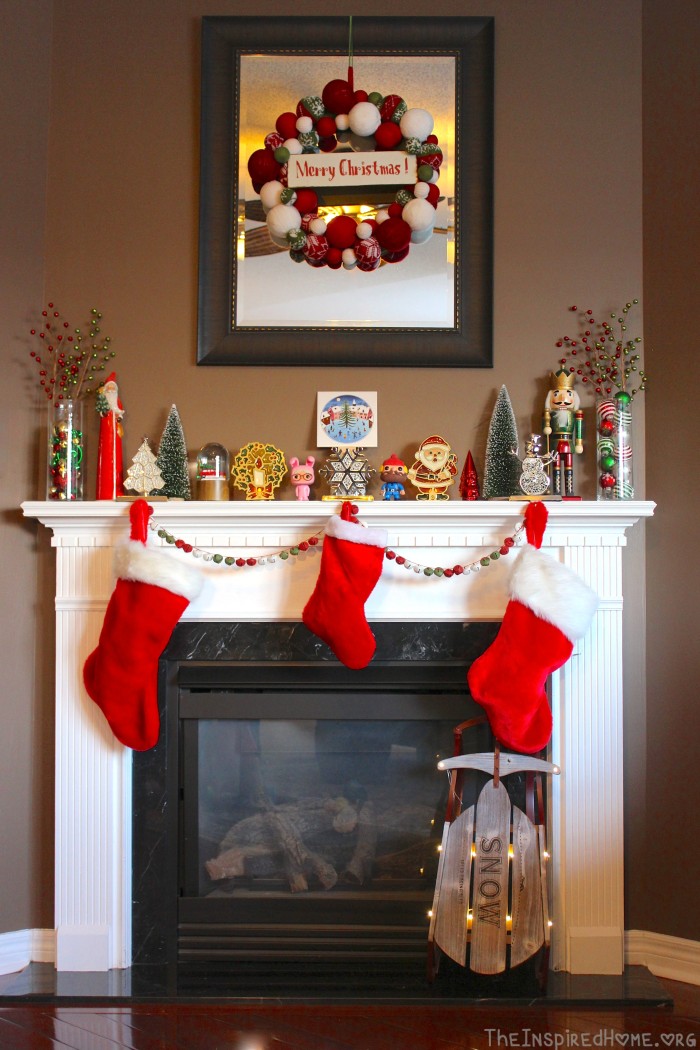
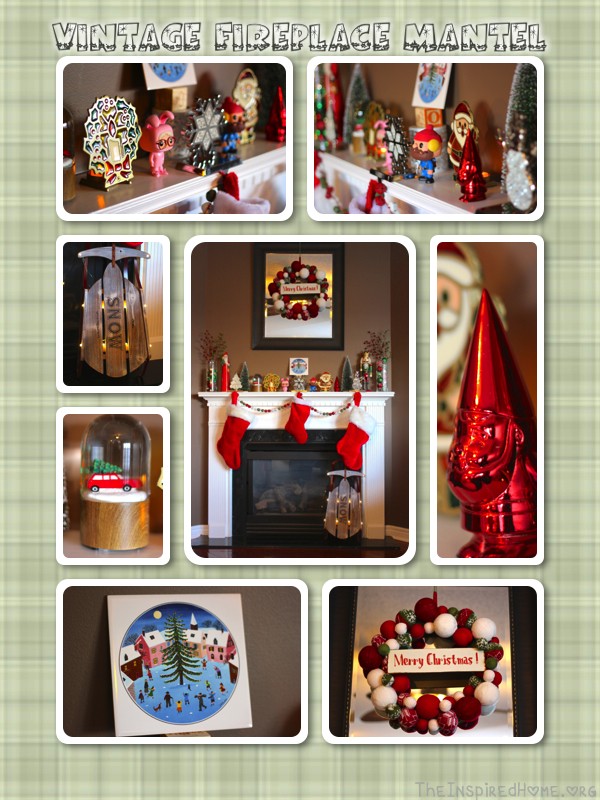
Vintage Christmas Mantel
This week’s theme is all about Vintage. My husband has had the pleasure of viewing four different styles of fireplace mantel decoration in our home this holiday season and this is his favourite (hence why it’s the last one to be featured!). I don’t think this mantel was originally what he had in mind when he started explaining what he wanted but I think I did a great job bringing both of our styles in to play.
Please note: As we have never actually used our fireplace (although it does work!), I have free reign when it comes to decorating it as nothing will melt since it never gets switched on. I cannot say the same for your fireplace mantel so please use caution and decorate using discretion.
Majority of the pieces in this mantel are new to our home. When hubby agreed that he would like a vintage theme, I decided the best place to find items to suit this theme would be stores which sell used items. Some of the pieces came from the Reuse Centre. Hubby kept Miss O occupied in the Reuse Centre by showing her a lot of old-school toys which she seemed to enjoy.
Details:
From left to right on mantel:
- Vase filled with jingle bells (get more ideas on vase fillers here)
- Tall santa figure (purchased from HomeSense)
- Mosaic tree stocking holder
- Medium-sized bottlebrush tree (originally seen on this mantel)
- Snow globe featuring a car that reminds hubby of National Lampoon’s Christmas Vacation (Adam’s fave holiday film)
- Vintage glass candle holder (from Reuse Centre)
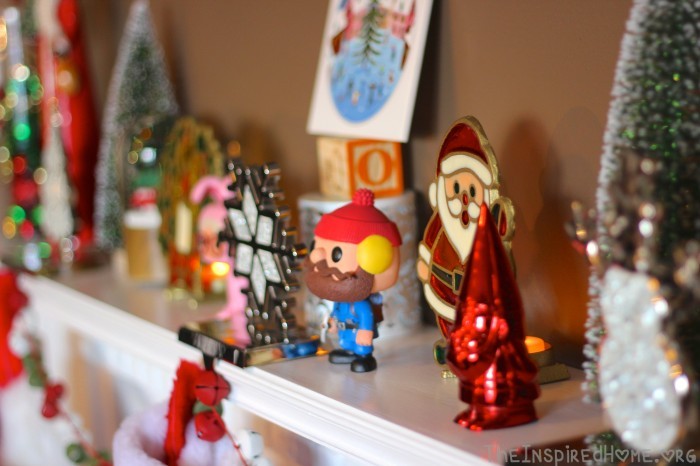
- Funko Pop Bunny Ralphie from A Christmas Story figure (our favourite holiday film)
- Villeroy & Boch Naif Christmas trivet purchased at the Reuse Centre for 50 cents!
- Mosaic snowflake stocking holder
- Funko Pop Yukon Cornelius from Rudolph the Red-Nosed Reindeer figure (my fave holiday film)
- Vintage glass Santa candle holder (from Reuse Centre)
- Little red gnome (purchased from Target)
- Tall bottlebrush tree (originally seen on this mantel)
- Mosaic snowman stocking holder
- Nutcracker
- Vase filled with tree decorations (get more ideas on vase fillers here)
Other details:
- Yarn-covered styrofoam ball wreath (purchased from Target)
- Merry Christmas vintage tin sign hung in centre of wreath
- Vintage jingle bell strand (purchased at Terra Greenhouses)
- Classic fuzzy red stockings
- LED vintage sled (purchased at HomeSense)
I had a lot of fun finding new items for this Vintage Christmas Mantel and finding new ways to use items from my personal collection. Which mantel has been your favourite? Did you implement any ideas from these mantels in your own home? I’d love to hear how you decorated for the holiday season!
Mantel Monday Link-Up
[inlinkz_linkup id=339601]
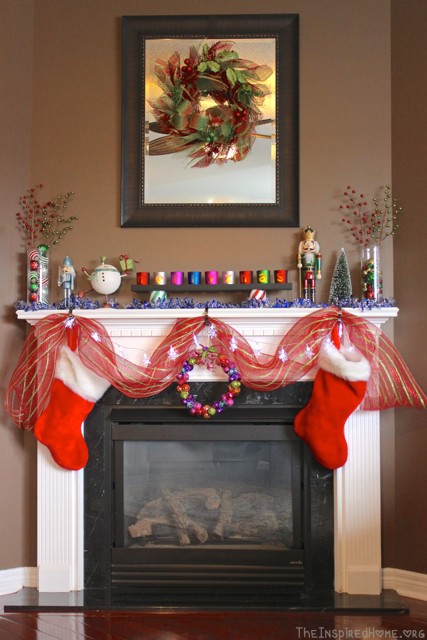
]]>Bright Festive Mantel
Everything on this mantel is from my own personal collection except for the wreath on the mirror. I think it’s really funky and it was only $20 at Walmart! The back of it is styrofoam thus making it very light – perfect for indoor decorating. I wouldn’t suggest hanging this wreath outdoors as it may blow away on a blustery day. It would also make a love centrepiece on your table with a tall pillar candle in the centre.
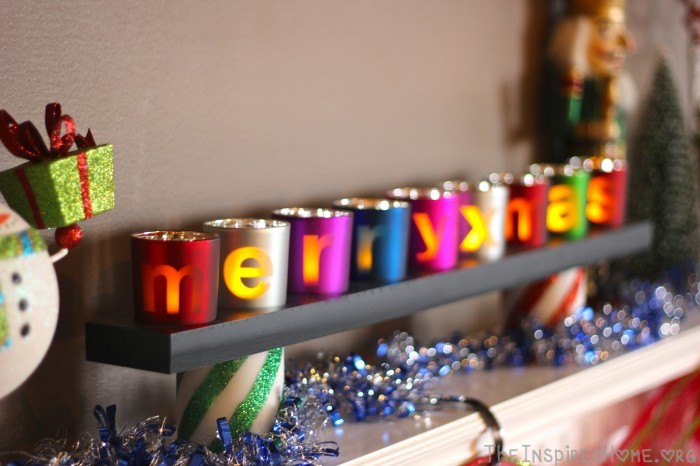
My fireplace mantel lends itself to some tall items. These vases are the tallest that I own so I added height to them by adding decorative sprigs from the floral department of Michaels. You can learn more about way to fill a vase here. The centre of the mantel also needed a little bit of height. I really wanted to use my ‘merry xmas’ candle holder so I improvised by balancing it on two short festive pillar candles! If you’re like me and use candles mostly for display purposes only then they are a perfect decorative way to add some height to a display.
What do you think of this bright festive fireplace mantel? Is it your style? Tell us how you like to decorate your mantel in the comments below!
Mantel Monday Link-Up
[inlinkz_linkup id=339601]
]]>Blue and Silver Mantel
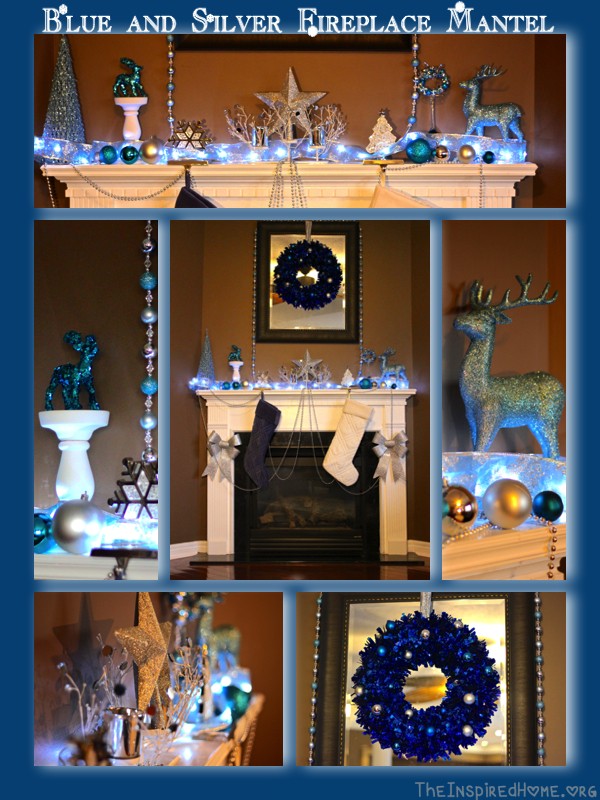
This week’s theme is a Blue and Silver Mantel. This has been the theme through my home for a number of years. I always found the combination of blue, white and silver to be striking and classically beautiful. My husband, however, disagrees. He has informed me that he has had enough of the blue & silver and that I must decide on a new theme! I am very glad that I got to have one last hurrah with these pieces for a brief window of time this year. Decorating the mantel four different times this month is helping me to figure out exactly what type of festive theme my husband prefers! All of the pieces used in this blue & silver mantel are from my own collection therefore I am unable to provide a total cost for this one. As I’m sure you have guessed by now, all of the pieces came from various discount decor stores over the years as I refuse to pay a ton of money on just about anything! I hope you enjoy this beautiful blue & silver mantel as much as I have over the years.
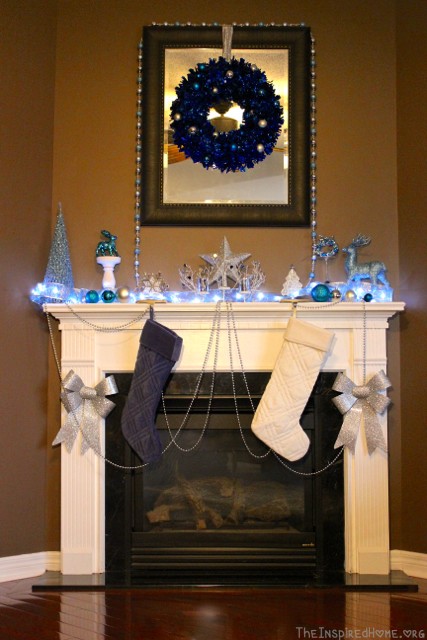
Details
From left to right on mantel:
- Blue & silver ribbon with white LEDs inside
- Blue glitter tree
- White candlestick with blue glitter reindeer
- Blue & silver tree decorations
- Snowflake shattered glass stocking holder
- White candle holder
- Silver glitter star tree-topper
- Tree shattered glass stocking holder
- Blue & silver tree decorations
- Upside-down wine glass
- Blue & silver jingle bell mini-wreath
- Large blue glitter reindeer
Other details:
- Large beaded garland strung over mirror
- Blue wreath with silver & blue decorations attached
- Silver beaded garland
- Silver glitter bows
- Blue & white fabric stockings
Tips for your mantel
- Use wine glasses on your mantel to hold battery-powered tea lights or add height to items
- Hang garlands in a different manner as I have around the mirror
- Extra tree decorations or tree toppers can find a lovely home on the mantel
- Explore different ribbon options – the battery-powered LED ribbon helps illuminate your hard work
- Use Command Hooks to hang items temporarily – ensure you follow directions completely to ensure proper removal
Mantel Monday Link-Up
[inlinkz_linkup id=339601]
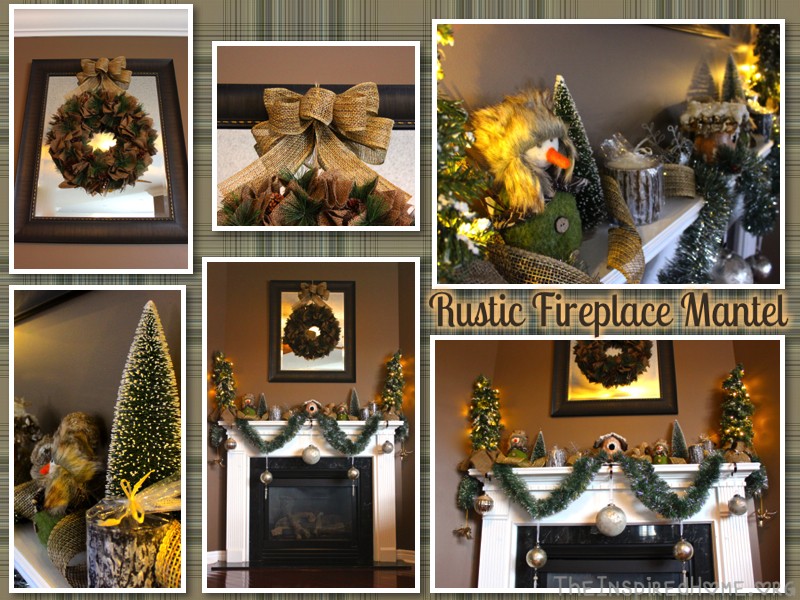
]]>Rustic Mantel
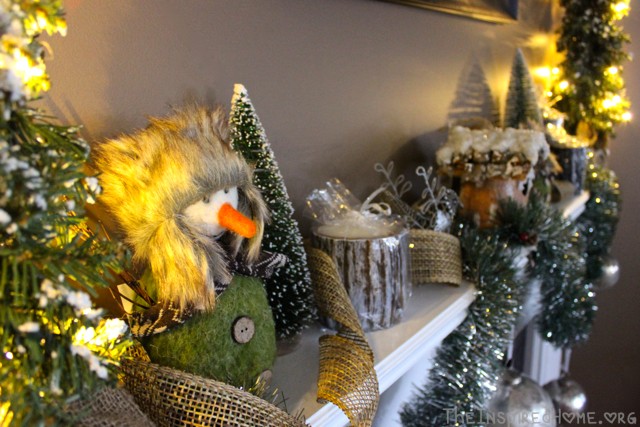
This week’s theme is a Rustic Mantel. I was inspired by Holly living in the foothills of the mountains in Alberta. I also channeled a ski lodge when I was looking for decorating inspiration. I picture the details from this mantel in a cute little skiing chalet in the mountains. Perhaps I’m delusional as I do not ski nor do I particularly like winter but humour me here! This is also a great mantel if you prefer more of a winter theme as opposed to a Christmas or holiday theme. The colours are very muted and tasteful. This mantel has its own quiet little way of standing out.
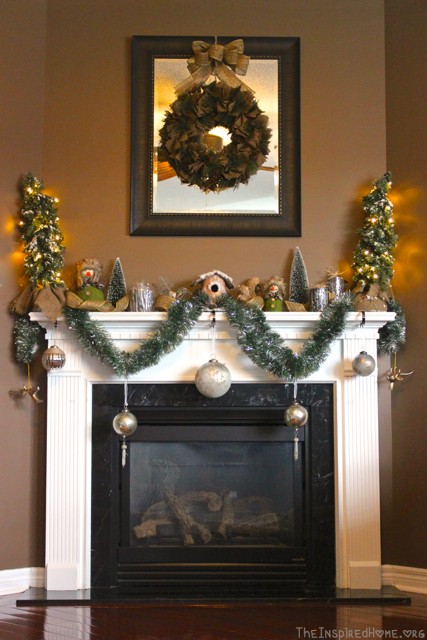
All items were purchased from Winners, Target and Terra Greenhouses. Winners, HomeSense & Marshalls are all the same company and typically carry very similar items so you can check out whichever store is closest to your home. There is a Winners location very near my house that has an excellent home decor section which is why I tend to check there first before making the trek down to the local HomeSense.
Here’s a list of all the items featured in this Rustic Mantel.
- Wreath – Winners – $30
- Bow – Made using roll of burlap ribbon (check out this fantastic ribbon tutorial) – Terra Greenhouses – $3.99/roll
- Tall pre-lit winter tree x2 – Winners – $25ea.
- Felt snowmen x2 – Winners – large $8, small $4
- Green glitter bottlebrush trees – Target – large-$8, small-$6
- Candles x3 – Winners – $8, $6, $7
- Wire bird – Winners – $6
- Birdhouse – Winners – $8
- Raffia squirrel – Winners – $5
- Decorations – Winners – Deer x-$5, Silver with twine-$4, Silver with tassel x2-$5, Large white & gold-$6, Silver-$4
- Garland – Target – $6
- Mantel clips – Target – $16/set of 4
The total cost for this mantel is $270. The big ticket items were the wreath and the pre-lit trees on the ends of the mantel. This may seem like a lot of money to spend on a mantel but keep in mind that it is a one-time cost. These pieces can be used every year and they are also interchangeable in a mix of themes should you decide to change it up with your mantel next holiday season. Another perk to this theme is that many of the items are simply winter-themed as opposed to Christmas-themed. This allows you to leave pieces like the pre-lit trees, snowmen, candles, birdhouse, wire bird and squirrel up on display well after Christmas.
What do you think of this Rustic Mantel? Does it fit your style? Stay tuned for the upcoming themes – I guarantee you will get some great ideas for your fireplace!
Mantel Monday Link-Up
[inlinkz_linkup id=339601]
]]>I have a slight addiction for changing the decor in my house on a regular basis. Although I buy things at discount stores like HomeSense or items on sale at other stores, it eventually becomes quite pricey to keep updating your home. We moved into our new home just over a year ago so there is always something new to decorate in my opinion! In an effort to save a bit of money (and stop driving my husband crazy) I have decided to focus more effort on altering the mantel above the fireplace for the different seasons and holidays.
Here is my homage to autumn mantel style:

The picture hanging above the mantel is a mosaic. As a result, any light shining in the house reflects off the glass tiles. It’s a stunning piece of artwork purchased from Pier 1 Imports. If I were a professional photographer then perhaps I could have captured its beauty but alas I am not. You will see a more detailed photo of the tiles below.
The large vases and their foliage were purchased at HomeSense as was the centerpiece and the candle in the center of it. The straw pumpkin, gold lantern and two embellished candles in the centerpiece were purchased at Pier 1 Imports. The gourds are from Frootogo, a local orchard located in Waterdown, Ontario.
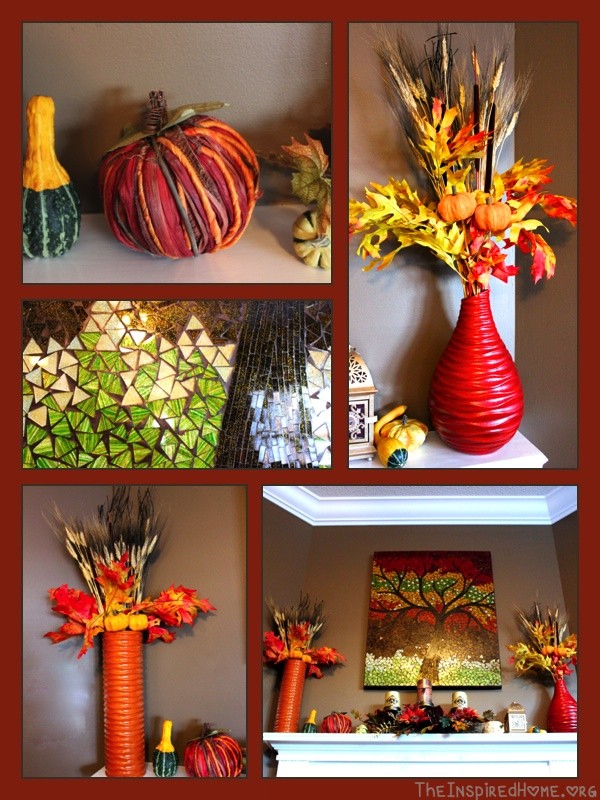
What’s your favourite fireplace decorating ideas lately?
]]>